Difference between revisions of "Localyzer Express Repository Configuration"
(→Navigate to the Repository page) |
|||
| Line 12: | Line 12: | ||
Repositories with the orange circle have not been configured; a green circle indicates a configured repository. For example, in the image above, marktext has not been configured and mobile-android has been configured. |
Repositories with the orange circle have not been configured; a green circle indicates a configured repository. For example, in the image above, marktext has not been configured and mobile-android has been configured. |
||
| − | Click on the repository name to go to the configuration page for that repository |
+ | * Click on the '''repository name''' to go to the configuration page for that repository |
If templates have been set up, you may select one and apply the template to configure your repository. For more information on templates, see [[Localyzer Express Templates]]. |
If templates have been set up, you may select one and apply the template to configure your repository. For more information on templates, see [[Localyzer Express Templates]]. |
||
Revision as of 21:00, 10 March 2021
Contents
Overview
Before resource files can be translated using Localyzer Express, each repository needs to be configured and validated. The configuration needs to have at least one source locale, one target locale, one resource file type, and one allowed branch.
- Click on the Repository menu item on the left side menu to go to the Repository page
The repositories (that were selected during installation) for your organization are listed. You can search for a repository using the Search entry field.
Repositories with the orange circle have not been configured; a green circle indicates a configured repository. For example, in the image above, marktext has not been configured and mobile-android has been configured.
- Click on the repository name to go to the configuration page for that repository
If templates have been set up, you may select one and apply the template to configure your repository. For more information on templates, see Localyzer Express Templates.
Set the locales
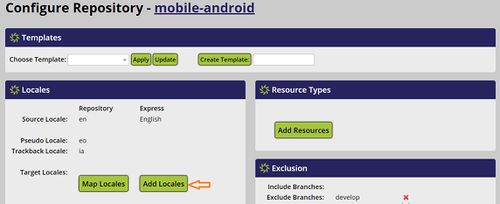
To check the files in the repository, click the repository name. In the image below, clicking mobile-android will take you to the repository.
- Click Add Locale as shown below:
A locale is a language and optionally a region and a variant. The source locale is used by developers to write their application, for example in U.S. English. Target locales are the locales in which the resource files will be translated, for example Spanish, Chinese, Japanese, French.
Resource files are identified in the repository in many ways. For example
- a directory above resource files may be a locale, like en-US for English
- the file names may include the locale, for example resources_fr.properties for French
The locale configuration must address the repository locale notation.
Set the source locale
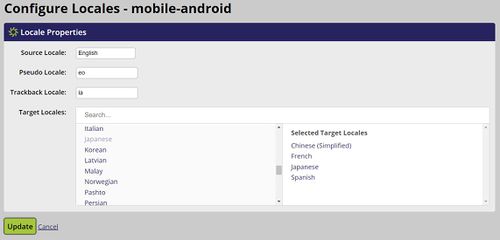
Pick the source locale using the drop down. The example above shows 'English' as the source locale.
Set the pseudo-locale and the trackback locale
Best is to leave the default as they are. Localyzer will not use these locales for translation.
Select target locales
- Click on a locale in the the left panel to add it to the selected locales
- Click on a locale in the right panel to remove it from the selected locales
- Click Update to finalize the selection and go back to the main configuration page for the repository.
In the example above, Chinese, French, Japanese, and Spanish are selected target locales.
Map the locales
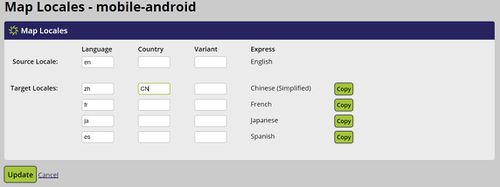
The locale notation for the resource files in the repository varies. For instance, the Chinese target file for 'resources.properties' may be specified:
- resources_zh.properties
- resources_zh_CN.properties
- resources_zh_Hans.properties
The mapping for each locales must correspond to the way the application expects to retrieve the resources.
- Click on Map Locales
- For each locale, indicate how the language, country, and variant are specified in the repository
Above, French is expected to be specified with fr, Chinese with zh and CN.
- Click Update to save the mapping
Select the resource types
Applications use properties, json, resx, and other file types. Each comes with its own standard. Localyzer Express relies on the standard definition of each supported file type. If your file type is not standard or not supported by Localyzer Express, please contact info @ lingoport.com for the full fledge Localyzer.
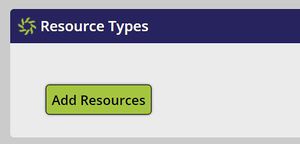
- Click "Add Resources" in the Resources panel
- Select the resource file type and repository convention; Click Update
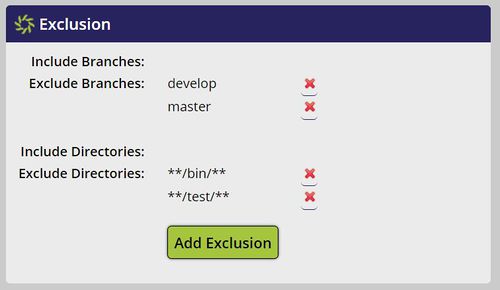
Include or Exclude Translation Branches and directories
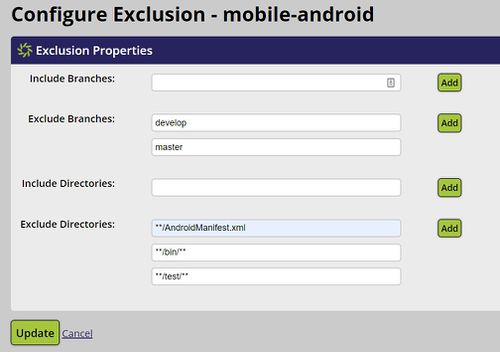
Once the configuration is finalized and valid, any commit to an allowed branch may trigger an immediate machine translation. Use regular expression to include or exclude which branch will be able to trigger the translations. For example, you may want to trigger translations only on the develop branch, or on the contrary on all branches except the develop branch.
You may also want to include or exclude directories, for example test directories.
- Click "Add Exclusion"
- Select the branches and directories to include or exclude; Click Update
Check your configuration and go to Validation step
To be saved, the configuration must be validated against a branch.

