Difference between revisions of "Pull Requests"
(→Add Configuration Items for Pull Requests and Commits) |
(→Add Configuration Items for Pull Requests and Commits) |
||
| Line 470: | Line 470: | ||
<li> <code> cd ~/lingoport/globalyzer-lite-VERSION </code> |
<li> <code> cd ~/lingoport/globalyzer-lite-VERSION </code> |
||
<li> <code>./install-lite.sh </code> (Should return Globalyzer Lite installation completed successfully) |
<li> <code>./install-lite.sh </code> (Should return Globalyzer Lite installation completed successfully) |
||
| + | </li> |
||
| + | </ol> |
||
| + | </li> |
||
| + | </ol> |
||
== Create Jenkins Build for Pull Requests and Commits via GitHub == |
== Create Jenkins Build for Pull Requests and Commits via GitHub == |
||
Revision as of 18:56, 26 May 2023
Pull Requests, Merge Requests code changes can be analyzed using the Globalyzer Scanner.
Contents
- 1 GitHub Pull Request
- 2 GitLab Pull Request
- 3 Bitbucket Pull Request
- 4 To Be Edited
- 5 GitHub and Git Pull Requests
- 6 Configuring Pull Requests
- 7 Verify the PullRequest
- 8 Pull Requests via Jenkins Running on Docker
GitHub Pull Request
See:
GitLab Pull Request
See:
Bitbucket Pull Request
See:
To Be Edited
The Lingoport Suite offers two options for Pull Requests from your repository. The Pull Request can be done on your Lingoport Server or there is a distributed option that uses the Master/Agent capability of Jenkins to distribute the work among several nodes.
To use the Distributed Pull Request option, please install the Node Installer optional software.
GitHub and Git Pull Requests
GitHub is a Web-based Git repository hosting service. It offers all of the distributed revision control and source code management (SCM) functionality of Git as well as adding its own features.
Files can be committed in a Git branch or directly in the Master branch. When committing files in a branch, pull requests let you know what changes you've made to a repository before they are committed to the repository's master branch. Once a pull request is sent, interested parties can review the set of changes, discuss potential modifications, and even push follow-up commits if necessary.
Configuring Pull Requests
Verify the Lingoport Dashboard Plugin
The Pull Requests rely on the Dashboard GitHub plugin. If your system was installed using the Stack Installer, this plugin should have been included. Verify that it is installed.
- Go to the Lingoport Dashboard and log in as Administrator.
- Select the Administration tab at the top of the window.
- Select the System pulldown and Update Center
- With Installed selected, search for GitHub. You should find a plugin with the description: "Provide some integration between GitHub and SonarQube"
If you do not find the plugin installed, select Available, search for 'GitHub' again and Install it.
Set up Nodes on Jenkins
If you are using the Distributed Pull Requests option, the first thing that needs to be done is to set up nodes in Jenkins. If you installed the Node Installer and followed its setup instructions, there should be a master system (where Jenkins and Lingoport Dashboard are hosted) and at least one agent or node system. The master system should be able to ssh into the agents' centos user and the jenkins user. If this is not completed, make sure that is done before proceeding further.
If you are not using nodes and agents, skip to the PullRequests section.
Create Nodes in Jenkins
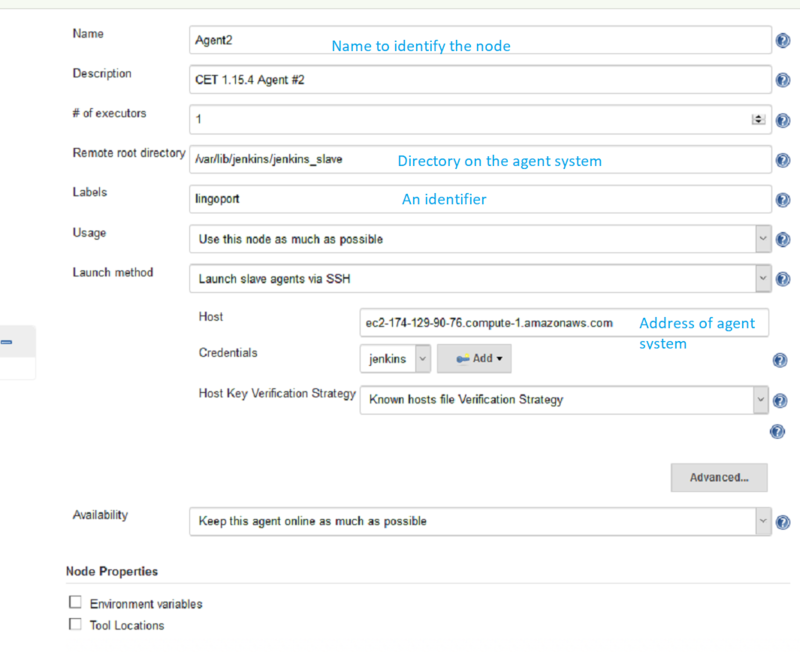
On the Master system, in Jenkins, select Manage Jenkins → Manage Nodes → New Node
Set up each agent node using this example:
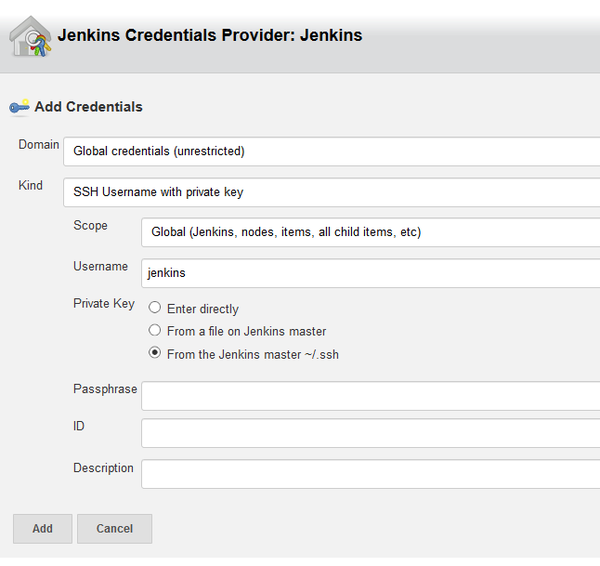
Select Add to create the jenkins ssh credentials
Nothing needs to be done with the master node. Online the new nodes and the console output should look like:
[01/26/18 16:26:19] [SSH] Opening SSH connection to ec2-54-227-210-213.compute-1.amazonaws.com:22.
[01/26/18 16:26:19] [SSH] SSH host key matches key in Known Hosts file. Connection will be allowed.
[01/26/18 16:26:19] [SSH] Authentication successful.
[01/26/18 16:26:19] [SSH] The remote user's environment is:
BASH=/usr/bin/bash
BASHOPTS=cmdhist:extquote:force_fignore:hostcomplete:interactive_comments:progcomp:promptvars:sourcepath
....
Verify the Agent setup in Jenkins
To verify that the Agent setup is correct, use the Jenkins 'Debug' job.
Under General check Restrict where this project can be run and set it to lingoport.
In the Execute Shell leave only:
whoami
pwd
sleep 5
Run the job. The console output should show:
Started by user anonymous
Building remotely on Agent1 (lingoport) in workspace /var/lib/jenkins/jenkins_slave/workspace/Debug
[Debug] $ /bin/sh -xe /tmp/jenkins7953464360000549139.sh
+ whoami
jenkins
+ pwd
/var/lib/jenkins/jenkins_slave/workspace/Debug
+ sleep 5
Note that it shows that it ran on the Agent using the lingoport label.
Jenkins PullRequest and DistributedPullRequest jobs
There are two Jenkins job templates for Distributed Pull Requests.
- Lingoport.SampleLite-PullRequest
- Lingoport.SampleLite-DistributedPullRequest
The Distributed Pull Request makes use of the Jenkins master/agent system.
Create a new Jenkins job using the Lingoport.SampleLite-PullRequest or Lingoport.SampleLite-DistributedPullRequest template. This should be modeled on an existing Jenkins project.
For example, if you have a Jenkins project called Acme.BigProject and you want to use PullRequests with this project and repository, name the new project Acme.BigProject-PullRequest.
Configuring the PullRequest Jenkins job
Additional Configuration
- /var/lib/jenkins/Lingoport_Data/Dashboard/github.properties
This file tells what username/token in GitHub will be used to push the data over. It should have three key/value pairs:
 sonar.github.login=<myGitLogin>
 sonar.github.oauth=<created token>
 sonar.host.url=<http(s)://<dashboard url>/
- General: GitHub project / project Url
In the Source Code Management section of the Jenkins job configuration, the GitHub 'project url' text field needs a GitHub URL in the form
https://github.com/<organization>/<project>
The Jenkins Job
Once you have created the new PullRequest project, some configurations need to be modified.
- Make sure the name is <Group>.<Project>-PullRequest. The <Group>.<Project> Jenkins job should already exist and have been executed. Anything other than <Group>.<Project>-PullRequest may cause problems.
- Leave the payload parameter alone. Do not modify it.
- If nodes have been set up for other projects, select Restrict where this project can be run and set it to master. If nodes have NOT been set up, nothing needs to be done with this option.
- Under Build Triggers, select Trigger builds remotely (e.g., from scripts) and set the value to HOOK.
- Under Build, and Execute Shell, set the Project Definition File for <Group>.<Project>
LITE_PROJECT_DEFINITION=/var/lib/jenkins/jobs/<Group>.<Project>/workspace/lingoport/LiteProjectDefinition.xml
- Save the configuration and Enable the project.
From the command line console, in /var/lib/jenkins/Lingoport_Data/Dashboard/Projects/GROUPNAME.PROJECTNAME-PullRequest/ (this may need to be created), make a sonar-project-pr.properties file that looks like:
# Make sure a Dashboard user is set up with the credential below
# otherwise the dashboard will not accept the pushed data
#
# -------Using $DASHBOARD_HOME/sonar-project-template.properties
#
sonar.login=admin
sonar.password=<admin password>
#
# Do not change the properties below
# the capital letter tokens will be replaced by
# build scripts
#
sonar.projectKey=PullRequest:scan
sonar.projectName=PullRequest
sonar.projectVersion=PR

sonar.language=lport
sonar.encoding=UTF-8

sonar.sources=/var/lib/jenkins/jobs/<Group>.<Project>-PullRequest/workspace
sonar.lingoport.project.root=/var/lib/jenkins/Lingoport_Data/Dashboard/Projects/<Group>.<Project>-PullRequest

#
# For the GitHub SonarQube Plugin to push the results to GitHub PR
# The same for all:
#
# -------Using $DASHBOARD_HOME/sonar-project-pr-template.properties
#

sonar.analysis.mode=preview
sonar.github.endpoint=https://api.github.com
sonar.github.disableInlineComments=true

# Specific for this install

# Specific to this GitHub Project
# If the github.properties file does not exist, the job will not push
# the data to GitHub
#
# -------Using $LINGOPORT_DATA/Dashboard/github.properties
#
sonar.github.login=<myGitLogin>
sonar.github.oauth=<created token>
sonar.host.url=<http(s)://<dashboard url>/

# Generated from the Jenkins setting under
# ------ General: GitHub project / project Url
sonar.github.repository=<Repo> #for example: NASA/nasa-latex-blocks
# Generated from the Webhook payload
sonar.github.pullRequest=<pr number>
Configuring the DistributedPullRequest Jenkins job
Once you have created the new DistributedPullRequest project, some configurations need to be modified. The DistributedPullRequest should be based on a <Group>.<Project> Jenkins job that has been executed.
- Leave the payload parameter alone
- Set the GIT_REPO parameter. This should be set to the form Company/Project as seen on GitHub. For example, in GitHub, NASA has many projects so the GIT_REPO would be set to NASA/nasa-latex-blocks
- Set the LITE_PROJECT_DEFINITION parameter to the value on the Agent.
$JENKINS_HOME/jenkins_slave/workspace/<Group>.<Project>-DistributedPullRequest/lingoport/LiteProjectDefinition.xml - Select Restrict where this project can be run and set it to lingoport.
- Under Build Triggers, select Trigger builds remotely (e.g., from scripts) and set the value to HOOK.
- Save the configuration and Enable the project.
Configuring GitHub for PullRequests
Some configuration needs to be done on GitHub for the PullRequests to occur.
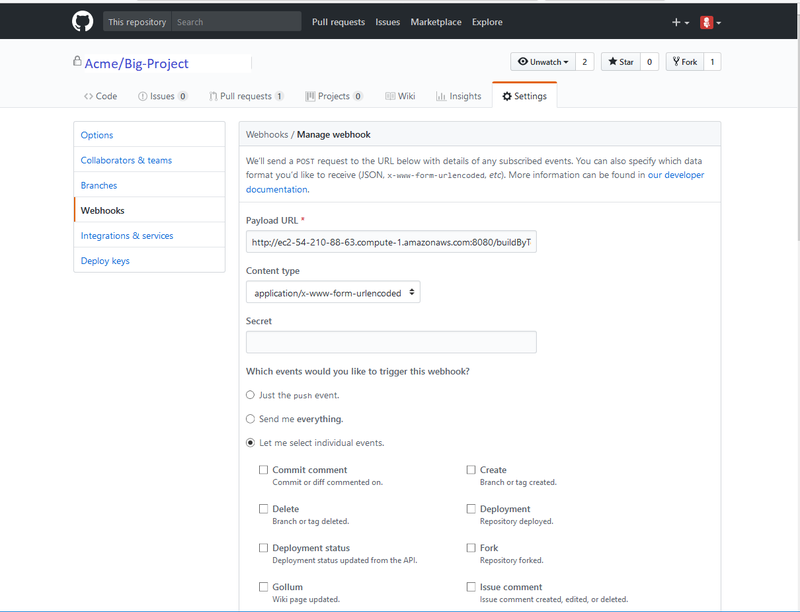
In the GitHub page for your Project:
- Select Settings at the top of the window.
- Select the Webhooks tab in the left menu.
- Select the Add webhook button.
- Set the Payload URL to
http://<Jenkins IP>/buildByToken/buildWithParameters?job=<Group>.<Project>-PullRequest&token=HOOK
for PullRequest jobs or
http://<Jenkins IP>/buildByToken/buildWithParameters?job=<Group>.<Project>-DistributedPullRequest&token=HOOK
for DistributedPullRequest jobs. - Make sure the Content Type is
application/x-www-form-urlencoded - Leave Secret blank
- Which events would you like to trigger this webhook? Select: Let me select individual events and check the Pull Request item.
- Select Active.
- Update or Add Webhook
If everything is correct, then after adding the Webhook, the Jenkins job <Group>.<Project>-PullRequest or <Group>.<Project>-DistributedPullRequest should be triggered. The job may FAIL, but at this point the verifying the communication between GitHub and the Jenkins job is a success.
Verify the PullRequest
To test that the Pull Request works,
- Use or create a new branch in the Git Project with changes to internationalization issues.
- In GitHub, select the Pull Requests tab
- Select the New Pull Request button
- Select the two branches you wish to compare. You should see the differences on the screen between the two branches.
- Select the Create New Pull Request button and enter a comment.
- Select Create Pull Request
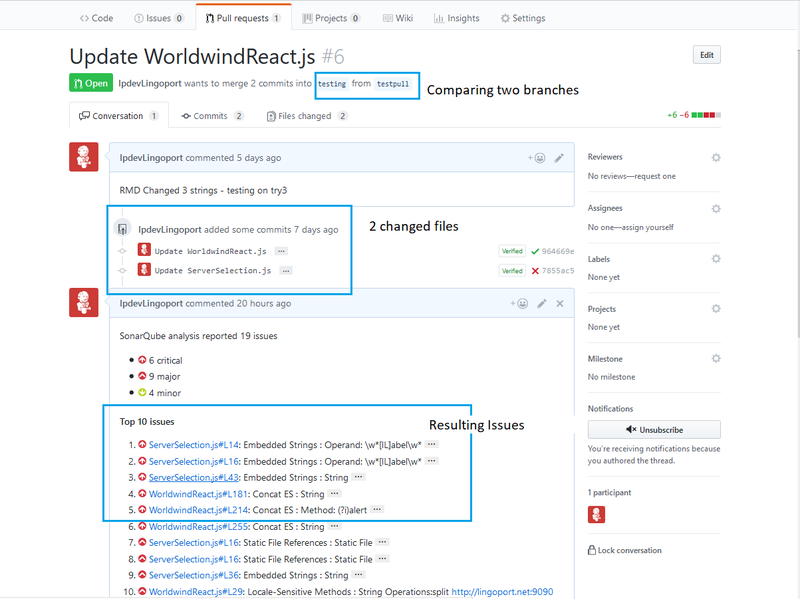
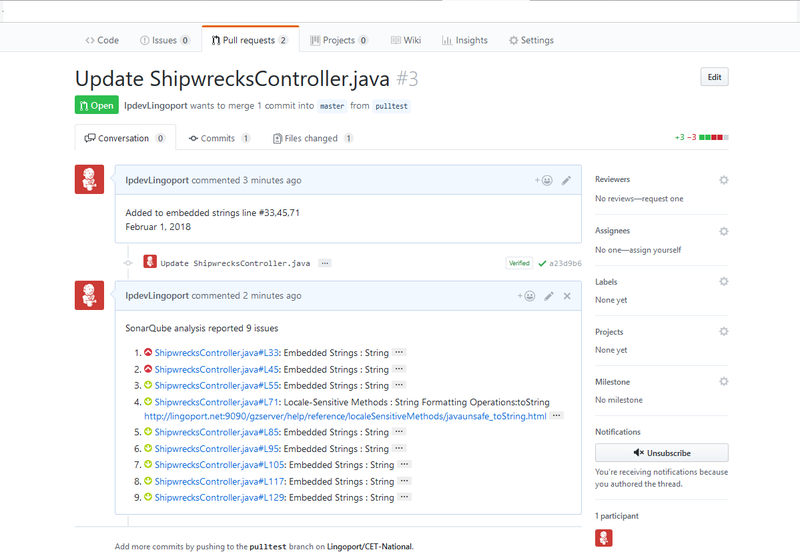
Return to the Jenkins Pull Request job. It should be triggered and running. If it is successful, return to your Pull Request tab in GitHub and you should see something like:
Pull Requests via Jenkins Running on Docker
THIS SECTION IS CURRENTLY A WORK IN PROGRESS AN NOT YET COMPLETE
Prerequisites
- VM running Linux and Docker
- JQ JSON Parser - Statically compiled binary version
- Github PAT credentials to connect to GitHub
- The user for these PAT credentials has read access to the repository
- Globalyzer.com credentials for logging in to globalyzer.com
- username
- password
- server
- Optional:
- Apache or nginx could be installed and running on the VM itself
- Used as a reverse proxy to front the Jenkins instance
File System Configuration
If Apache is installed as per normal for many Lingoport systems, the following is required to configure Apache to permit proper connection to the Jenkins Docker container
- Copy the tar file to the home directory of the user that will be running docker and unzip
- Identify the port that will be used to connect to the Jenkins instance in the container. It could be something like 8085 for example. That is what will be used in this instruction set.
- Obtain the UID/GID for the user that will be running docker. Note this user must have sudo privileges.
- Create the directory structure for the volume storage used by jenkins. Be sure there is sufficient space. Base install will consume 650MB of space for the volume itself.
- Place files as noted below before installing
- Be sure that the jq binary is executable once copied
- Create the .globalyzerrc file and populate it with the credentials for logging into globalyzer.com or the globalyzer server that will be connected to.
Here are the steps from the terminal.
   mkdir ~/docker/jenkins/lingoport/bin
   pp ~/PRC-Docker/Globalyzer.license ~/docker/jenkins/lingoport/
   cp ~/PRC-Docker/globalyzer-lite-VERSION.zip ~/docker/jenkins/lingoport/
   cp -p  ~/PRC-Docker/jq ~/docker/jenkins/lingoport/bin/
   cd ~/docker/jenkins/lingoport
   unzip globalyzer-lite-VERSION.zip
   rm /globalyzer-lite-VERSION.zip
   cd globalyzer-lite/GitHub_PRC
   cp -p job_lite_pr.sh job_lite_pr.sh_orig
   cp ~/PRC-Docker/job_lite_pr.sh.tar .
   tar -xf job_lite_pr.sh.tar
   rm job_lite_pr.sh.tar
   cd ~/docker/jenkins
   vi .globalyzerrc
Launching the Jenkins Docker Container
Given the file system has been created and UID/GID are known as well as the port that will be used for connecting to the Jenkins instance. Start the docker instance for Jenkins.
- The -d detaches the command being run from the terminal. Normally this is something that will only be used once everything is in place and confirmed to be working. For initial startup, its use can be ignored.
- The -u is for setting the uid/gid of the user that owns the volume storage identified earlier. This user should also be the user that is starting the docker instance.
- The -p 8085:8080 is the port external to internal mapping identified earlier. The 8080 would never change, only the external port is modifiable
- The -p 50000:50000 is for mapping between Jenkins instances only. Not required for standalone systems.
- The JENKINS_OPTS sets the baseurl for the application
- The -v mounts the prior locally created file system to the running docker instance as a volume and mas it.
- The jenkins/jenkins:lts-jdk11 is the long term support image for Jenkins. Currently, it is Jenkins 2.387.3
The below command string will create a new container instance that will restart the container unless specifically stopped. It will reuse the existing container on a restart of the OS. If the container is stopped before the reboot is performed, it will need to be started using sudo docker start "CONTAINER ID"
sudo docker run -d -u 1000:1000 -p 8085:8080 -p 50000:50000 --env JENKINS_OPTS="--prefix=/jenkins" --restart=unless-stopped -v /USER_HOME_DIR/docker/jenkins:/var/jenkins_home jenkins/jenkins:lts-jdk11
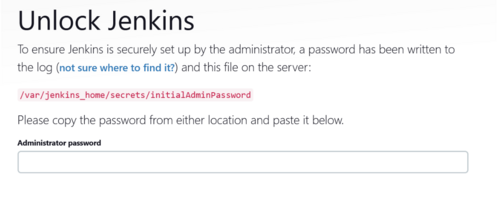
This will download the required images and start the container. There will be a message about initial password, make note of it as it will be used to log into Jenkins
   *************************************************************
   *************************************************************
   *************************************************************
   Jenkins initial setup is required. An admin user has been created and a password generated.
   Please use the following password to proceed to installation:

   xxxxxxxxxxxxxxxxxxxxxxxxxxxxxx

   This may also be found at: /var/jenkins_home/secrets/initialAdminPassword

   *************************************************************
   *************************************************************
   *************************************************************
Browser Connected Configuration
Go to application using the browser and use the above password to log in initially
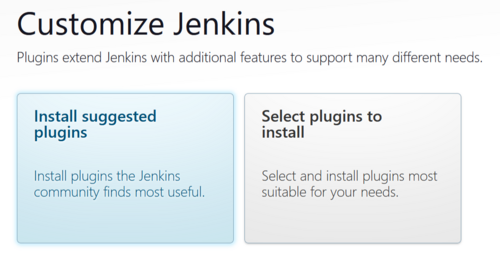
At this screen select Install Suggested Plugins
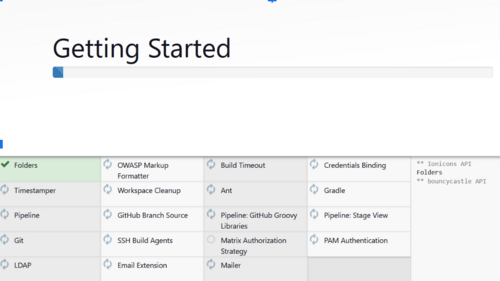
The plugins will begin to install, this will only be a few minutes.
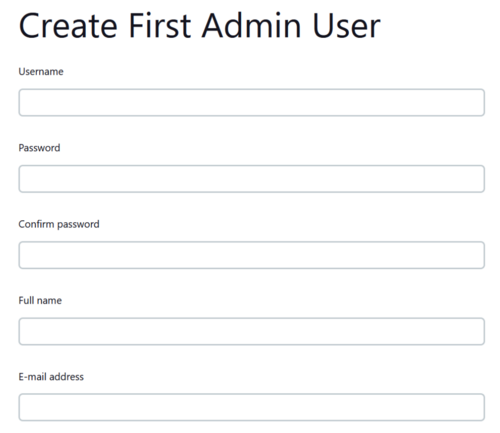
Create the Admin account. This will be a new account outside of what was used to connect initially. It will be the administrator account.
This sets up the URL with a path to the instance. It will include /jenkins so it should be something like “http(s)://<YOUR FQDN/jenkins/
The base Jenkins system install is complete at this point.
Click Start using Jenkins and the Dashboard appears
The alert is caused by this running locally and not using nodes. Click on it and select “Dismiss”
If once this is cleared, this message appears. It is due to a reverse proxy being used that needs to have some additional configuration.
When using Apache as a reverse proxy, adding these two entries to the virtual host SSL configuration should correct the error.
RequestHeader set X-Forwarded-Proto "https"
RequestHeader set X-Forwarded-Port "443"
Add Configuration Items for Pull Requests and Commits
Install and additional plugin called “Discard Old Builds” by going to Manage Jenkins → Manage Plugins → Available Plugins and search for “Discard old builds”
Install an additional plugin called “Throttle Concurrent Builds” by going to Manage Jenkins → Manage Plugins → Available Plugins and search for “Throttle Concurrent Builds”
Once plugin is installed to go Manage Jenkins → Configure System → Throttle Concurrent Builds and select Add Category:
Create Category Name PRC_THROTTLE and set Maximum Total Concurrent Builds = 1 and Maximum Concurrent Builds Per Node = 1.
Select “Apply” to save
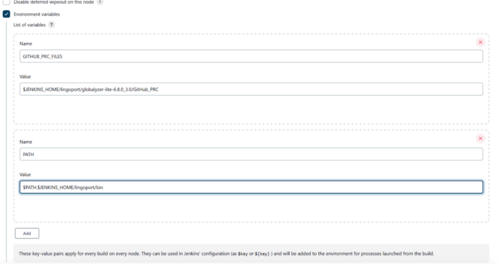
Set up the environment variables in Jenkins:
- Select the Environment Variables checkbox
- Select Add and add the following
- For a GitHub Installation
- GITHUB_PRC_FILES = $JENKINS_HOME/lingoport/<globalyzer-lite-dir>/GitHub_PRC
- PATH = $PATH:$JENKINS_HOME/lingoport/bin
- If https is to be used for connecting to the git repos set to true. If ssh is to be used to connect to git repos set to false.
- useHTTPS = true or false
- For a GitHub Installation
Click Apply and Save
Add new API token to be used by GitHub Webhook
In Jenkins create a new API token for the user that will be running the build. This will be required to be added to the webhook to permit connection back to the Jenkins instance
The credentials used for GitHub will require read access to the git repository.
- Select Dashboard → Manage Jenkins → Manage Users → Select the gear icon on the right side of the Admin user (Admin user created earlier)
- In the API Token section, select Add new Token
- Set the name of the new token to GitHub-PRC-TOKEN or something that is memorable and can identify with the PRC action.
- Be sure to copy the token value as it will never be displayed beyond this time.
Leave the GUI and go back to the file system
- Edit the github.properties file:
- /HOME_DIR/docker/jenkins/lingoport/globalyzer-lite-VERSION/GitHub_PRC/github.properties.
- Update the github.login and github.oauth with the appropriate PAT values that were created ahead of time.
- When using https there will need to be a .netrc file placed in the jenkins_home directory inside of the container. This can be placed in the volume directory at /HOME_DIR/docker/jenkins/.netrc
- login <GitHub login ID> (Not email)
- password PAT
- When using ssh there will need to be the ssh public and private keys stored in the /HOME_DIR/docker/jenkins/.ssh directory. Also with ssh be sure to manually connect to the git repo prior to using the PRC scripts. The known_hosts file needs to be updated and that is a manual process that requires manually accepting the key. This should only be needed to be performed once.
- Run the installer for Globalyzer-Lite. This must be done inside of the contains so everything is properly set up in that environment
- Obtain the container id
-
sudo docker container ps
-
-
sudo docker exec -it CONTAINER ID /bin/bash -
cd ~/lingoport/globalyzer-lite-VERSION -
./install-lite.sh(Should return Globalyzer Lite installation completed successfully)
- Obtain the container id
