Difference between revisions of "On Boarding a Globalyzer Project"
(Created page with "=Before On Boarding a Globalyzer Project = To on-board any project, a number of basic information is needed: === Globalyzer and LRM === * '''Code Repository Location''' **...") |
|||
| (14 intermediate revisions by one other user not shown) | |||
| Line 1: | Line 1: | ||
| + | = OBSOLETE = |
||
| + | |||
=Before On Boarding a Globalyzer Project = |
=Before On Boarding a Globalyzer Project = |
||
| + | Lingoport has created a [[Pre_Flight_Check|Pre-flight Check]] for Globalyzer. Before on boarding a Globalyzer project, please do the pre-flight check. |
||
| − | To on-board any project, a number of basic information is needed: |
||
| + | |||
| + | To on-board a Globalyzer project, some basic information is needed: |
||
| + | |||
| + | === Code Repository Location === |
||
| + | |||
| + | * The code repository location and branch for the project. |
||
| + | * Git locations could look like: https://github.com/group/project ; In addition, the branch for the Git project is needed. |
||
| + | * SVN locations could look like: https://svn.group.com/project/trunk. |
||
| + | * <b>Read and Write Access</b> granted to repository. |
||
| + | |||
| + | === Globalyzer Scan Information === |
||
| + | |||
| + | * The directories and files to be scanned, as well as what should not be scanned, like code libraries. |
||
| + | * The rulesets to be used to scan the source code. |
||
| + | * A Globalyzer Project file is created with this information and put in the code repository. |
||
| + | |||
| + | =On Boarding the Globalyzer Automation Job= |
||
| + | == Jenkins == |
||
| + | === Create the Jenkins job === |
||
| + | To begin the on-boarding process, go to Jenkins, and select the '''1-Automation''' Tab, and '''New Item''' |
||
| + | |||
| + | [[File:automation_tab_new_item.jpg|700px]] |
||
| + | |||
| + | * Make a copy of '''<code>Lingoport.SampleLite</code>''' |
||
| + | * Set the name of the new job to '''<groupname>.<projectname>''' |
||
| + | * Make sure '''Add to current view''' is checked and select '''OK''' |
||
| + | |||
| + | === Configure the Jenkins job === |
||
| + | |||
| + | ==== General ==== |
||
| + | [[File:GeneralTab.png|700px]] |
||
| + | |||
| + | *'''General''' section: Select the GitHub project and fill in the Project url (if using git repositories) |
||
| + | *'''Throttle Concurrent Builds''' should be checked. |
||
| + | *'''Throttle this project as part of one or more categories ''' |
||
| + | *'''LRM Throttle''' should be checked. |
||
| + | |||
| + | ==== Source Code Management ==== |
||
| + | [[File:source_code_management.jpg|700px]] |
||
| + | |||
| + | '''Source Code Management''' section: Set up the Repository, Credentials, and Branch. For example if the Git repository is Acme/myproject and the code to work with is in the 'development' branch, then set the Repository URL to '''<nowiki>https://github.com/Acme/myproject.git</nowiki>'''. It is often easy to copy this from GitHub. For the branch, make sure to define it as '''*/development'''. If the '*/' is left off, there will be problems. |
||
| + | |||
| + | ==== Build Triggers ==== |
||
| + | [[File:BuildTriggers.png|700px]] |
||
| + | |||
| + | These are left unchecked by default, but the '''Build Periodically''' can be set to build on a repeating basis. |
||
| + | |||
| + | ==== Build Environment ==== |
||
| + | [[File:BuildEnvironment.png|700px]] |
||
| + | |||
| + | Leave these unchecked. |
||
| + | |||
| + | ==== Build ==== |
||
| + | |||
| + | [[File:BuildGlobalyzerJenkins.png|700px]] |
||
| + | |||
| + | Globalyzer requires a Project Definition File. Is is recommended that this is put in the repository in a lingoport folder, although it can be anywhere as long as it can be found. Here is an example of a [[Globalyzer_CI/CD_(Continuous_Integration_and_Continuous_Delivery)#Project_Definition_Format |Project Definition File]]. |
||
| + | |||
| + | For the full instructions to setup a project definition file, see our |
||
| + | [https://www.globalyzer.com/gzserver/help/referenceLite/project-definition-file-overview.html help page]. |
||
| + | |||
| + | ==== Post Build Actions ==== |
||
| + | * Nothing needs to be modified in this section |
||
| + | |||
| + | Select the '''Save''' button. '''Enable''' the project and '''Build Now'''. The Jenkins project should run and push the results to the Lingoport Dashboard. |
||
| + | |||
| + | For more information, see [[Project Configuration Files]] |
||
| + | = Verifying the Automation Job = |
||
| − | === Globalyzer and LRM === |
||
| + | The Jenkins job should complete successfully and populate the Lingoport Dashboard. |
||
| − | * '''Code Repository Location''' |
||
| − | ** The code repository location and branch for the project. |
||
| − | *** Git locations could look like: https://github.com/group/project ; In addition, the branch for the Git project is needed |
||
| − | *** SVN locations could look like: https://svn.group.com/project/trunk |
||
| − | ** <b>Read and Write Access</b> granted to repository |
||
| + | To check if it completed successfully, select the project and look at the '''Build History''' |
||
| − | === LRM === |
||
| + | [[File:BuildHistoryNational.png|500px]] |
||
| − | * '''Users''' |
||
| − | ** The list of translation requesters. Those members to add to Jenkins so they have permission to trigger the Prep Kit job: <code> username1@company.org, username2@companyname.com </code> |
||
| − | ** The list of emails to be notified of the LRM actions: <code> username1@company.org, username2@companyname.com, username3@companyname.com </code> Note: All emails will also be used as Dashboard user identifiers. |
||
| + | The indicator should look like a blue ball. If it is a red ball, select it to go to '''Console Output''' and look for errors. |
||
| − | * '''Locales''' |
||
| − | ** The locale of the files created by developers and to be translated |
||
| − | ** The list of target translation locales |
||
| − | ** The pseudo-locale |
||
| − | * '''Resource Files''' |
||
| − | ** Files types (for instance .properties, .resx, etc.) |
||
| − | ** Naming convention for the base file: for instance '''<filename>_en.properties''' or '''<filename>.properties''' |
||
| − | ** Translated file naming convention: for instance '''<filename>_fr_FR.properties''' |
||
| − | ** The files or directories which follow the above convention but should NOT be translated. For instance **/config*.properties |
||
| − | === Globalyzer === |
||
| + | [[File:DashboardNational.png|700px]] |
||
| − | * '''Globalyzer Scan Information''' |
||
| − | ** The directories files to be scanned |
||
| − | ** The rulesets to be used to scan the source code. |
||
| + | If the indicator is blue, then login to the Lingoport Dashboard and verify that the project is on the Dashboard. The Globalyzer Dashboard will show the number of issues found and the rule sets that were used to scan the code as well as how much code was scanned. |
||
| + | If there are problems at this point, please contact '''support@lingoport.com''' for assistance. |
||
| − | == Next Step == |
||
| − | [[On Boarding the Automation Job]] |
||
Latest revision as of 17:23, 20 March 2024
Contents
OBSOLETE
Before On Boarding a Globalyzer Project
Lingoport has created a Pre-flight Check for Globalyzer. Before on boarding a Globalyzer project, please do the pre-flight check.
To on-board a Globalyzer project, some basic information is needed:
Code Repository Location
- The code repository location and branch for the project.
- Git locations could look like: https://github.com/group/project ; In addition, the branch for the Git project is needed.
- SVN locations could look like: https://svn.group.com/project/trunk.
- Read and Write Access granted to repository.
Globalyzer Scan Information
- The directories and files to be scanned, as well as what should not be scanned, like code libraries.
- The rulesets to be used to scan the source code.
- A Globalyzer Project file is created with this information and put in the code repository.
On Boarding the Globalyzer Automation Job
Jenkins
Create the Jenkins job
To begin the on-boarding process, go to Jenkins, and select the 1-Automation Tab, and New Item
- Make a copy of
Lingoport.SampleLite - Set the name of the new job to <groupname>.<projectname>
- Make sure Add to current view is checked and select OK
Configure the Jenkins job
General
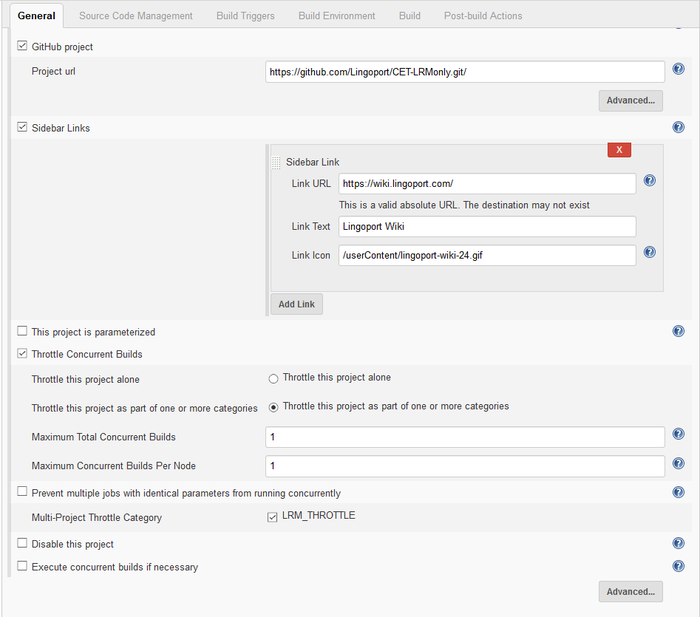
- General section: Select the GitHub project and fill in the Project url (if using git repositories)
- Throttle Concurrent Builds should be checked.
- Throttle this project as part of one or more categories
- LRM Throttle should be checked.
Source Code Management
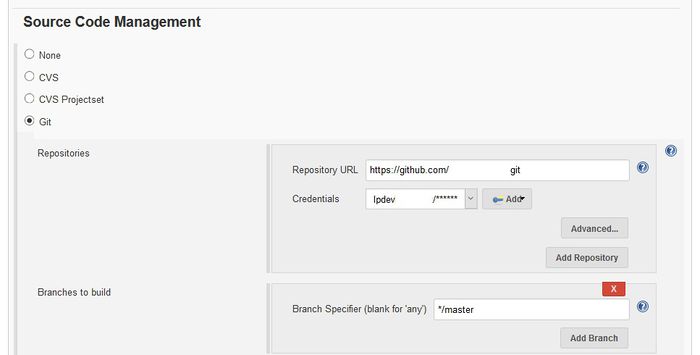
Source Code Management section: Set up the Repository, Credentials, and Branch. For example if the Git repository is Acme/myproject and the code to work with is in the 'development' branch, then set the Repository URL to https://github.com/Acme/myproject.git. It is often easy to copy this from GitHub. For the branch, make sure to define it as */development. If the '*/' is left off, there will be problems.
Build Triggers
These are left unchecked by default, but the Build Periodically can be set to build on a repeating basis.
Build Environment
Leave these unchecked.
Build
Globalyzer requires a Project Definition File. Is is recommended that this is put in the repository in a lingoport folder, although it can be anywhere as long as it can be found. Here is an example of a Project Definition File.
For the full instructions to setup a project definition file, see our help page.
Post Build Actions
- Nothing needs to be modified in this section
Select the Save button. Enable the project and Build Now. The Jenkins project should run and push the results to the Lingoport Dashboard.
For more information, see Project Configuration Files
Verifying the Automation Job
The Jenkins job should complete successfully and populate the Lingoport Dashboard.
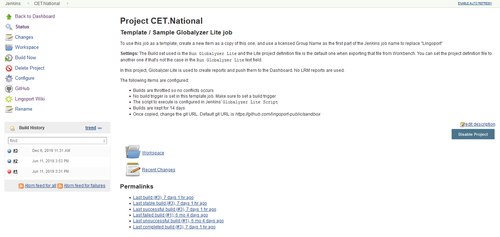
To check if it completed successfully, select the project and look at the Build History
The indicator should look like a blue ball. If it is a red ball, select it to go to Console Output and look for errors.
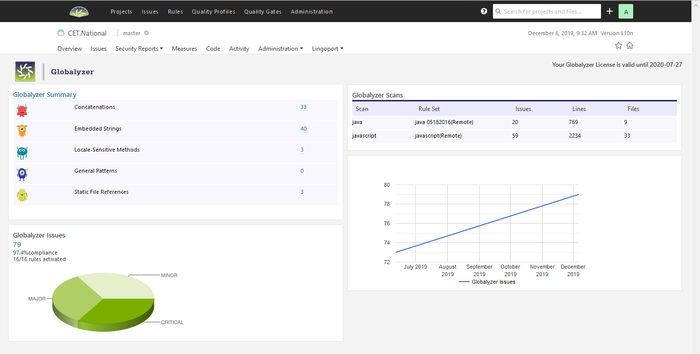
If the indicator is blue, then login to the Lingoport Dashboard and verify that the project is on the Dashboard. The Globalyzer Dashboard will show the number of issues found and the rule sets that were used to scan the code as well as how much code was scanned.
If there are problems at this point, please contact support@lingoport.com for assistance.


