Difference between revisions of "Globalyzer in IDE"
(→Using Globalyzer Lite from an Integrated Development Environment) |
(→Globalyzer Lite for VSCode) |
||
| (27 intermediate revisions by 4 users not shown) | |||
| Line 22: | Line 22: | ||
Those refactoring and the comment tags are now part of the code: The Continuous Globalization System using the same Lite project definition file will show the same results in the Dashboard. |
Those refactoring and the comment tags are now part of the code: The Continuous Globalization System using the same Lite project definition file will show the same results in the Dashboard. |
||
| + | |||
| + | ==How do I install Globalyzer Lite?== |
||
| + | |||
| + | To install the Globalyzer Lite, you first need a Globalyzer account (see [[Globalyzer_Overview_and_General#How_do_I_obtain_a_Globalyzer_account.3F|this FAQ]]). Once you have an account, you log into the Globalyzer Server and at the bottom of your home page there is a link to download Globalyzer Lite. |
||
| + | |||
| + | The Globalyzer Lite is a standalone Java application. It uses Rule Sets to scan code at the command line. It is used in Jenkins configured for the Continuous G11n System and can be integrated as an external tool in an IDE. |
||
| + | |||
| + | Please see [https://www.globalyzer.com/gzserver/home/installclient installation] for complete Globalyzer Lite download/installation instructions. |
||
| + | |||
| + | To install: |
||
| + | |||
| + | # Unzip the Globalyzer Lite zip file at a desired location |
||
| + | # Run either <code>lite-setup.bat</code> or <code>lite-setup.sh</code> depending on your system. |
||
| + | |||
| + | To verify the installation, from a command line at the location that it was installed: |
||
| + | java -jar globalyzer-lite.jar -version |
||
| + | |||
| + | or, show the help info: |
||
| + | java -jar globalyzer-lite.jar -help |
||
| + | |||
| + | == Sharing Project Definition Files Between IDEs and Build Systems == |
||
| + | |||
| + | It is common to check in a single project definition file per code repository. However, the desired IDE configuration may sometimes be incompatible with the desired build system configuration. |
||
| + | |||
| + | These incompatibilities are best solved by modifying the project definition file within the build system. The IDE config can then be used as the default. |
||
| + | |||
| + | Here is an example: The desired report type for Globalyzer Lite may be ScanDetailedCSV for developer usage, but will need to be ScanDetailedXML within the build system. The project definition file would then be written out with the <report-type> set to ScanDetailedCSV: |
||
| + | <pre><gzproject> |
||
| + | ... |
||
| + | <report-type>ScanDetailedCSV</report-type> |
||
| + | ... |
||
| + | </gzproject></pre> |
||
| + | |||
| + | The build system can then be set to auto-replace "ScanDetailedCSV" with "ScanDetailedXML". The following Linux command will do so: |
||
| + | |||
| + | <code>$ sed --in-place 's|ScanDetailedCSV|ScanDetailedXML|' $WORKSPACE/ProjectDefinition.xml</code> |
||
| + | |||
| + | If desired, the opposite replacement also may be performed at the end of the build. |
||
| + | |||
| + | Finally, here is a bash function to replace the content of any XML field: |
||
| + | |||
| + | <pre>replace_xml_token() { |
||
| + | token_name=$1 |
||
| + | new_content=$2 |
||
| + | sed -ri "s|(<${token_name}>).*(</${token_name}>)|\1${new_content}\2|g" $WORKSPACE/ProjectDefinition.xml |
||
| + | }</pre> |
||
| + | |||
| + | It may be used like so: |
||
| + | |||
| + | <code>$ replace_xml_token "report-type" "ScanDetailedXML"</code> |
||
| + | |||
| + | == Lite IDE Ignore== |
||
| + | When using Lite in an IDE (see https://www.globalyzer.com/gzserver/help/referenceLite/globalyzer-lite-IDE-usage.html ), you can use the power of the IDE to mark some issues in the code as to be ignored. Globalyzer uses a set of standard comments, namely <code>$NON-NLS-L$</code>. There are many ways to do so. We will illustrate one such way with Lite in Eclipse. |
||
| + | |||
| + | == Globalyzer Lite in Eclipse == |
||
| + | To use Globalyzer Lite in your Eclipse environment, refer to https://www.globalyzer.com/gzserver/help/referenceLite/globalyzer-lite-IDE-usage.html#Eclipse ; There are two sections, one for Linux, one for Windows. |
||
| + | |||
| + | |||
| + | [[File:LiteConfigured.gif]] |
||
| + | |||
| + | === Run Lite === |
||
| + | * Select the directory or file you want to analyze |
||
| + | * Click on the external tools button |
||
| + | |||
| + | => Lite analyzes the relevant files based on the Globalyzer Project Definition file and shows the clickable results in the Console view. |
||
| + | |||
| + | [[File:LiteRun.gif]] |
||
| + | |||
| + | === Navigate to the Issue === |
||
| + | * Click on the issue in the Console |
||
| + | |||
| + | => It opens the file and highlights the line with the issue. |
||
| + | |||
| + | === Refactor the Code or Ignore the Issue=== |
||
| + | Depending on what the developer sees, the issue either needs to be refactored or ignored. If the issue needs to be ignored, the //$NON-NLS-L$ comment needs to be added at the end of that line. One can simply add it by typing it. Some short cut exist and some can be created. For instance: |
||
| + | |||
| + | * Go to the end of the line to ignore and type <Ctr><Space> |
||
| + | * Choose "nls - non externalize string marker" in the list of templates. |
||
| + | |||
| + | or |
||
| + | |||
| + | * Add the string "nls" and type <Ctr><Space> |
||
| + | * Eclipse proposes the standard $NLS notation by default. Select that notation and type L. |
||
| + | |||
| + | [[File:LiteNlsCtrSpace.gif]] |
||
| + | |||
| + | |||
| + | |||
| + | The line now reads: |
||
| + | <code>Locale locale = new Locale("en", "US"); //$NON-NLS-L$</code> |
||
| + | |||
| + | * Repeat the process for other false positives |
||
| + | |||
| + | Lines tagged with the <code>//$NON-NLS-L$</code> will be ignored by Globalyzer the next time you run the Lite external tool. |
||
| + | |||
| + | === Advanced Template === |
||
| + | The previous illustration was done using the default template. You can modify the template to have directly <code>//$NON-NLS-L$</code> on other key combination or the same <code>nls<Ctr><Space></code>. |
||
| + | |||
| + | The following image shows how to use <code>nll<Ctr><Space></code> to insert directory <code>//$NON-NLS-L$</code>. |
||
| + | |||
| + | [[File:NllTemplate.gif]] |
||
| + | |||
| + | |||
| + | |||
| + | This is one way of adding <code>//$NON-NLS-L$</code> at the end of the line. Some developers will decide on other methods. |
||
| + | |||
| + | == Globalyzer Lite for VSCode == |
||
| + | |||
| + | To Configure the Lite VSCode Task: |
||
| + | *Install Globalyzer Lite as directed above. |
||
| + | *Open your project folder in VSCode |
||
| + | *Select “Terminal->Configure Tasks” from the top menu bar |
||
| + | [[File:Vccode1.png|800px]] |
||
| + | * Select “Create tasks.json file from template” from the popup option list |
||
| + | [[File:Vccode2.png|700px]] |
||
| + | *Select “Others” from the Task Template list |
||
| + | [[File:Vccode3.png|700px]] |
||
| + | [[File:Vccode4.png|800px]] |
||
| + | *Change the default template for the generated tasks.json file to match the following: |
||
| + | <pre> |
||
| + | { |
||
| + | "version": "2.0.0", |
||
| + | "tasks": [ |
||
| + | { |
||
| + | "label": "GlobalyzerLite", |
||
| + | "type": "shell", |
||
| + | "command": "java", |
||
| + | "args": [ |
||
| + | { |
||
| + | "value": "-jar", |
||
| + | "quoting": "weak" |
||
| + | }, |
||
| + | { |
||
| + | "value": "/Applications/Lingoport/globalyzer-lite-6.6.0_8.0/globalyzer-lite.jar", |
||
| + | "quoting": "strong" |
||
| + | }, |
||
| + | { |
||
| + | "value": "-f", |
||
| + | "quoting": "weak" |
||
| + | }, |
||
| + | { |
||
| + | "value": "${workspaceFolder}/lingoport/LiteProjectDefinition.xml", |
||
| + | "quoting": "strong" |
||
| + | }, |
||
| + | { |
||
| + | "value": "--project-path", |
||
| + | "quoting": "weak" |
||
| + | }, |
||
| + | { |
||
| + | "value": "${workspaceFolder}", |
||
| + | "quoting": "strong" |
||
| + | }, |
||
| + | { |
||
| + | "value": "--report-path", |
||
| + | "quoting": "weak" |
||
| + | }, |
||
| + | { |
||
| + | "value": "${workspaceFolder}/Lingoport", |
||
| + | "quoting": "strong" |
||
| + | }, |
||
| + | { |
||
| + | "value": "--scan-items", |
||
| + | "quoting": "weak" |
||
| + | }, |
||
| + | { |
||
| + | "value": "${file}", |
||
| + | "quoting": "strong" |
||
| + | }, |
||
| + | { |
||
| + | "value": "--console-output", |
||
| + | "quoting": "weak" |
||
| + | }, |
||
| + | { |
||
| + | "value": "visual-studio", |
||
| + | "quoting": "weak" |
||
| + | } |
||
| + | |||
| + | ], |
||
| + | "presentation": { |
||
| + | "showReuseMessage": false, |
||
| + | "clear": true, |
||
| + | "revealProblems": "onProblem" |
||
| + | }, |
||
| + | "problemMatcher": { |
||
| + | "fileLocation": ["absolute"], |
||
| + | "severity": "warning", |
||
| + | "owner": "globalyzer", |
||
| + | "pattern": { |
||
| + | "regexp": "^(.*)\\((\\d*)\\):\\s+(.*),\\s+(P\\d+):\\s+(.*)", |
||
| + | "file": 1, |
||
| + | "line": 2, |
||
| + | "message": 3, |
||
| + | "severity": 4, |
||
| + | "code": 5 |
||
| + | } |
||
| + | } |
||
| + | } |
||
| + | ] |
||
| + | } |
||
| + | </pre> |
||
| + | *“label” is the name of the task - this can be changed to whatever makes the most sense |
||
| + | *“type” specifies that the command should be run in a shell - required |
||
| + | *“command” is the command to execute in the shell - required |
||
| + | *“problemMatcher” used to auto-format the output, |
||
| + | *“args” specifies the arguments to be passed to the command at execution |
||
| + | *“value” contains the actual arguments |
||
| + | **-jar specifies the jar to execute |
||
| + | ***Replace 'path/to/globalyzer-lite.jar' with the absolute path to your globalyzer-lite.jar. |
||
| + | ***‘C:\Lingoport\globalyzer-lite-x.y.z\globalyzer-lite.jar’ |
||
| + | **-f is the name of the Project Definition file |
||
| + | ***Replace the ‘/path/to/LiteProjectDefinition.xml’ with the workspace relative path of your Project Definition file |
||
| + | ***E.g. ${workspaceFolder}/lingoport/LiteProjectDefinition.xml |
||
| + | **--project-path is the path of this project |
||
| + | ***Leave this as the ${workspaceFolder} VSCode environment variable |
||
| + | **--scan-items Overrides the default settings for which files and directories to scan |
||
| + | ***Use ${file} to scan only the currently selected file in VSCode |
||
| + | **--console-output prints scan report output to console with specified format. |
||
| + | ***Leave as "visual-studio" - format report output for visual studio. This allows the user to click on a candidate issue in the output and jump to its location within a file. |
||
| + | *“quoting” specifies how to handle quoting within the args - 'strong' is used for arguments that may contain spaces. |
||
| + | *“presentation” configures how the workspace should handle displaying the task as it executes |
||
| + | *“problemMatcher” uses a regular expression to extract the problems found in the scan and display them in the problems panel |
||
| + | |||
| + | ===To Execute a Scan on the Current Opened File:=== |
||
| + | 1.Select “Terminal->Run Task” and choose the GlobalyzerLite task from the list in the modal window |
||
| + | |||
| + | 2.Scan will execute in a VSCode terminal panel and display problems in the problems panel if any are found. Terminal output and problem panel screenshots on next page. |
||
| + | [[File:Vccode5.png|700px]] |
||
| + | [[File:Vccode6.png|700px]] |
||
Latest revision as of 00:51, 15 December 2023
Contents
Can I use Globalyzer Lite with my standard IDE?
The Globalyzer Lite client can be used with Eclipse, Visual Studio and IntelliJ IDEs.
Using Globalyzer Lite from an Integrated Development Environment
Globalyzer Lite may be used within many IDEs that support external tools, including Visual Studio, IntelliJ IDEA, and Eclipse. Configuring Lite as an external tool takes some initial setup, but is relatively easy to accomplish. Once configured, Lite may be used through the IDE's external tool menu with the click of a button. The recommended, documented tools:
- Scan the currently selected file/directory.
- Scan everything within the parent directory of the currently selected file/directory.
- Scan the entire project.
Demonstration videos are available for:
To configure Lite in the IDE, please see this page: Lite IDE Usage.
The developer can then use the power of the IDE to refactor the relevant issues or to mark false positives in the code using Globalyzer ignore comments, such as $NON-NLS-L$. For more information, see the Globalyzer Comment Tags in False Positives .
Those refactoring and the comment tags are now part of the code: The Continuous Globalization System using the same Lite project definition file will show the same results in the Dashboard.
How do I install Globalyzer Lite?
To install the Globalyzer Lite, you first need a Globalyzer account (see this FAQ). Once you have an account, you log into the Globalyzer Server and at the bottom of your home page there is a link to download Globalyzer Lite.
The Globalyzer Lite is a standalone Java application. It uses Rule Sets to scan code at the command line. It is used in Jenkins configured for the Continuous G11n System and can be integrated as an external tool in an IDE.
Please see installation for complete Globalyzer Lite download/installation instructions.
To install:
- Unzip the Globalyzer Lite zip file at a desired location
- Run either
lite-setup.batorlite-setup.shdepending on your system.
To verify the installation, from a command line at the location that it was installed:
java -jar globalyzer-lite.jar -version
or, show the help info:
java -jar globalyzer-lite.jar -help
Sharing Project Definition Files Between IDEs and Build Systems
It is common to check in a single project definition file per code repository. However, the desired IDE configuration may sometimes be incompatible with the desired build system configuration.
These incompatibilities are best solved by modifying the project definition file within the build system. The IDE config can then be used as the default.
Here is an example: The desired report type for Globalyzer Lite may be ScanDetailedCSV for developer usage, but will need to be ScanDetailedXML within the build system. The project definition file would then be written out with the <report-type> set to ScanDetailedCSV:
<gzproject>
  ...
  <report-type>ScanDetailedCSV</report-type>
  ...
</gzproject>
The build system can then be set to auto-replace "ScanDetailedCSV" with "ScanDetailedXML". The following Linux command will do so:
$ sed --in-place 's|ScanDetailedCSV|ScanDetailedXML|' $WORKSPACE/ProjectDefinition.xml
If desired, the opposite replacement also may be performed at the end of the build.
Finally, here is a bash function to replace the content of any XML field:
replace_xml_token() {
  token_name=$1
  new_content=$2
  sed -ri "s|(<${token_name}>).*(</${token_name}>)|\1${new_content}\2|g" $WORKSPACE/ProjectDefinition.xml
}
It may be used like so:
$ replace_xml_token "report-type" "ScanDetailedXML"
Lite IDE Ignore
When using Lite in an IDE (see https://www.globalyzer.com/gzserver/help/referenceLite/globalyzer-lite-IDE-usage.html ), you can use the power of the IDE to mark some issues in the code as to be ignored. Globalyzer uses a set of standard comments, namely $NON-NLS-L$. There are many ways to do so. We will illustrate one such way with Lite in Eclipse.
Globalyzer Lite in Eclipse
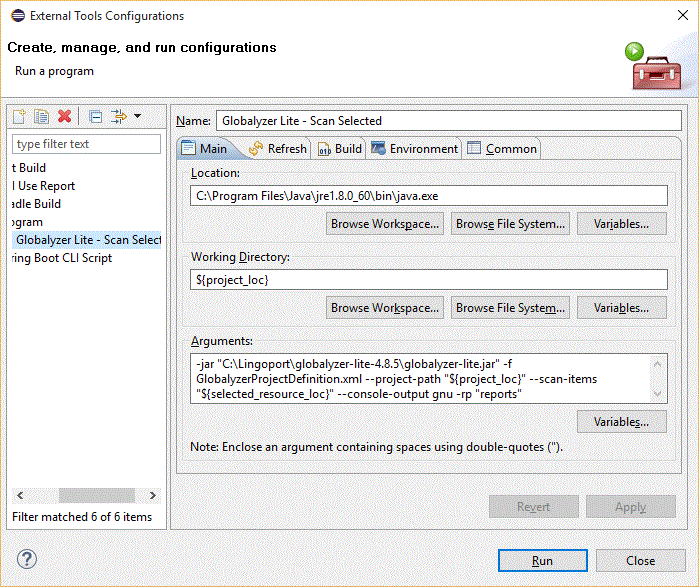
To use Globalyzer Lite in your Eclipse environment, refer to https://www.globalyzer.com/gzserver/help/referenceLite/globalyzer-lite-IDE-usage.html#Eclipse ; There are two sections, one for Linux, one for Windows.
Run Lite
- Select the directory or file you want to analyze
- Click on the external tools button
=> Lite analyzes the relevant files based on the Globalyzer Project Definition file and shows the clickable results in the Console view.
- Click on the issue in the Console
=> It opens the file and highlights the line with the issue.
Refactor the Code or Ignore the Issue
Depending on what the developer sees, the issue either needs to be refactored or ignored. If the issue needs to be ignored, the //$NON-NLS-L$ comment needs to be added at the end of that line. One can simply add it by typing it. Some short cut exist and some can be created. For instance:
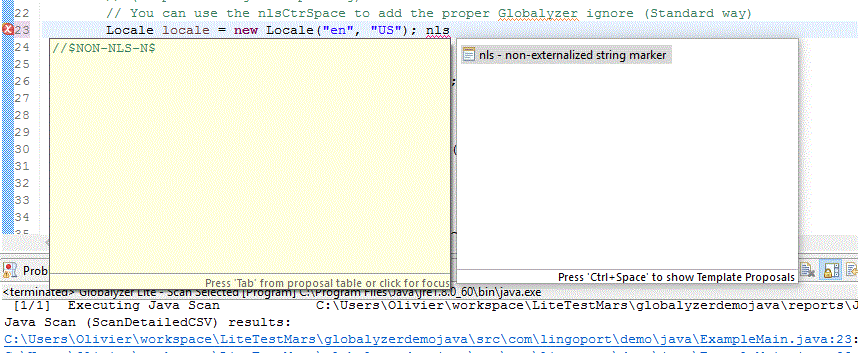
- Go to the end of the line to ignore and type <Ctr><Space>
- Choose "nls - non externalize string marker" in the list of templates.
or
- Add the string "nls" and type <Ctr><Space>
- Eclipse proposes the standard $NLS notation by default. Select that notation and type L.
The line now reads:
Locale locale = new Locale("en", "US"); //$NON-NLS-L$
- Repeat the process for other false positives
Lines tagged with the //$NON-NLS-L$ will be ignored by Globalyzer the next time you run the Lite external tool.
Advanced Template
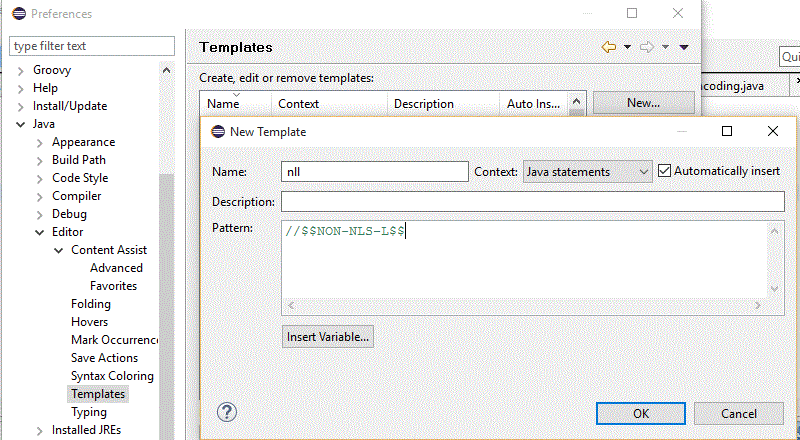
The previous illustration was done using the default template. You can modify the template to have directly //$NON-NLS-L$ on other key combination or the same nls<Ctr><Space>.
The following image shows how to use nll<Ctr><Space> to insert directory //$NON-NLS-L$.
This is one way of adding //$NON-NLS-L$ at the end of the line. Some developers will decide on other methods.
Globalyzer Lite for VSCode
To Configure the Lite VSCode Task:
- Install Globalyzer Lite as directed above.
- Open your project folder in VSCode
- Select “Terminal->Configure Tasks” from the top menu bar
- Select “Create tasks.json file from template” from the popup option list
- Select “Others” from the Task Template list
- Change the default template for the generated tasks.json file to match the following:
{
    "version": "2.0.0",
    "tasks": [
        {
            "label": "GlobalyzerLite",
            "type": "shell",
            "command": "java",
            "args": [
                {
                    "value": "-jar",
                        "quoting": "weak"
                },
                {
                    "value": "/Applications/Lingoport/globalyzer-lite-6.6.0_8.0/globalyzer-lite.jar",
                        "quoting": "strong"
                },
                {
                    "value": "-f",
                        "quoting": "weak"
                },
                {
                    "value": "${workspaceFolder}/lingoport/LiteProjectDefinition.xml",
                        "quoting": "strong"
                },
                {
                    "value": "--project-path",
                        "quoting": "weak"
                },
                {
                    "value": "${workspaceFolder}",
                        "quoting": "strong"
                },
                {
                    "value": "--report-path",
                        "quoting": "weak"
                },
                {
                    "value": "${workspaceFolder}/Lingoport",
                        "quoting": "strong"
                },
                {
                    "value": "--scan-items",
                        "quoting": "weak"
                },
                {
                    "value": "${file}",
                        "quoting": "strong"
                },
                {
                    "value": "--console-output",
                        "quoting": "weak"
                },
                {
                    "value": "visual-studio",
                        "quoting": "weak"
                }

            ],
            "presentation": {
                "showReuseMessage": false,
                "clear": true,
                "revealProblems": "onProblem"
            },
            "problemMatcher": {
                "fileLocation": ["absolute"],
                "severity": "warning",
                "owner": "globalyzer",
                "pattern": {
                    "regexp": "^(.*)\\((\\d*)\\):\\s+(.*),\\s+(P\\d+):\\s+(.*)",
                    "file": 1,
                    "line": 2,
                    "message": 3,
                    "severity": 4,
                    "code": 5
                }
            }
        }
    ]
 }
- “label” is the name of the task - this can be changed to whatever makes the most sense
- “type” specifies that the command should be run in a shell - required
- “command” is the command to execute in the shell - required
- “problemMatcher” used to auto-format the output,
- “args” specifies the arguments to be passed to the command at execution
- “value” contains the actual arguments
- -jar specifies the jar to execute
- Replace 'path/to/globalyzer-lite.jar' with the absolute path to your globalyzer-lite.jar.
- ‘C:\Lingoport\globalyzer-lite-x.y.z\globalyzer-lite.jar’
- -f is the name of the Project Definition file
- Replace the ‘/path/to/LiteProjectDefinition.xml’ with the workspace relative path of your Project Definition file
- E.g. ${workspaceFolder}/lingoport/LiteProjectDefinition.xml
- --project-path is the path of this project
- Leave this as the ${workspaceFolder} VSCode environment variable
- --scan-items Overrides the default settings for which files and directories to scan
- Use ${file} to scan only the currently selected file in VSCode
- --console-output prints scan report output to console with specified format.
- Leave as "visual-studio" - format report output for visual studio. This allows the user to click on a candidate issue in the output and jump to its location within a file.
- -jar specifies the jar to execute
- “quoting” specifies how to handle quoting within the args - 'strong' is used for arguments that may contain spaces.
- “presentation” configures how the workspace should handle displaying the task as it executes
- “problemMatcher” uses a regular expression to extract the problems found in the scan and display them in the problems panel
To Execute a Scan on the Current Opened File:
1.Select “Terminal->Run Task” and choose the GlobalyzerLite task from the list in the modal window
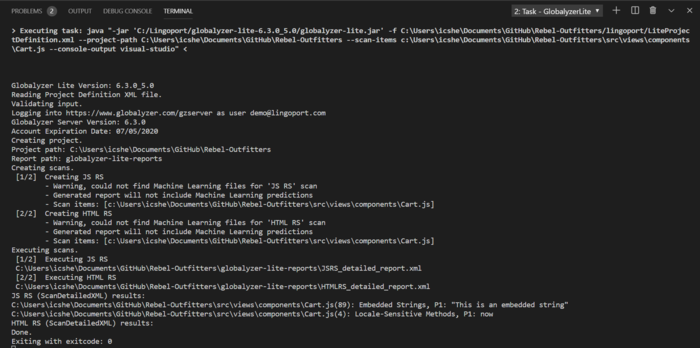
2.Scan will execute in a VSCode terminal panel and display problems in the problems panel if any are found. Terminal output and problem panel screenshots on next page.


