Difference between revisions of "Localyzer Machine Translation through a Proxy Server"
(→Proxy Validation) |
(→Rational) |
||
| (35 intermediate revisions by the same user not shown) | |||
| Line 1: | Line 1: | ||
| − | = |
+ | = Rationale = |
| − | A proxy Server may be used for Localyzer ''' |
+ | A proxy Server may be used for Localyzer Machine Translation through '''Amazon Translate''' if necessary for IT/Network/Security requirements. Only Amazon Translate is supported as of 2020-11-05. |
This is done by setting the ''''https_proxy'''' environment variable. Another variable, 'http_proxy', is available for http connections, but will not be needed for use with Amazon Translate. |
This is done by setting the ''''https_proxy'''' environment variable. Another variable, 'http_proxy', is available for http connections, but will not be needed for use with Amazon Translate. |
||
| + | |||
| + | = Overview = |
||
| + | |||
| + | == Definition == |
||
| + | |||
| + | Definition of a proxy server per [https://en.wikipedia.org/wiki/Proxy_server#Forward_proxies wikipedia]: |
||
| + | |||
| + | In computer networking, a proxy server is a server application or appliance that acts as an intermediary for requests from clients seeking resources from servers that provide those resources. A proxy server thus functions on behalf of the client when requesting service. |
||
| + | |||
| + | == Purpose == |
||
| + | |||
| + | A proxy may be used when direct access from a Lingoport System to Amazon Translate is not supported by the network configuration, but IT permits external access through a proxy. |
||
| + | |||
| + | = Requirements = |
||
| + | |||
| + | A forward http proxy server must be made available by your IT group. It must be possible to connect to this proxy server from the Lingoport Suite System. |
||
| + | |||
| + | You will need to know: |
||
| + | # The URL and/or IP address of the proxy you will use |
||
| + | # The port you will connect to the proxy on |
||
| + | |||
| + | The proxy will need to support: |
||
| + | # Passthrough connections to https://translate.<region>.amazonaws.com, where <region> may be us-east-1, us-east-2, us-west-1, us-west-2, or any other region as supported by Amazon Translate. E.g. https://translate.us-east-1.amazonaws.com |
||
| + | |||
| + | For validation purposes, it is recommended that the proxy also support connections to an external site that may report your IP address, such as but not limited to https://canhazip.com . |
||
| + | |||
= Proxy Validation = |
= Proxy Validation = |
||
| − | It is recommended that you validate you have access to |
+ | It is recommended that you validate you have access to the proxy you'll use, from your system, prior to enabling it. |
Test steps (example proxy used is http://masnes.testproxy.internal.lingoport.io:3128): |
Test steps (example proxy used is http://masnes.testproxy.internal.lingoport.io:3128): |
||
| + | * SSH to the Lingoport Suite System |
||
| − | 1. ssh to your system |
||
| − | + | * Install 'telnet', if it is not already present <code>sudo yum install telnet</code> |
|
| + | * Validate that you can connect to your proxy server, while keeping proxy settings clear - for now: |
||
| − | :: <code>sudo yum install telnet</code> |
||
| + | :: <code>http_proxy="" https_proxy="" telnet <proxyurl-no-http/s> <proxyport></code> |
||
| − | # validate that you can connect to your proxy server, while keeping proxy settings clear - for now: |
||
| − | ::: <code>http_proxy="" https_proxy="" telnet <proxyurl-no-http/s> <proxyport></code> |
||
:: Example: |
:: Example: |
||
::: <code>http_proxy="" https_proxy="" telnet masnes.testproxy.internal.lingoport.io 3128</code> |
::: <code>http_proxy="" https_proxy="" telnet masnes.testproxy.internal.lingoport.io 3128</code> |
||
| − | :: Result |
+ | :: Result: |
| − | ::: Trying 172.31.81.146... |
+ | ::: <code>Trying 172.31.81.146...</code> |
| − | ::: Connected to masnes.testproxy.internal.lingoport.io. |
+ | ::: <code>Connected to masnes.testproxy.internal.lingoport.io.</code> |
| − | ::: Escape character is '^]'. |
+ | ::: <code>Escape character is '^]'.</code> |
| − | ::: Note: <code>Enter</code> will quit and return you to your terminal. |
+ | ::: '''Note:'''After connection is established, <code>Enter</code> will quit and return you to your terminal. If connection takes a while, use <code>Ctrl-C</code> instead. |
| − | :: If the connection takes more than 5 seconds, you may not be able to connect to the proxy |
+ | :: If the connection '''takes more than 5 seconds''', you may '''not''' be able to connect to the proxy. '''Please check your security groups / firewall / networking settings before continuing!''' |
| − | + | * Next, as a comparison point, try curling to an external site that will return your ip address, without using the proxy settings yet. |
|
:: Here, we use 'https://canhazip.com' as the external site. We set a timeout in case the connection is blocked. |
:: Here, we use 'https://canhazip.com' as the external site. We set a timeout in case the connection is blocked. |
||
: Command |
: Command |
||
| Line 29: | Line 54: | ||
: Expected Result |
: Expected Result |
||
:: <your systems ip>, something like '34.195.141.162' |
:: <your systems ip>, something like '34.195.141.162' |
||
| − | : Alternate Expected Result - You'll see this if you are blocked from external connections by your firewall (possibly what you're using the proxy to |
+ | : Alternate Expected Result - You'll see this if you are blocked from external connections by your firewall (possibly what you're using the proxy to avoid!): |
:: NOTE ...Connection timed out after 5 seconds. |
:: NOTE ...Connection timed out after 5 seconds. |
||
| − | + | * Next, try using the proxy with curl + an external site that will return your ip address. |
|
: Command |
: Command |
||
:: <code>https_proxy="http://<proxyurl>:<proxyport>" curl https://canhazip.com --silent --connect-timeout 5 || echo "FAILED: With proxy, connection timed out after 5 seconds."</code> |
:: <code>https_proxy="http://<proxyurl>:<proxyport>" curl https://canhazip.com --silent --connect-timeout 5 || echo "FAILED: With proxy, connection timed out after 5 seconds."</code> |
||
| Line 37: | Line 62: | ||
:: <code>https_proxy="http://masnes.testproxy.internal.lingoport.io:3128" curl https://canhazip.com --silent --connect-timeout 5 || echo "FAILED: With proxy, connection timed out after 5 seconds."</code> |
:: <code>https_proxy="http://masnes.testproxy.internal.lingoport.io:3128" curl https://canhazip.com --silent --connect-timeout 5 || echo "FAILED: With proxy, connection timed out after 5 seconds."</code> |
||
: Expected Result |
: Expected Result |
||
| − | :: <proxy ip>, something different from the above. For the above example it was '54.205.127.98'. |
+ | :: <proxy ip>, something different from the above. For the above example it was '54.205.127.98', which was different from the previous '34.195.141.162'. This time, the connection must '''not''' fail. |
If you're able to connect to the proxy via telnet, you're able to use the proxy to get your remote ip from https://canhazip.com, and if the result you get from https://canhazip.com via the proxy is different than without the proxy, then you are ready to proceed. |
If you're able to connect to the proxy via telnet, you're able to use the proxy to get your remote ip from https://canhazip.com, and if the result you get from https://canhazip.com via the proxy is different than without the proxy, then you are ready to proceed. |
||
| − | = Defining the Proxy for use with |
+ | = Defining the Proxy for use with Localyzer Amazon Translate = |
| − | To set a proxy server, define the environment variable "https_proxy" prior to running |
+ | To set a proxy server, define the environment variable "https_proxy" prior to running Localyzer with Amazon Translate. Through Jenkins, the easiest way to do so is: |
: Manage Jenkins -> (Goes to a new page) |
: Manage Jenkins -> (Goes to a new page) |
||
| Line 56: | Line 81: | ||
https_proxy |
https_proxy |
||
http://masnes.testproxy.internal.lingoport.io:3128 |
http://masnes.testproxy.internal.lingoport.io:3128 |
||
| + | |||
| + | [[File:Jenkins-config-env-https proxy.png]] |
||
| + | |||
| + | Click either 'Save' or 'Apply' once you are finished. |
||
= Validating the Proxy through Jenkins = |
= Validating the Proxy through Jenkins = |
||
| Line 61: | Line 90: | ||
You can add a step to your Jenkins Automation build(s) to confirm that the proxy is used. To do so: |
You can add a step to your Jenkins Automation build(s) to confirm that the proxy is used. To do so: |
||
| − | + | * Start at the Jenkins HomePage |
|
| − | + | * Select the build you would like to test with. For example 'MyCompany.MyProject' -> (Goes to a new page) |
|
| − | + | * Go to Configure on the left -> (Goes to a new page) |
|
| − | + | * Scroll to the bottom of the Configure page. You should see an 'Add build step' button just '''above''' 'Post-build actions' |
|
| − | + | * Add build step -> Execute shell -> (An empty 'Execute shell' box should appear) |
|
| + | [[File:Jenkins-add-build-step-execute-shell.png]] |
||
| − | # In the box, add the following content: |
||
| + | * In the box, add the following content: |
||
<pre> |
<pre> |
||
set +e # curl may fail without the proxy, depending on network configuration. |
set +e # curl may fail without the proxy, depending on network configuration. |
||
| Line 86: | Line 116: | ||
echo |
echo |
||
</pre> |
</pre> |
||
| − | + | * After you have filled it out, drag and drop this box so that it is moved higher, above any other boxes such as 'Update Dashboard' or 'L10n Vendor'. This way it runs first. |
|
| + | [[File:Jenkins-proxy-build-step-execute-shell-above-run-lrm.png]] |
||
| − | # Save the build. Then run it. Navigate to the console output of the build. You should see a section that shows: |
||
| + | * Save the build. Then run it. Navigate to the console output of the build. You should see a section that shows: |
||
<pre> |
<pre> |
||
Validating Proxy is Used: |
Validating Proxy is Used: |
||
| Line 100: | Line 131: | ||
IP returned: 54.205.127.98 |
IP returned: 54.205.127.98 |
||
</pre> |
</pre> |
||
| + | |||
| + | Like so: |
||
| + | |||
| + | [[File:Jenkins-proxy-build-output-validate-proxy.png]] |
||
| + | |||
| + | |||
| + | You are now using an https proxy! |
||
| + | |||
| + | Please see [[Machine Translation]] for details of Localyzer Machine Translation. Proxy configurations have been validated with '''Amazon Translate'''. It will take effect automatically as long as the https_proxy environment variable is set. |
||
Latest revision as of 21:13, 5 November 2020
Contents
Rationale
A proxy Server may be used for Localyzer Machine Translation through Amazon Translate if necessary for IT/Network/Security requirements. Only Amazon Translate is supported as of 2020-11-05.
This is done by setting the 'https_proxy' environment variable. Another variable, 'http_proxy', is available for http connections, but will not be needed for use with Amazon Translate.
Overview
Definition
Definition of a proxy server per wikipedia:
In computer networking, a proxy server is a server application or appliance that acts as an intermediary for requests from clients seeking resources from servers that provide those resources. A proxy server thus functions on behalf of the client when requesting service.
Purpose
A proxy may be used when direct access from a Lingoport System to Amazon Translate is not supported by the network configuration, but IT permits external access through a proxy.
Requirements
A forward http proxy server must be made available by your IT group. It must be possible to connect to this proxy server from the Lingoport Suite System.
You will need to know:
- The URL and/or IP address of the proxy you will use
- The port you will connect to the proxy on
The proxy will need to support:
- Passthrough connections to https://translate.<region>.amazonaws.com, where <region> may be us-east-1, us-east-2, us-west-1, us-west-2, or any other region as supported by Amazon Translate. E.g. https://translate.us-east-1.amazonaws.com
For validation purposes, it is recommended that the proxy also support connections to an external site that may report your IP address, such as but not limited to https://canhazip.com .
Proxy Validation
It is recommended that you validate you have access to the proxy you'll use, from your system, prior to enabling it.
Test steps (example proxy used is http://masnes.testproxy.internal.lingoport.io:3128):
- SSH to the Lingoport Suite System
- Install 'telnet', if it is not already present
sudo yum install telnet - Validate that you can connect to your proxy server, while keeping proxy settings clear - for now:
http_proxy="" https_proxy="" telnet <proxyurl-no-http/s> <proxyport>- Example:
http_proxy="" https_proxy="" telnet masnes.testproxy.internal.lingoport.io 3128
- Result:
Trying 172.31.81.146...Connected to masnes.testproxy.internal.lingoport.io.Escape character is '^]'.- Note:After connection is established,
Enterwill quit and return you to your terminal. If connection takes a while, useCtrl-Cinstead.
- If the connection takes more than 5 seconds, you may not be able to connect to the proxy. Please check your security groups / firewall / networking settings before continuing!
- Next, as a comparison point, try curling to an external site that will return your ip address, without using the proxy settings yet.
- Here, we use 'https://canhazip.com' as the external site. We set a timeout in case the connection is blocked.
- Command
https_proxy="" curl https://canhazip.com --silent --connect-timeout 5 || echo "NOTE: ...Connection timed out after 5 seconds."
- Expected Result
- <your systems ip>, something like '34.195.141.162'
- Alternate Expected Result - You'll see this if you are blocked from external connections by your firewall (possibly what you're using the proxy to avoid!):
- NOTE ...Connection timed out after 5 seconds.
- Next, try using the proxy with curl + an external site that will return your ip address.
- Command
https_proxy="http://<proxyurl>:<proxyport>" curl https://canhazip.com --silent --connect-timeout 5 || echo "FAILED: With proxy, connection timed out after 5 seconds."
- Example
https_proxy="http://masnes.testproxy.internal.lingoport.io:3128" curl https://canhazip.com --silent --connect-timeout 5 || echo "FAILED: With proxy, connection timed out after 5 seconds."
- Expected Result
- <proxy ip>, something different from the above. For the above example it was '54.205.127.98', which was different from the previous '34.195.141.162'. This time, the connection must not fail.
If you're able to connect to the proxy via telnet, you're able to use the proxy to get your remote ip from https://canhazip.com, and if the result you get from https://canhazip.com via the proxy is different than without the proxy, then you are ready to proceed.
Defining the Proxy for use with Localyzer Amazon Translate
To set a proxy server, define the environment variable "https_proxy" prior to running Localyzer with Amazon Translate. Through Jenkins, the easiest way to do so is:
- Manage Jenkins -> (Goes to a new page)
- Configure System -> (Goes to a new page)
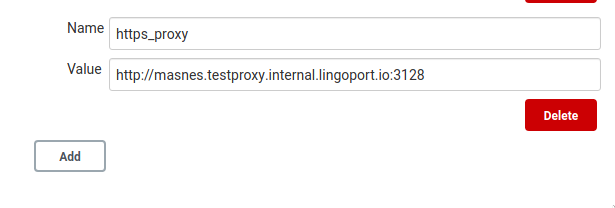
- Global Properties -> Environment Variables -> Add (Button at the bottom of the Environment Variables settings)
Settings should be: Name: https_proxy Value: http://<yourproxy>:<yourproxyport>
Example https_proxy http://masnes.testproxy.internal.lingoport.io:3128
Click either 'Save' or 'Apply' once you are finished.
Validating the Proxy through Jenkins
You can add a step to your Jenkins Automation build(s) to confirm that the proxy is used. To do so:
- Start at the Jenkins HomePage
- Select the build you would like to test with. For example 'MyCompany.MyProject' -> (Goes to a new page)
- Go to Configure on the left -> (Goes to a new page)
- Scroll to the bottom of the Configure page. You should see an 'Add build step' button just above 'Post-build actions'
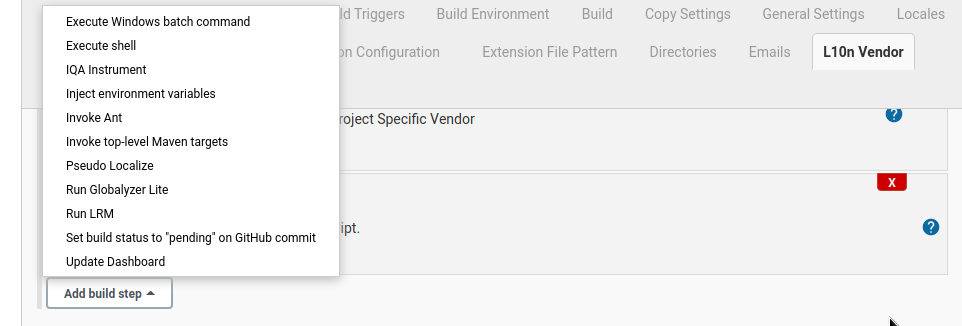
- Add build step -> Execute shell -> (An empty 'Execute shell' box should appear)
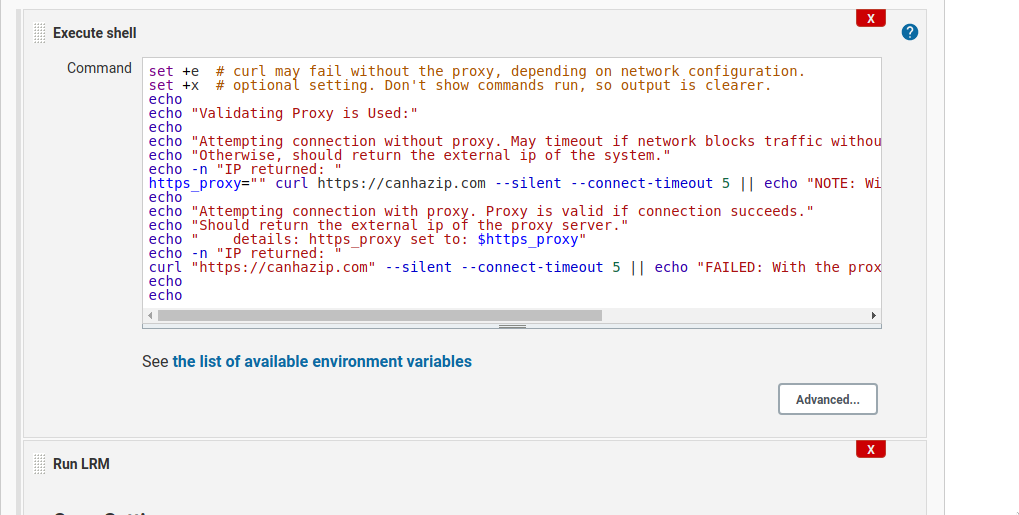
- In the box, add the following content:
set +e  # curl may fail without the proxy, depending on network configuration.
set +x  # optional setting. Don't show commands run, so output is clearer.
echo
echo "Validating Proxy is Used:"
echo
echo "Attempting connection without proxy. May timeout if network blocks traffic without proxy."
echo "Otherwise, should return the external ip of the system."
echo -n "IP returned: "
https_proxy="" curl https://canhazip.com --silent --connect-timeout 5 || echo "NOTE: Without proxy, connection timed out after 5 seconds."
echo
echo "Attempting connection with proxy. Proxy is valid if connection succeeds."
echo "Should return the external ip of the proxy server."
echo "    details: https_proxy set to: $https_proxy"
echo -n "IP returned: "
curl "https://canhazip.com" --silent --connect-timeout 5 || echo "FAILED: With the proxy set, connection timed out after 5 seconds."
echo
echo
- After you have filled it out, drag and drop this box so that it is moved higher, above any other boxes such as 'Update Dashboard' or 'L10n Vendor'. This way it runs first.
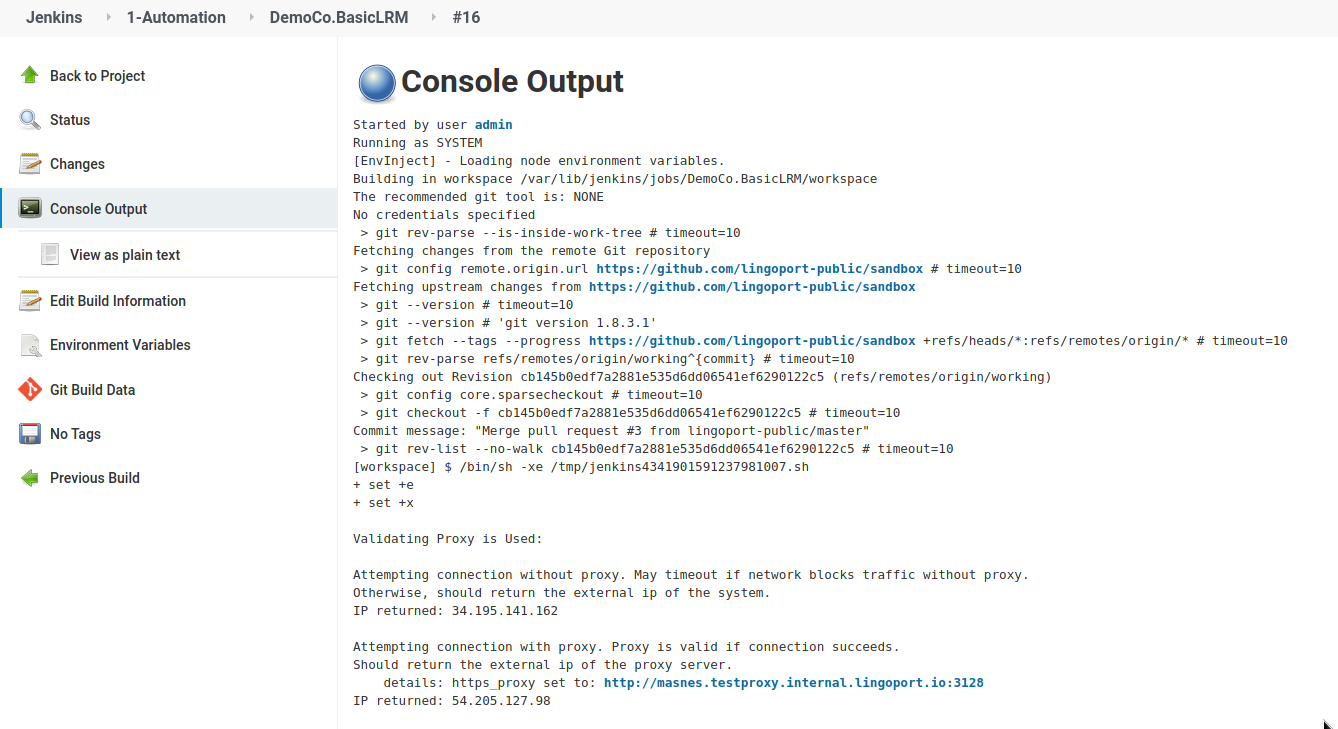
- Save the build. Then run it. Navigate to the console output of the build. You should see a section that shows:
Validating Proxy is Used:

Attempting connection without proxy. May timeout if network blocks traffic without proxy.
Otherwise, should return the external ip of the system.
IP returned: 34.195.141.162

Attempting connection with proxy. Proxy is valid if connection succeeds.
Should return the external ip of the proxy server.
    details: https_proxy set to: http://masnes.testproxy.internal.lingoport.io:3128
IP returned: 54.205.127.98
Like so:
You are now using an https proxy!
Please see Machine Translation for details of Localyzer Machine Translation. Proxy configurations have been validated with Amazon Translate. It will take effect automatically as long as the https_proxy environment variable is set.


