Difference between revisions of "Trados Enterprise"
(→On the Command Center side) |
(→Example Workflow Task Table) |
||
| (47 intermediate revisions by the same user not shown) | |||
| Line 1: | Line 1: | ||
== On the Trados Cloud side == |
== On the Trados Cloud side == |
||
| + | |||
| − | On Trados Enterprise, Trados Accelerate, and Trados Team, depending on your integration, an integration application must be set up for Localyzer to connect. |
||
| + | <span style="color:#0000FF">'''The Trados Cloud configuration requires a Trados Administrator.''' </span> |
||
| + | |||
| + | On Trados Enterprise, Trados Accelerate, and Trados Team, depending on your integration, an integration <code>application</code> must be set up for Localyzer to connect. |
||
=== Integration Application === |
=== Integration Application === |
||
| + | |||
| + | To ensure a seamless integration between Trados and an external system via a service user (Connector), follow these key setup rules: |
||
The Administrator on the Trados Side must set up |
The Administrator on the Trados Side must set up |
||
* a Service User: under the ''Users > Service Users'' tab |
* a Service User: under the ''Users > Service Users'' tab |
||
| + | * an Application |
||
| − | * an Application: Navigate from the account drop down in the upper right corner to 'Integration', then Application |
||
| + | * A specific Workflow for the Lingoport integration |
||
| − | ** for the Webhook, use the CommandCenter URL and a Command Center API User/token in this fashion: |
||
| + | |||
| − | ** https://<URL>/command-center/callback/tradoscallback?apiusername=<API_USER>&apitoken=<TOKEN> |
||
| + | ====Service User and Folder Scope ==== |
||
| + | *The service user should be created in the specific customer folder where automation is needed. |
||
| + | * The webhook behaviour is scoped by both the service user’s '''folder location''' and '''permission set''': |
||
| + | **If the service service user is created at the '''root''' of the tenant and given an admin role, it will receive '''all''' webhooks for '''all projects''' in the tenant. |
||
| + | **If the service user is created in '''Customer Folder X''' and granted a scoped role (e.g. Customer Requestor), it will only receive webhooks for '''projects created in that location'''. |
||
| + | |||
| + | ''Recommendation'': For safety and clarity, always place the service user and its permission set at the '''exact folder level''' needed. This prevents overloading the external system (e.g. Lingoport) with irrelevant webhook calls. |
||
| + | |||
| + | ==== Application ==== |
||
| + | |||
| + | |||
| + | To create an Application, navigate from the '''account drop down''' in the upper right corner to <code>Integration</code>, then Application |
||
| + | |||
| + | [[File:TradosEnterpriseApplicationConfiguration.jpg|center|600px]] |
||
| + | |||
| + | |||
| + | For the Webhook, use the CommandCenter URL and a Command Center API User/token in this fashion: |
||
| + | * https://<URL>/command-center/callback/tradoscallback?apiusername=<API_USER>&apitoken=<TOKEN> |
||
| + | |||
| + | Configure it to trigger on <code>PROJECT.TASK.CREATED</code> and <code>PROJECT.TASK.UPDATED</code>. |
||
| + | |||
| + | ''Note:'' A request is already in place with the Trados API team to introduce more granular webhook events, such as <code>PROJECT.TASK.CREATED.FILEDDELIVERY</code>. Until this is supported, filtering must be handled through folder and permission setup. |
||
| − | Gather the following information: |
+ | '''Gather the following information:''' |
* Client ID: see the Integration Application > API Access |
* Client ID: see the Integration Application > API Access |
||
* Client Secret: see the Integration Application > API Access |
* Client Secret: see the Integration Application > API Access |
||
| Line 18: | Line 45: | ||
These may need to be gathered by a Trados Administrator, who is likely not a Command Center administrator. |
These may need to be gathered by a Trados Administrator, who is likely not a Command Center administrator. |
||
| − | === Workflow Configuration === |
+ | ==== Workflow Configuration ==== |
| − | + | The correct configuration for the integration to be able to communicate the requests '''requires''' to: |
|
| + | * Enable '''Final Check''' stage in the workflow, and have a user/group assigned (user will need to '''manually''' action/complete this task) |
||
| + | * Enable '''File Delivery''' stage |
||
| + | * Enable '''Hold for Feedback''' stage in the workflow, assign this stage to a Group that contains the connector '''service user''' |
||
| + | * Ensure the Hold for Feedback stage retains its default outcome: "Send to Final Check". This stage will be handled by Localyzer and must not be completed by a user. |
||
| + | Localyzer expects the Trados Webhook (set up in the Application section above) to push a PROJECT.TASK.CREATED or a PROJECT.TASK.UPDATED event with the following key: |
||
| − | * Enable Final Check stage in the workflow, and have a user/group assigned (user will need to manually action/complete this task |
||
| + | * "key": "file-delivery" |
||
| − | * Enable File Delivery stage |
||
| − | * Enable Hold for Feedback stage in the workflow, assign this stage to a Group that contains the connector service user |
||
| − | * Ensure the Hold for Feedback stage retains its default outcome: "Send to Final Check" |
||
| + | '''Each event must be sent separately''' for the protocol between Trados Cloud and Localyzer to work correctly. Make sure events sent back via the Webhook are not 'batched'. If they are, Localyzer will not handle them. See the 'Batch' checkbox in the Webhook configuration. |
||
| − | Localyzer expects the Trados Webhook (set up in the Application section above) to push aPROJECT.TASK.CREATED event with the following key: |
||
| − | * "key": "final-check" |
||
| − | For those files that are moved back into the workflow for Final Check stage (either because of import errors or a re-import), then the ' |
+ | For those files that are moved back into the workflow for Final Check stage (either because of import errors or a re-import), then the 'file-delivery' task will be created again triggering the PROJECT.TASK.CREATED or PROJECT.TASK.UPDATED event. |
| + | |||
| + | |||
| + | |||
| + | ====Example Workflow Task Table ==== |
||
| + | |||
| + | This table illustrates a typical workflow setup using the Connector service user. Excluded tasks are shown in ''italics'' for clarity. |
||
| + | |||
| + | |||
| + | {| class="wikitable" |
||
| + | ! Stage |
||
| + | ! Task Name |
||
| + | ! Included |
||
| + | ! Task Type |
||
| + | ! Setup Required |
||
| + | |- |
||
| + | | '''Preprocessing''' |
||
| + | | '''File Type Detection''' |
||
| + | | '''Yes''' |
||
| + | | '''Automated''' |
||
| + | | '''No special configuration required''' |
||
| + | |- |
||
| + | | |
||
| + | | '''Engineering''' |
||
| + | | '''Yes''' |
||
| + | | '''Human''' |
||
| + | | '''Assign to engineer manually''' |
||
| + | |- |
||
| + | | |
||
| + | | '''File Format Conversion''' |
||
| + | | '''Yes''' |
||
| + | | '''Automated''' |
||
| + | | '''Confirm input/output compatibility''' |
||
| + | |- |
||
| + | | |
||
| + | | '''Copy Source to Target''' |
||
| + | | '''Yes''' |
||
| + | | '''Automated''' |
||
| + | | '''Review copy behaviour logic''' |
||
| + | |- |
||
| + | | |
||
| + | | ''PerfectMatch'' |
||
| + | | ''No'' |
||
| + | | ''Automated'' |
||
| + | | ''None'' |
||
| + | |- |
||
| + | | |
||
| + | | ''Translation Memory Matching'' |
||
| + | | ''No'' |
||
| + | | ''Automated'' |
||
| + | | ''None'' |
||
| + | |- |
||
| + | | |
||
| + | | '''Machine Translation''' |
||
| + | | '''Yes''' |
||
| + | | '''Automated''' |
||
| + | | '''Configure MT engine''' |
||
| + | |- |
||
| + | | |
||
| + | | ''Bilingual Engineering'' |
||
| + | | ''No'' |
||
| + | | ''Human'' |
||
| + | | ''None'' |
||
| + | |- |
||
| + | | |
||
| + | | ''Generate Offline Package Resources'' |
||
| + | | ''No'' |
||
| + | | ''Automated'' |
||
| + | | ''None'' |
||
| + | |- |
||
| + | | |
||
| + | | '''Analysis''' |
||
| + | | '''Yes''' |
||
| + | | '''Automated''' |
||
| + | | '''Define templates/output''' |
||
| + | |- |
||
| + | | |
||
| + | | ''Customer Quote Generation'' |
||
| + | | ''No'' |
||
| + | | ''Automated'' |
||
| + | | ''None'' |
||
| + | |- |
||
| + | | '''Quoting''' |
||
| + | | ''Customer Quote Review'' |
||
| + | | ''No'' |
||
| + | | ''Human'' |
||
| + | | ''None'' |
||
| + | |- |
||
| + | | |
||
| + | | ''Customer Quote Approval'' |
||
| + | | ''No'' |
||
| + | | ''Human'' |
||
| + | | ''None'' |
||
| + | |- |
||
| + | | '''Preparation''' |
||
| + | | ''Project Planning'' |
||
| + | | ''No'' |
||
| + | | ''Human'' |
||
| + | | ''None'' |
||
| + | |- |
||
| + | | '''Translation''' |
||
| + | | '''Translation''' |
||
| + | | '''Yes''' |
||
| + | | '''Human''' |
||
| + | | '''Assign to translator''' |
||
| + | |- |
||
| + | | |
||
| + | | ''Translation Automated QA Check'' |
||
| + | | ''No'' |
||
| + | | ''Automated'' |
||
| + | | ''None'' |
||
| + | |- |
||
| + | | '''Linguistic Review''' |
||
| + | | ''Linguistic Review'' |
||
| + | | ''No'' |
||
| + | | ''Human'' |
||
| + | | ''None'' |
||
| + | |- |
||
| + | | |
||
| + | | ''Linguistic Review Automated QA Check'' |
||
| + | | ''No'' |
||
| + | | ''Automated'' |
||
| + | | ''None'' |
||
| + | |- |
||
| + | | '''Customer Review''' |
||
| + | | ''Remove Tracked Changes and Comments'' |
||
| + | | ''No'' |
||
| + | | ''Automated'' |
||
| + | | ''None'' |
||
| + | |- |
||
| + | | |
||
| + | | ''Customer Review'' |
||
| + | | ''No'' |
||
| + | | ''Human'' |
||
| + | | ''None'' |
||
| + | |- |
||
| + | | |
||
| + | | ''Implement Customer Review'' |
||
| + | | ''No'' |
||
| + | | ''Human'' |
||
| + | | ''None'' |
||
| + | |- |
||
| + | | '''Finalization''' |
||
| + | | ''Translation Memory Update'' |
||
| + | | ''No'' |
||
| + | | ''Automated'' |
||
| + | | ''None'' |
||
| + | |- |
||
| + | | |
||
| + | | '''Target File Generation''' |
||
| + | | '''Yes''' |
||
| + | | '''Automated''' |
||
| + | | '''Confirm output file type/structure''' |
||
| + | |- |
||
| + | | |
||
| + | | '''Final Check''' |
||
| + | | '''Yes''' |
||
| + | | '''Human''' |
||
| + | | '''Assign to user/group; manual completion required''' |
||
| + | |- |
||
| + | | |
||
| + | | '''File Delivery''' |
||
| + | | '''Yes''' |
||
| + | | '''Automated''' |
||
| + | | '''Output path or trigger confirmation''' |
||
| + | |- |
||
| + | | |
||
| + | | '''Hold for Feedback''' |
||
| + | | '''Yes''' |
||
| + | | '''Human''' |
||
| + | | '''Assign to group that contains the connector service user''' |
||
| + | |- |
||
| + | | '''Error''' |
||
| + | | '''Error''' |
||
| + | | '''Yes''' |
||
| + | | '''Human''' |
||
| + | | '''Assign handler or escalation owner''' |
||
| + | |} |
||
=== Special Handling === |
=== Special Handling === |
||
| − | ==== |
+ | ==== Comments ==== |
| − | In general, to see the comments and the context in Trados Online Editor, please: |
||
| + | 1. Comments should not be translated. Some comments are specific to Localyzer, such as the top comments in a file. To prevent comments from being translated, navigate to Resources > File Type Configuration and the Configuration used by the template. Click on the file type of interest. In the example below, we use Java Resources, i.e. properties. Make sure the 'Translate Comments' checkbox is unchecked: |
||
| − | * <span style="color:#009999">QUESTION TO RWS: FILTERS / COMMENTS : HOW DO THEY SHOW IN ONLINE EDITOR / HOW TO CONFIGURE THEM</span> |
||
| + | [[File:TradosTeamDoNotTranslateComments.jpg|center|600px]] |
||
| + | |||
| + | |||
| + | 2. View Comments in the right hand side |
||
| + | In general, to see the comments and the context in Trados Online Editor, click on the Show Document Structure Outline button on the right hand side: |
||
| + | |||
| + | [[File:TradosTeamViewComments.jpg|center|600px]] |
||
| + | |||
| + | |||
| + | 3. ''By default'', the raw file can be shown in the Preview window. This feature can be useful to check the comments and file structure directly in the Editor view. |
||
| + | |||
| + | [[File:TradosTeamShowFullFile.jpg|center|600px]] |
||
| + | |||
| + | The Preview window can also be configured to show a ''context'' captured on the Localyzer side. In that case, the Preview will show the screen where the string to be translated was captured. |
||
| + | * '''Note''': ''This feature is undergoing revision at the moment. The 3.1 release will have the updated version.'' |
||
| + | |||
| + | ==== Parameters ==== |
||
| + | |||
| + | Nake sure that parameters are not translated on the resources. The filtering for parameters can vary for different projects. The template should use the appropriate file type. As for Comments above, the Resources > File type configuration may need to be configured. |
||
| + | |||
| + | [[File:TradosTeamParameterMishandling.jpg|center|600px]] |
||
| + | |||
| + | In the example above, a minor change is made to the {userName} parameter: it does not keep the casing and changes it to {username}. This change is an error. The file type needs to identify {someparametername} and preserve it exactly. |
||
==== JSON Files ==== |
==== JSON Files ==== |
||
Localyzer sends JSON files with comments: comments are indicated by key/value pairs where keys start with _ (underscore). |
Localyzer sends JSON files with comments: comments are indicated by key/value pairs where keys start with _ (underscore). |
||
| − | If JSON files those types of comments cannot be parsed, Localyzer can send instead .properties files with # comments |
+ | If JSON files those types of comments cannot be parsed, Localyzer can send instead .properties files with # comments, as shown in the project above. |
| + | |||
| + | === Note on Online Editor === |
||
| + | |||
| + | Localyzer will create a new project in the Trados Cloud product. The files to be translated into a target locale may need to be assigned to a linguist. |
||
| + | |||
| + | The linguist should be able to open the file in Online Editor, and <code>Accept</code> to translate, translate/verify the MT/AI translation, and 'Complete' the task. For each file, that will send a Webhook call with a <code>file-delivery</code> event. See below the Webhook section. |
||
| + | |||
| + | == InContext and RWS == |
||
| + | |||
| + | When sending files as [[PXML]], leverage the following for translation with context: |
||
| + | |||
| + | === Localyzer Connect - File type Settings On Line Editor === |
||
| + | |||
| + | The PXML file type settings & documentation: |
||
| + | * https://appstore.rws.com/Plugin/363 |
||
| + | * https://appstore.rws.com/Plugin/363?tab=documentation |
||
| + | |||
| + | === Localyzer Connect for Trados Studio === |
||
| + | The Trados Studio plugin documentation and plugin: |
||
| − | * <span style="color:#009999">QUESTION TO RWS: FILTERS / COMMENTS : HOW DO THEY SHOW IN ONLINE EDITOR / HOW TO CONFIGURE THEM</span> |
||
| + | * https://appstore.rws.com/Plugin/359?tab=documentation |
||
| + | * https://appstore.rws.com/Plugin/359 |
||
== On the Command Center side== |
== On the Command Center side== |
||
| Line 56: | Line 303: | ||
| − | + | === Information from the '''Trados Side''' === |
|
| + | * API User: This user must be first created on the Command Center side |
||
| + | |||
| + | * Client ID: Provide by the Trados Administrator (See above) |
||
| + | * Secret Key: Provide by the Trados Administrator (See above) |
||
| + | * Tenant ID: Provide by the Trados Administrator (See above) |
||
| + | |||
| + | * Template ID: Provide by the Trados Administrator (See above) (for the next step) |
||
[[File:TradosEnterpriseTMSConfiguration2.jpg|center|600 px]] |
[[File:TradosEnterpriseTMSConfiguration2.jpg|center|600 px]] |
||
| + | |||
| + | === Template === |
||
| + | Enter which '''template''' to use: |
||
| + | |||
| + | * Template ID: Provide by the Trados Administrator (See above) |
||
| + | |||
| + | * Non supported file type: JSON is supported by Trados products. However, you may want to send JSON files are properties depending on the configuration of the filters on the Trados side |
||
| + | * Import Schedule: enter how often to check for imports. For instance, to check every 2 hours, enter 2. Left blank, checking for imports will be done only manually from a project's Localyzer page or from the TMS Configuration |
||
| + | * Callback URL: This is for information only, and to make sure that the configuration set up by the Trados Administrator does match (see above) |
||
| + | |||
[[File:TradosEnterpriseTMSConfiguration3.jpg|center|600 px]] |
[[File:TradosEnterpriseTMSConfiguration3.jpg|center|600 px]] |
||
| + | |||
| + | === Context Server === |
||
| + | Enter which '''Context Server''' to use. |
||
| + | This step only matters if you are using InContext |
||
| + | See: [[About InContext Translation]] |
||
| + | |||
| + | [[File:TradosEnterpriseTMSConfiguration4.jpg|center|600 px]] |
||
| + | |||
| + | === Locales and Locale Codes=== |
||
| + | By default, the list of locales are those supported by Trados at large. |
||
| + | Some templates only allow certain locales, so you may want to match the template locales and the locales of this configuration. This is not necessary. If a Localyzer project locale is not part of the Trados Template locales, Localyzer will show an error. |
||
| + | |||
| + | [[File:TradosEnterpriseTMSConfiguration5.jpg|center|600 px]] |
||
| + | |||
| + | ===Name your connection=== |
||
| + | |||
| + | [[File:TradosEnterpriseTMSConfiguration6.jpg|center|600 px]] |
||
| + | |||
| + | Save your configuration. This configuration can now be used for Localyzer projects. |
||
| + | |||
| + | ===Webhook check=== |
||
| + | In the System Log, files can be downloaded only when the Webhook calls into Localyzer with a file-delivery event. Once a translation has been completed in the Trados Online Editor, the log should show: |
||
| + | |||
| + | |||
| + | Payload: {"eventId":"677d44c8f89ce7776300fed3","accountId":"6759daa43fc4433cadd2211c","data":{"taskType": {"automatic":false,"id":"676096321d5fb27e3bc8f07e",'''"key":"file-delivery"'''},"project":{"id":"677d4426a764526e3797d090"},"assignees":[{"type":"user","user":{"id":"6759daaf1d6799656c114924"},"vendorOrderTemplate":null,"group":null}],"location":{"id":"b7847b146c2148b988eac9a8db87fec1"},"id":"677d44c8378bc2451a6dbf96","dueBy":"2025-01-09T15:11:32.379Z","status":"created"},"eventType":"PROJECT.TASK.UPDATED","version":"1.0","timestamp":"2025-01-07T15:14:16.645765051Z"} |
||
| + | |||
| + | Getting events like the above means that Localyzer is download the associated file and if all the files for a target locale are translated and downloaded, the import process can proceed. |
||
Latest revision as of 15:43, 27 January 2026
On the Trados Cloud side
The Trados Cloud configuration requires a Trados Administrator.
On Trados Enterprise, Trados Accelerate, and Trados Team, depending on your integration, an integration application must be set up for Localyzer to connect.
Integration Application
To ensure a seamless integration between Trados and an external system via a service user (Connector), follow these key setup rules:
The Administrator on the Trados Side must set up
- a Service User: under the Users > Service Users tab
- an Application
- A specific Workflow for the Lingoport integration
Service User and Folder Scope
- The service user should be created in the specific customer folder where automation is needed.
- The webhook behaviour is scoped by both the service user’s folder location and permission set:
- If the service service user is created at the root of the tenant and given an admin role, it will receive all webhooks for all projects in the tenant.
- If the service user is created in Customer Folder X and granted a scoped role (e.g. Customer Requestor), it will only receive webhooks for projects created in that location.
Recommendation: For safety and clarity, always place the service user and its permission set at the exact folder level needed. This prevents overloading the external system (e.g. Lingoport) with irrelevant webhook calls.
Application
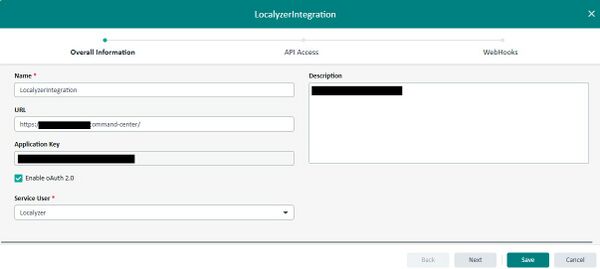
To create an Application, navigate from the account drop down in the upper right corner to Integration, then Application
For the Webhook, use the CommandCenter URL and a Command Center API User/token in this fashion:
- https://<URL>/command-center/callback/tradoscallback?apiusername=<API_USER>&apitoken=<TOKEN>
Configure it to trigger on PROJECT.TASK.CREATED and PROJECT.TASK.UPDATED.
Note: A request is already in place with the Trados API team to introduce more granular webhook events, such as PROJECT.TASK.CREATED.FILEDDELIVERY. Until this is supported, filtering must be handled through folder and permission setup.
Gather the following information:
- Client ID: see the Integration Application > API Access
- Client Secret: see the Integration Application > API Access
- Tenant ID: Navigate to Manage Account from the Account drop down, use Trados Account ID
- Template ID: See the last 24 numbers of the URL when clicking on the template name in Trados Enterprise/Accelerate/Team, in Resources/Project Templates.
These may need to be gathered by a Trados Administrator, who is likely not a Command Center administrator.
Workflow Configuration
The correct configuration for the integration to be able to communicate the requests requires to:
- Enable Final Check stage in the workflow, and have a user/group assigned (user will need to manually action/complete this task)
- Enable File Delivery stage
- Enable Hold for Feedback stage in the workflow, assign this stage to a Group that contains the connector service user
- Ensure the Hold for Feedback stage retains its default outcome: "Send to Final Check". This stage will be handled by Localyzer and must not be completed by a user.
Localyzer expects the Trados Webhook (set up in the Application section above) to push a PROJECT.TASK.CREATED or a PROJECT.TASK.UPDATED event with the following key:
- "key": "file-delivery"
Each event must be sent separately for the protocol between Trados Cloud and Localyzer to work correctly. Make sure events sent back via the Webhook are not 'batched'. If they are, Localyzer will not handle them. See the 'Batch' checkbox in the Webhook configuration.
For those files that are moved back into the workflow for Final Check stage (either because of import errors or a re-import), then the 'file-delivery' task will be created again triggering the PROJECT.TASK.CREATED or PROJECT.TASK.UPDATED event.
Example Workflow Task Table
This table illustrates a typical workflow setup using the Connector service user. Excluded tasks are shown in italics for clarity.
| Stage | Task Name | Included | Task Type | Setup Required |
|---|---|---|---|---|
| Preprocessing | File Type Detection | Yes | Automated | No special configuration required |
| Engineering | Yes | Human | Assign to engineer manually | |
| File Format Conversion | Yes | Automated | Confirm input/output compatibility | |
| Copy Source to Target | Yes | Automated | Review copy behaviour logic | |
| PerfectMatch | No | Automated | None | |
| Translation Memory Matching | No | Automated | None | |
| Machine Translation | Yes | Automated | Configure MT engine | |
| Bilingual Engineering | No | Human | None | |
| Generate Offline Package Resources | No | Automated | None | |
| Analysis | Yes | Automated | Define templates/output | |
| Customer Quote Generation | No | Automated | None | |
| Quoting | Customer Quote Review | No | Human | None |
| Customer Quote Approval | No | Human | None | |
| Preparation | Project Planning | No | Human | None |
| Translation | Translation | Yes | Human | Assign to translator |
| Translation Automated QA Check | No | Automated | None | |
| Linguistic Review | Linguistic Review | No | Human | None |
| Linguistic Review Automated QA Check | No | Automated | None | |
| Customer Review | Remove Tracked Changes and Comments | No | Automated | None |
| Customer Review | No | Human | None | |
| Implement Customer Review | No | Human | None | |
| Finalization | Translation Memory Update | No | Automated | None |
| Target File Generation | Yes | Automated | Confirm output file type/structure | |
| Final Check | Yes | Human | Assign to user/group; manual completion required | |
| File Delivery | Yes | Automated | Output path or trigger confirmation | |
| Hold for Feedback | Yes | Human | Assign to group that contains the connector service user | |
| Error | Error | Yes | Human | Assign handler or escalation owner |
Special Handling
Comments
1. Comments should not be translated. Some comments are specific to Localyzer, such as the top comments in a file. To prevent comments from being translated, navigate to Resources > File Type Configuration and the Configuration used by the template. Click on the file type of interest. In the example below, we use Java Resources, i.e. properties. Make sure the 'Translate Comments' checkbox is unchecked:
2. View Comments in the right hand side
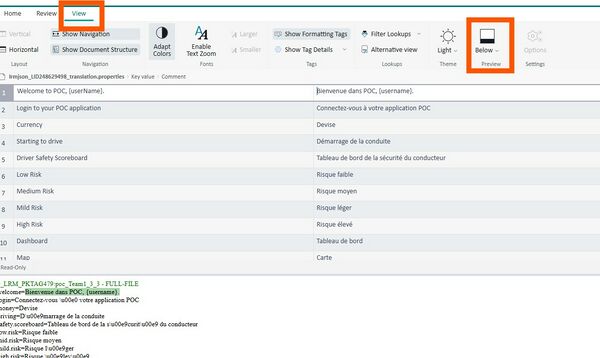
In general, to see the comments and the context in Trados Online Editor, click on the Show Document Structure Outline button on the right hand side:
3. By default, the raw file can be shown in the Preview window. This feature can be useful to check the comments and file structure directly in the Editor view.
The Preview window can also be configured to show a context captured on the Localyzer side. In that case, the Preview will show the screen where the string to be translated was captured.
- Note: This feature is undergoing revision at the moment. The 3.1 release will have the updated version.
Parameters
Nake sure that parameters are not translated on the resources. The filtering for parameters can vary for different projects. The template should use the appropriate file type. As for Comments above, the Resources > File type configuration may need to be configured.
In the example above, a minor change is made to the {userName} parameter: it does not keep the casing and changes it to {username}. This change is an error. The file type needs to identify {someparametername} and preserve it exactly.
JSON Files
Localyzer sends JSON files with comments: comments are indicated by key/value pairs where keys start with _ (underscore).
If JSON files those types of comments cannot be parsed, Localyzer can send instead .properties files with # comments, as shown in the project above.
Note on Online Editor
Localyzer will create a new project in the Trados Cloud product. The files to be translated into a target locale may need to be assigned to a linguist.
The linguist should be able to open the file in Online Editor, and Accept to translate, translate/verify the MT/AI translation, and 'Complete' the task. For each file, that will send a Webhook call with a file-delivery event. See below the Webhook section.
InContext and RWS
When sending files as PXML, leverage the following for translation with context:
Localyzer Connect - File type Settings On Line Editor
The PXML file type settings & documentation:
Localyzer Connect for Trados Studio
The Trados Studio plugin documentation and plugin:
On the Command Center side
Once the above is set,
- navigate to General Settings,
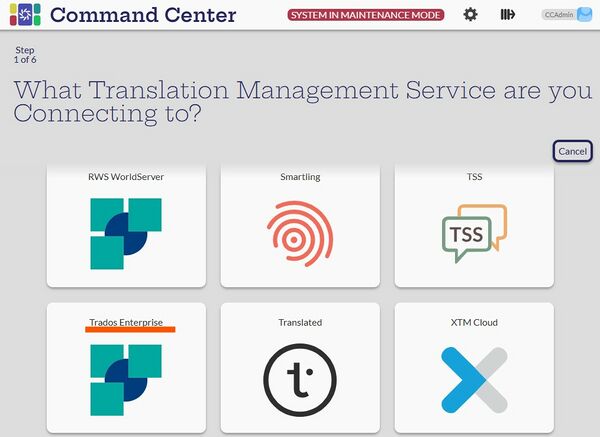
- put the system in Maintenance Mode,
- Click on to the Translation Management Systems and Machine Translation tile
- Select the Trados tile of choice
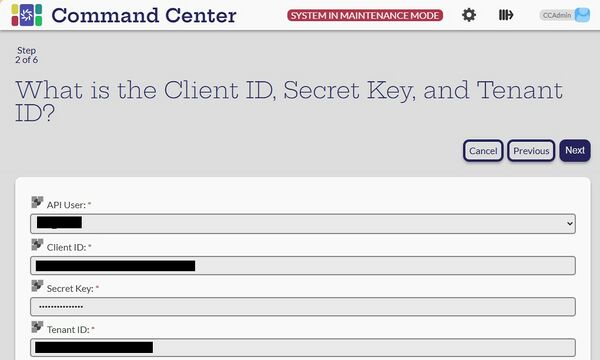
Information from the Trados Side
- API User: This user must be first created on the Command Center side
- Client ID: Provide by the Trados Administrator (See above)
- Secret Key: Provide by the Trados Administrator (See above)
- Tenant ID: Provide by the Trados Administrator (See above)
- Template ID: Provide by the Trados Administrator (See above) (for the next step)
Template
Enter which template to use:
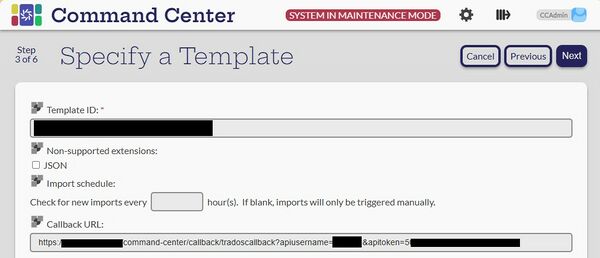
- Template ID: Provide by the Trados Administrator (See above)
- Non supported file type: JSON is supported by Trados products. However, you may want to send JSON files are properties depending on the configuration of the filters on the Trados side
- Import Schedule: enter how often to check for imports. For instance, to check every 2 hours, enter 2. Left blank, checking for imports will be done only manually from a project's Localyzer page or from the TMS Configuration
- Callback URL: This is for information only, and to make sure that the configuration set up by the Trados Administrator does match (see above)
Context Server
Enter which Context Server to use. This step only matters if you are using InContext See: About InContext Translation
Locales and Locale Codes
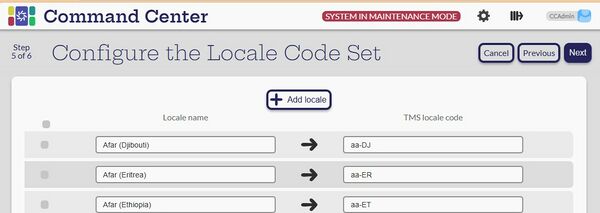
By default, the list of locales are those supported by Trados at large. Some templates only allow certain locales, so you may want to match the template locales and the locales of this configuration. This is not necessary. If a Localyzer project locale is not part of the Trados Template locales, Localyzer will show an error.
Name your connection
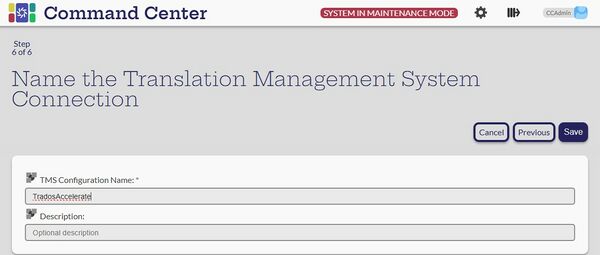
Save your configuration. This configuration can now be used for Localyzer projects.
Webhook check
In the System Log, files can be downloaded only when the Webhook calls into Localyzer with a file-delivery event. Once a translation has been completed in the Trados Online Editor, the log should show:
Payload: {"eventId":"677d44c8f89ce7776300fed3","accountId":"6759daa43fc4433cadd2211c","data":{"taskType": {"automatic":false,"id":"676096321d5fb27e3bc8f07e","key":"file-delivery"},"project":{"id":"677d4426a764526e3797d090"},"assignees":[{"type":"user","user":{"id":"6759daaf1d6799656c114924"},"vendorOrderTemplate":null,"group":null}],"location":{"id":"b7847b146c2148b988eac9a8db87fec1"},"id":"677d44c8378bc2451a6dbf96","dueBy":"2025-01-09T15:11:32.379Z","status":"created"},"eventType":"PROJECT.TASK.UPDATED","version":"1.0","timestamp":"2025-01-07T15:14:16.645765051Z"}
Getting events like the above means that Localyzer is download the associated file and if all the files for a target locale are translated and downloaded, the import process can proceed.
