Set Up Jenkins Lingobot User
The first step in the configuration process is to create a Jenkins user which LingoBot can have access to. This is the primary mechanism that LingoBot uses to access the Lingoport product suite, so it is very important that the configuration is done correctly. Please follow these instructions closely for the best results!
Create the Lingobot Jenkins user
- Navigate to your Lingoport Jenkins instance in a web browser.
- If an admin account has been configured, log in as the admin (otherwise no login is necessary) and click on the "Manage Jenkins" menu item on the left hand side of the window. (indicated by a small gear icon).
- If you don't see this menu item, this means the current account does not have administrative privileges.
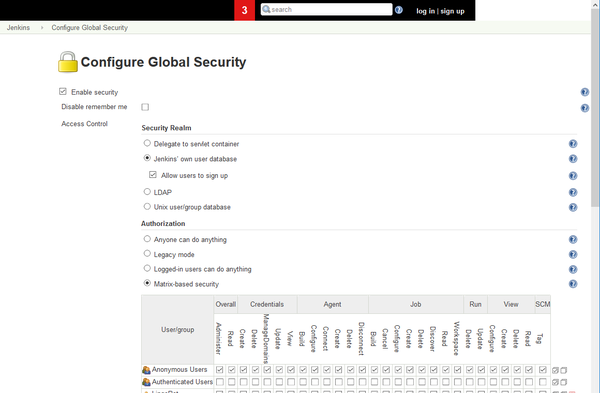
- Click on "Configure Global Security", and on this page make sure that the following boxes are checked:
- Enable security
- Jenkins' own user database
- One of the authorization methods (preferably "Matrix-based security").
- IMPORTANT: If Matrix-based security is selected and no users have been configured yet, make sure that "Anonymous" has full privileges (all boxes next to Anonymous MUST be checked).
- Once this is done, click "Save" and return to the previous "Manage Jenkins" page.
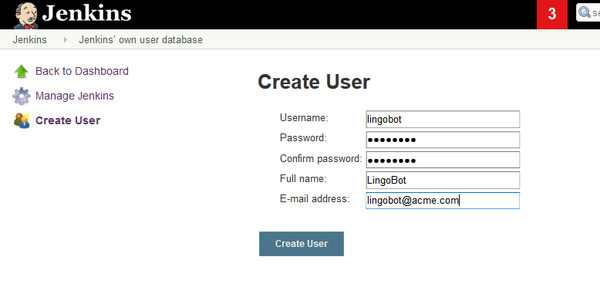
- Scroll down and click on "Manage Users", and on this page, select "Create User" from the left hand menu and fill out the form with the following information:
- Username: "lingobot"
- Password: Choose a secure password.
- Confirm Password: Repeat your previous entry
- Full Name: "LingoBot"
- Email: "lingobot@lingoport.com"
- Click "Create User"
Configure the security for the Lingobot user
- Return once again to the "Configure Global Security" page (Manage Jenkins > Configure Global Security) and scroll down to the "Authorization" section.
- In the "User/group to add" field under Matrix-based security, enter "lingobot" and click add. This should result in lingobot being added as a row in the security matrix above.
- Enable the following security permissions for the lingobot account:
- Under "Overall"
- Administer
- Read
- Under "Job"
- Build
- Cancel
- Configure
- Create
- Delete
- Read
- Workspace
- Under "View"
- Configure
- Read
- Under "Overall"
- Once those boxes are checked, click "Save" and log out if you were previously logged in.
Get the Lingobot Jenkins Token
- Log in as the newly created "lingobot" account using the password you just created.
- Once logged in, in the top-right hand corner of the window, click on the account name (LingoBot)
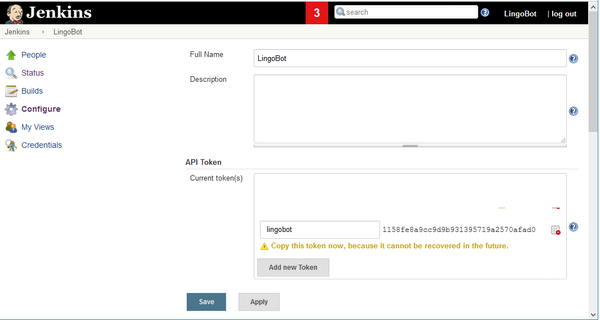
- Select "Configure" from the menu on the left (or from the dropdown menu below the account-name button)
- On this page there should be a section called "API Token" and a corresponding button labeled "Show API Token..." or Add new Token. Click this button. If adding a new token, it can be named anything, it is just a label.
- Copy the API Token that is displayed and paste it into the LingoBot configuration file (/var/lib/jenkins/lingoport/lingobot-<x.y>/config/lingobot_config.sh) next to the LINGOBOT_JENKINS_TOKEN variable declaration.
Example:
 export LINGOBOT_JENKINS_USERNAME=lingobot
 export LINGOBOT_JENKINS_TOKEN=1234567890abcdef14d4f2789bea4f22a
 export LINGOBOT_JENKINS_DOMAIN=http://acme.company.com/jenkins
You're done with this part! Just make sure that the LINGOBOT_JENKINS_USERNAME is set correctly to the username you chose when creating LingoBot's Jenkins account (by default it is set to "lingobot")


