Google Translate
Contents
Localyzer integration with the Google Cloud Platform Translation Service
How the process works
For information on Machine Translation and how the process works see Localyzer Integration with Machine Translation.
Supported Localyzer File Types
Not all file types are supported for machine translation. For a list of supported types see Supported File Types.
Setting up your Localyzer group or project to use Google Translate
To set up the ability to machine translate your resource files using Google Translate you’ll need to have access to the Lingoport Jenkins Server. The vendor setup is located in the Jenkins System Configuration.
Jenkins -> Manage Jenkins -> Configure System
Add Google Translate Vendor
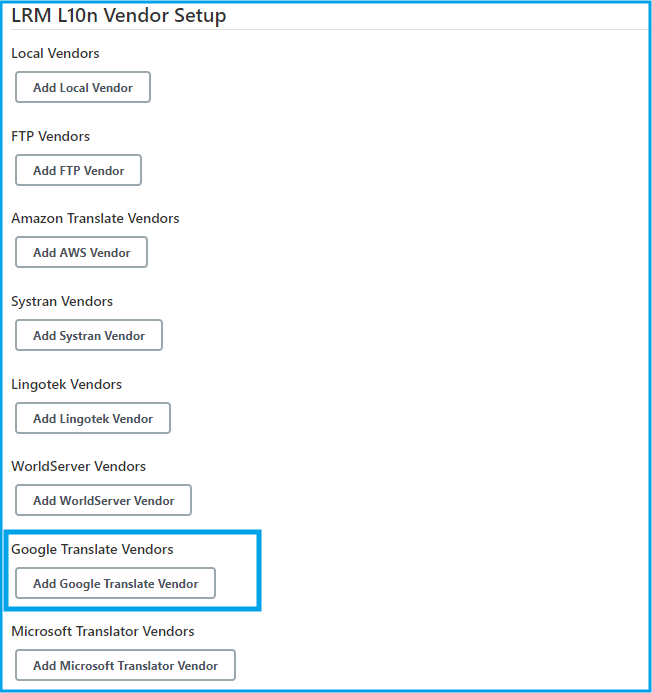
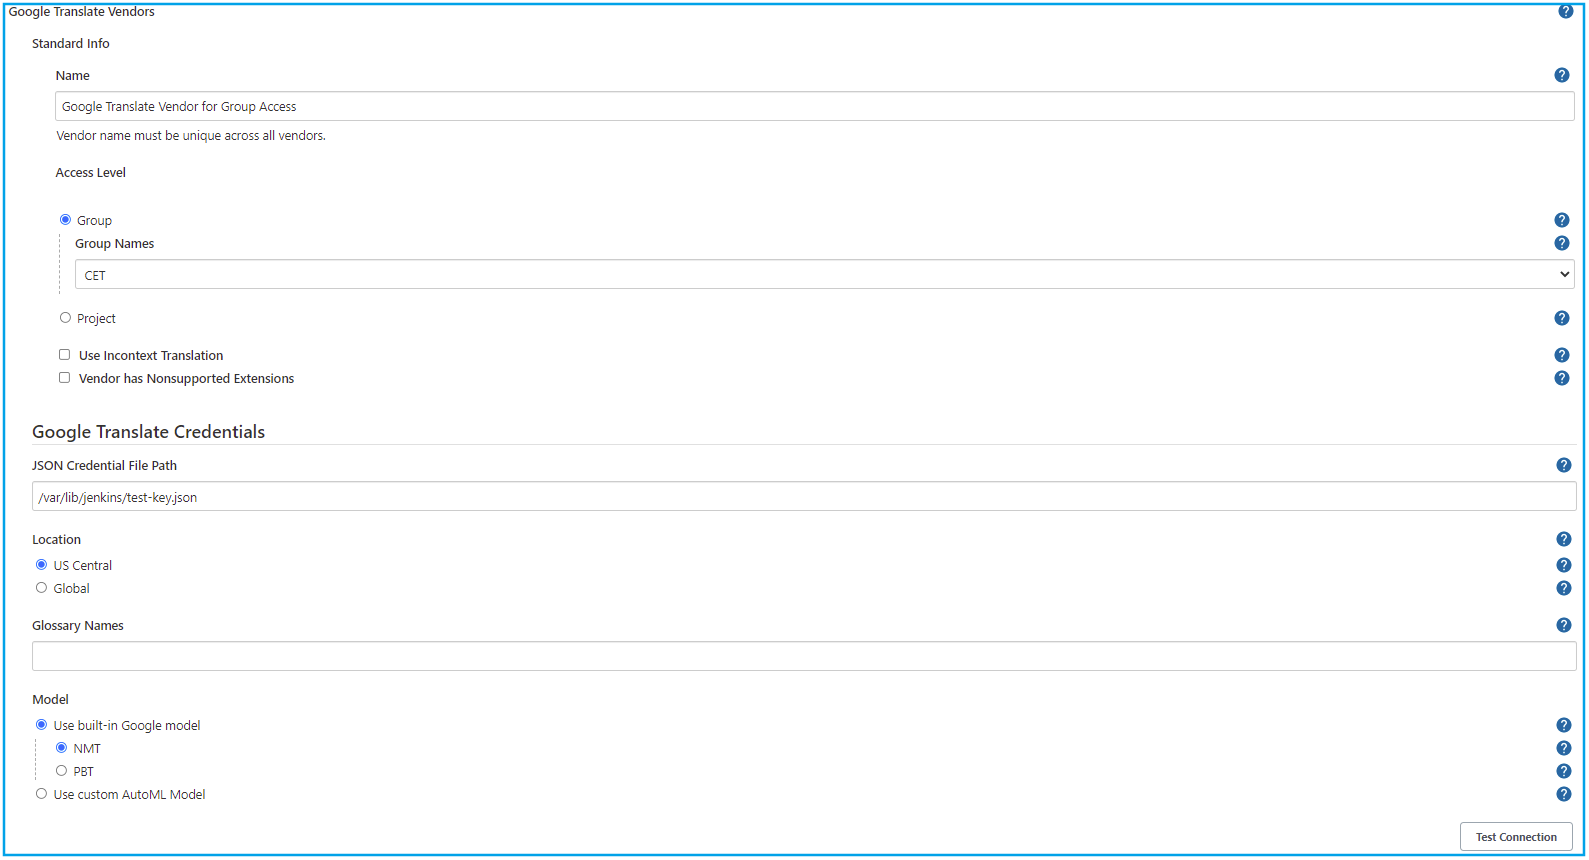
The Add Google Translate Vendor button can be found under the LRM L10n Vendor Setup section of the Jenkins Configure System page. After clicking on Add Google Translate Vendor, the Standard Info as well as the Google Translate Credentials field groups will be displayed.
Standard Info
This is the information that is standard to all vendor types.
For more information on setting up the standard vendor info see Standard Vendor Info.
Google Translate Credentials
All of the Google Translate credential information should be available through the department responsible for setting up your Google Cloud Platform service.
JSON Credential File Path
Services from a Google Cloud Platform Project, such as the Google Translate service, can be accessed securely using a Service Account Key. These keys come in the form of a single credential file in JSON format. The department responsible for setting up the Google Cloud Platform service can manage these service account keys from their Google Cloud Console. From the home page, use the side menu to navigate to
IAM & Admin -> Service Accounts`
or go to https://console.cloud.google.com/iam-admin/serviceaccounts and select the Google Cloud project to manage service accounts for.
Localyzer requires a service account with at least Cloud Translation API Admin and Storage Admin roles (note: the Owner role is the easiest to select in this scenario as it has permission for every Google Cloud operation, including those provided by the two other roles).
If an appropriate service account has already been created for the Google Cloud project, clicking on the name of that service account, and then navigating to the Keys menu of that service account will provide a web interface to delete old or lost keys, or to create new keys associated with that service account and download the JSON credential file associated with that key.
In order for Localyzer to use Google Translate, the JSON credential file must be downloaded placed on the same system as the Lingoport Jenkins Server (typically in a location like /var/lib/jenkins/… because the jenkins user needs access to the file), and that location needs to be specified to Localyzer in this vendor setup process.
Location
Google Cloud Platform requires Localyzer to let it know the translation requests are coming from one of two locations: US Central, or Global.
Currently, Google requires the US Central location in order to use the advanced translation features such as glossaries or AutoML models. It is for this reason that the Global location should only ever be selected if those advanced features are not required at all, the Jenkins server is outside of the US, and you require lower latency calls to Google Translate than the US Central location can offer.
Glossary Names
Glossaries are an optional feature of the Google Cloud Platform Translation service that allows for phrases to have guaranteed translations, regardless of the phrase’s context or the translation algorithm’s decision. This is useful for preserving brand names, product names, and other translation memory.
Glossaries are identified by their names given to them upon creation. Google unfortunately does not provide any user interface for the department responsible for configuring the Google Cloud project to manage glossaries, though there are still ways to do it.
When configuring a Google Translate Vendor, multiple glossary names can be entered, separated by commas. Then when Localyzer uses Google Translate to translate your resources, the first glossary in the list that is compatible with the current source and target locales will be used.
Currently, Google only supports the glossary feature with the US Central location.
Model
The model that is chosen determines the translation algorithm that is used. The Google Cloud Platform Translation service comes with two built in models that don’t require any configuration and work across all locales.
The first model, NMT or Neural Machine Translation, is the default model for Google Translate. This is the preferred of the two built in models, it is newer and yields better results, though there might still be some rare edge cases where it still doesn’t work yet. In this scenario, the Google Cloud Platform Translation service will automatically fall back to the second built in model, PBMT or Phrase Based Machine Translation. This model is the previous generation of Google Translate, and is generally less preferred, but it can still be selected to be used over the newer model if so desired. The third option for a model is to enter the model ID of an AutoML model. AutoML models are based on the built in NMT model, but they have been custom “trained” or “fine-tuned” to a large data-set of internal company documents. This can result in better domain specific translation than the built in NMT model if used properly.
Test Connection
The Test Connection button is used to test the validity of the entered credentials. If the credentials are valid then the Network Access Test Succeeded! Message will be displayed, otherwise an error message will be displayed.
Saving vendor info and linking the vendor to your project
When the Save button is clicked, the vendor information will be stored in the Jenkins com.lingoport.plugins.jenkinsgyzrlrmplugin.global.GlobalSettings.xml config file.
If the Access Level is for Group then the /var/lib/jenkins/Lingoport_Data/L10nStreamlining/<group name>/config/config_l10n_vendor.properties file will be created containing the vendor information otherwise the config_l10n_vendor.properties will not be created until it is used by a project.
For more information on Access Level and linking this vendor to your project see Standard Vendor Info.
Train a custom AutoML model for translation
Creating and managing AutoML models can be done by the department responsible for setting up the Google Translate service with ease thanks to the AutoML Web Interface that Google provides. This section will give a brief overview of how to add and manage AutoML models, though it should be noted that Google has a much more in depth documentation on the subject if further inquiry is desired.
Preparing training data
AutoML models can use Translation Memory eXchange (TMX) formatted data for training purposes, which is a universal format that most translation management systems should be able to export in. At least 1000 sentence pairs are required for training an AutoML model, though at least 5000 is recommended, and 15 million sentence pairs is the maximum. Google recommends keeping sentences to less than 200 words each for the best results.
Creating a dataset
To create a dataset from the training data that you have prepared:
- Visit the AutoML Web Interface, and select the project to train the model for.
- Under the Datasets page, click the Create Dataset button.
- In the Create Dataset dialog, enter a name for the dataset and select the source and target locales for the dataset.
- Clicking Create will bring you to the Import dialog, where you can upload the training data that you prepared in the previous section, and finish creating the dataset.
Training a model
To train a model from the dataset that you have uploaded to Google Cloud:
- Visit the AutoML Web Interface, and select the project to train the model for.
- Under the Datasets page, click on the dataset to use in the model’s training process.
- Use the Sentences tab at the top to review the dataset if desired, and the Train tab to start training the model.
- Click Start Training and enter a name for the model to start the training process.
- Under the Models page, you will find a list of model names and IDs (to be entered in the Jenkins configuration section), as well as their status.


