Google Translate
Contents
- 1 Localyzer integration with the Google Cloud Platform Translation Service
- 2 Supported Localyzer File Types
- 3 Setting up your Localyzer group or project to use Google Translate
- 4 Customize translations with glossaries and AutoML
Localyzer integration with the Google Cloud Platform Translation Service
How the process works
For information on Machine Translation and how the process works see Localyzer Integration with Machine Translation.
Supported Localyzer File Types
Not all file types are supported for machine translation. For a list of supported types see Supported File Types.
Setting up your Localyzer group or project to use Google Translate
Configure a Google Translate subscription on Google Cloud Platform
Create a project
The first step in configuring an instance of Google Translate to be used with Localyzer is to log in to the Google Cloud Console and select or create a Google Cloud project.
- Log into console.cloud.google.com with a Google Services email account. Use a secure account, as it will have “owner” permissions over the project.
- Click on the project select drop-down in the top left of the page.
- At this point if you already have a project set up which you would like to configure Google Translate on, you can skip to the next section, Enable billing. If not, or you otherwise would like to create a new project, click on New Project in the top right of the menu.
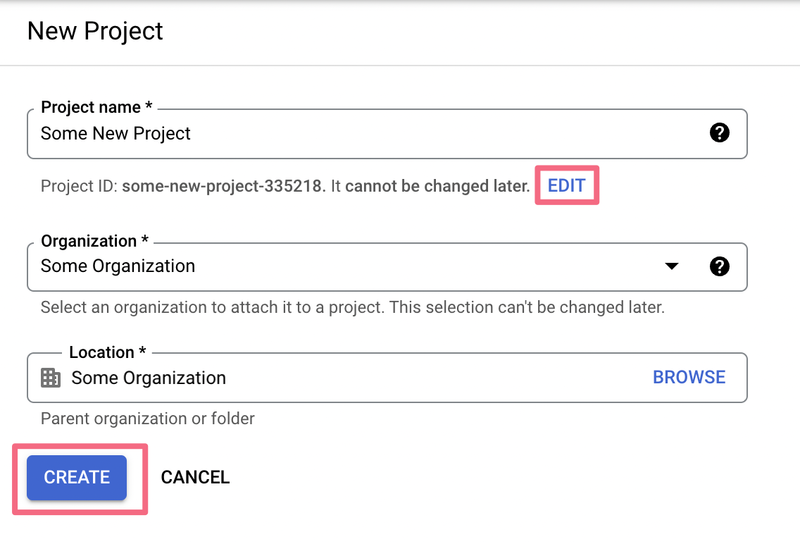
- In the new project configuration screen, enter in a name for the project and select an organization to organize the project under. Pay special attention to the project ID, as this is important to the project, and cannot be changed later. Google Cloud Console will automatically generate a project ID for you, though if you would like to set one yourself just hit the Edit button.
Enable billing
Once we have created a new project (or selected an existing one), we need to make sure that billing is enabled on the project before we can enable Google Translate.
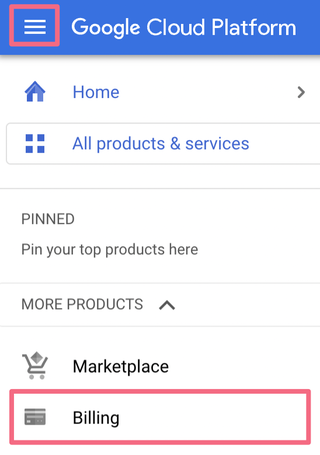
- Click on the navigation hamburger menu in the top left corner of the page, and then select Billing.
- If billing is already enabled on the project, you’ll see a billing overview page. If not, you will be prompted with a pop-up window containing instructions on how to enable billing for the project. Follow these instructions to enable billing on the project.
Enable the Cloud Translation API
Now that we have a project with billing enabled, we are ready to enable the Cloud Translation API.
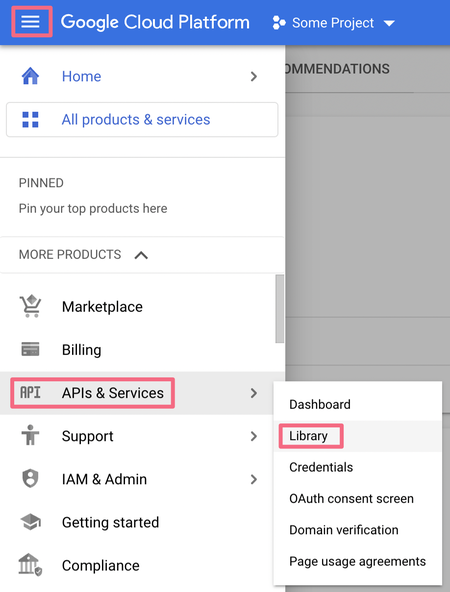
- Click on the navigation hamburger menu in the top left corner of the page, and then select APIs & Services, and then select Library.
- Use the search bar to search for "Cloud Translation API".
- Select the Cloud Translation API, and click the Enable button.
Create a service account
Next, a service account must be created. This service account acts as the credentials for Localyzer to access your Google Cloud Translation service. To learn more about what service accounts are, and why they are used, see Google’s article on understanding service accounts.
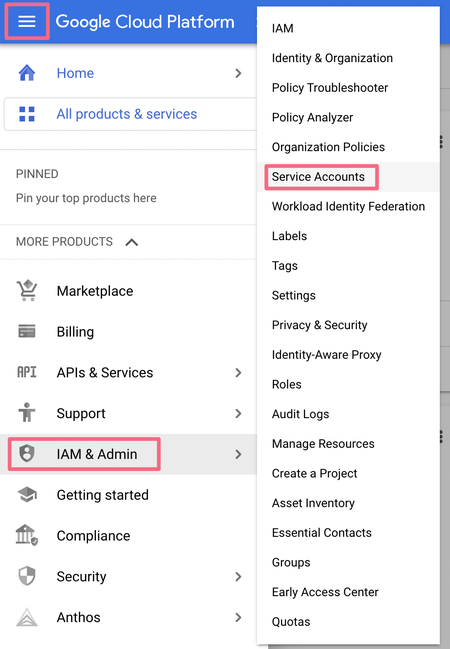
- Click on the navigation hamburger menu in the top left corner of the page, and then select IAM & Admin, and then select Service Accounts.
- Click on Create Service Account near the top of the page.
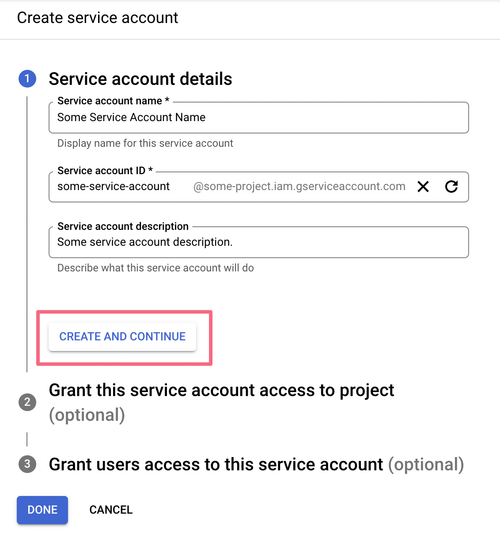
- Fill out the service account’s name, ID, and optional description. Do NOT hit done at this stage, instead click on the Save and Continue button.
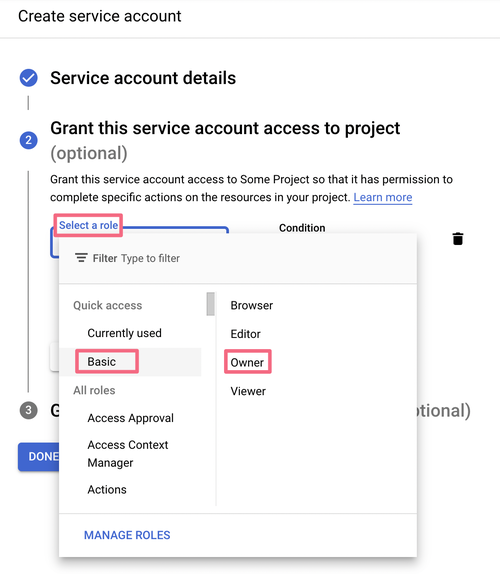
- Under the second step to creating a service account, Grant this service account access to project, click on the Add role button, then click on the Select a role dropdown menu. Use the menu to search for the basic role "Owner", and add the role to the service account.
- Now you can click Done to finish the creation of the service account.
Download the JSON credential file
Finally, after the service account is created, we can create or add a new key to the account. This key is in the form of a JSON file which is used by Localyzer to access the translation service.
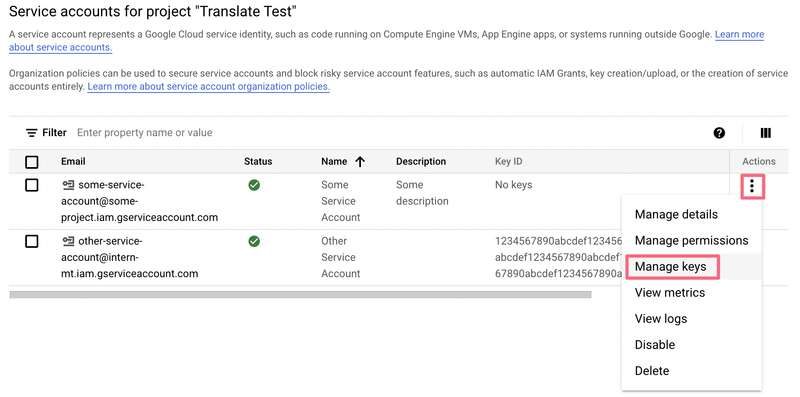
- From the main Service Accounts screen (the previous section in this tutorial), click on the 3 dot icon next to the service account that was just created, then click on Manage keys.
- Click on the Add Key dropdown menu, and then select the Create new key option.
- Select Key Type JSON (it should already be selected by default), and click the Create button.
- The JSON key file will be automatically downloaded to your machine at this point. All you need to do is upload the file to your Jenkins or Localyzer Express machine, and then configure the Google Translate Vendor in Jenkins settings or in Localyzer Express!
Add Google Translate Vendor
To set up the ability to machine translate your resource files using Google Translate you’ll need to have access to the Lingoport Jenkins Server. The vendor setup is located in the Jenkins System Configuration.
Jenkins -> Manage Jenkins -> Configure System
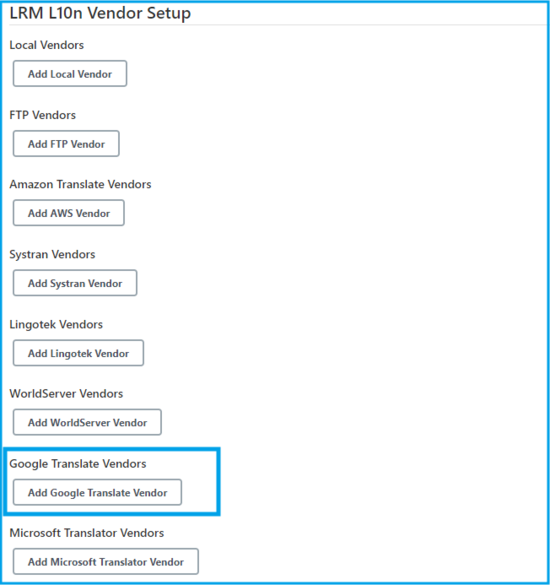
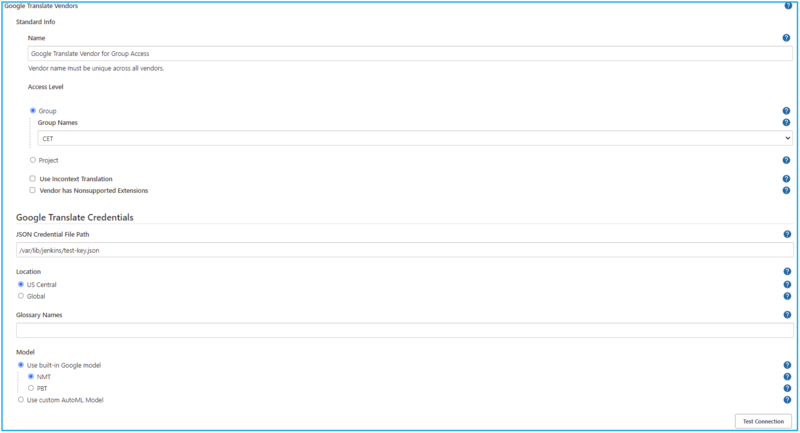
The Add Google Translate Vendor button can be found under the LRM L10n Vendor Setup section of the Jenkins Configure System page. After clicking on Add Google Translate Vendor, the Standard Info as well as the Google Translate Credentials field groups will be displayed.
Standard Info
This is the information that is standard to all vendor types.
For more information on setting up the standard vendor info see Standard Vendor Info.
Google Translate Credentials
All of the Google Translate credential information should be available through the department responsible for setting up your Google Cloud Platform service.
JSON Credential File Path
Services from a Google Cloud Platform Project, such as the Google Translate service, can be accessed securely using a Service Account Key. These keys come in the form of a single credential file in JSON format.
The department responsible for setting up the Google Cloud Platform service can manage these service account keys from their Google Cloud Console. See Download the JSON credential file for more details.
Localyzer requires a service account with at least Cloud Translation API Admin, Storage Admin, and AutoML Admin roles (note: the Owner role is the easiest to select in this scenario as it has permission for every Google Cloud operation, including those provided by the other three roles).
In order for Localyzer to use Google Translate, the JSON credential file must be downloaded placed on the same system as the Lingoport Jenkins Server (typically in a location like /var/lib/jenkins/… because the jenkins user needs access to the file), and that location needs to be specified to Localyzer in this vendor setup process.
Location
Google Cloud Platform requires Localyzer to let it know the translation requests are coming from one of two locations: US Central, or Global.
Currently, Google requires the US Central location in order to use the advanced translation features such as glossaries or AutoML models. It is for this reason that the Global location should only ever be selected if those advanced features are not required at all, the Jenkins server is outside of the US, and you require lower latency calls to Google Translate than the US Central location can offer.
Glossary Names
Glossaries are an optional feature of the Google Cloud Platform Translation service that allows for phrases to have guaranteed translations, regardless of the phrase’s context or the translation algorithm’s decision. This is useful for preserving brand names, product names, and other translation memory.
Glossaries are identified by their names given to them upon creation. Google unfortunately does not provide any user interface for the department responsible for configuring the Google Cloud project to manage glossaries, though there are still ways to do it.
When configuring a Google Translate Vendor, multiple glossary names can be entered, separated by commas. Then when Localyzer uses Google Translate to translate your resources, the first glossary in the list that is compatible with the current source and target locales will be used.
Currently, Google only supports the glossary feature with the US Central location.
Model
The model that is chosen determines the translation algorithm that is used. The Google Cloud Platform Translation service comes with two built in models that don’t require any configuration and work across all locales.
The first model, NMT or Neural Machine Translation, is the default model for Google Translate. This is the preferred of the two built in models, it is newer and yields better results, though there might still be some rare edge cases where it still doesn’t work yet. In this scenario, the Google Cloud Platform Translation service will automatically fall back to the second built in model, PBMT or Phrase Based Machine Translation. This model is the previous generation of Google Translate, and is generally less preferred, but it can still be selected to be used over the newer model if so desired. The third option for a model is to enter the model ID of an AutoML model. AutoML models are based on the built in NMT model, but they have been custom “trained” or “fine-tuned” to a large data-set of internal company documents. This can result in better domain specific translation than the built in NMT model if used properly.
Add QA Changes to Glossaries
Localyzer, when used in conjunction with Localyzer QA, has a Translation Memory feature, which can be enabled with this checkbox. See the section on Translation Memory further down on this page for more information.
Test Connection
The Test Connection button is used to test the validity of the entered credentials. If the credentials are valid then the Network Access Test Succeeded! Message will be displayed, otherwise an error message will be displayed.
Saving vendor info and linking the vendor to your project
When the Save button is clicked, the vendor information will be stored in the Jenkins com.lingoport.plugins.jenkinsgyzrlrmplugin.global.GlobalSettings.xml config file.
If the Access Level is for Group then the /var/lib/jenkins/Lingoport_Data/L10nStreamlining/<group name>/config/config_l10n_vendor.properties file will be created containing the vendor information otherwise the config_l10n_vendor.properties will not be created until it is used by a project.
For more information on Access Level and linking this vendor to your project see Standard Vendor Info.
Customize translations with glossaries and AutoML
Set up guaranteed translations with glossaries
Glossaries are source-target sets of phrases or sentences that the machine translator will always consistently translate the same, regardless of context around the phrase or sentence. They can be useful for:
- Do not translate (DNT) terms
- Product and/or brand names
- Ambiguous words
Unfortunately at this time, Google doesn’t provide any basic web interface with their cloud platform to add, update, or manage glossaries. But your department responsible for setting up the Google Translate service still has two options for managing their glossaries. Option one is to follow the steps outlined in Google’s [Creating and using glossaries (advanced)](https://cloud.google.com/translate/docs/advanced/glossary) documentation. Option two is to set up the initial glossary files, and then contact Lingoport support to take care of the rest.
Preparing glossary files
Glossaries can be created out of files of either Translation Memory eXchange (TMX), Comma Separated Values (CSV), or Tab Separated Values (TSV) format. TMX is the most universal format for translation management systems, but CSV files can be easy to read and create as spreadsheets, so they each have their own advantages and disadvantages as file types.
Unidirectional glossaries
Typically, glossaries are associated with just two locales, their source locale (the locale which translations are occurring from), and their target locale (the locale which translations are occurring to). These most basic forms of glossaries are known as unidirectional glossaries.
For a CSV or a TSV file, there should be just two values per line/row: the first being the desired phrase in the source language, and the second being the desired phrase in the target language. What the locales actually are, shouldn’t be specified in the CSV or TSV file itself, as they are actually specified upon association of the file with the glossary itself.
For a TMX file, it shouldn’t have to be written itself, but rather exported from a different/previous service. Make sure that the TMX file follows the standards of TMX Version 1.4. this section in Google’s documentation on glossaries contains an example TMX file if needed.
Equivalent terms set glossaries
If a glossary is needed in more than one source-target language set, either multiple versions of the unidirectional glossary can be created, or one single equivalent terms set glossary can accomplish the task as well. There are limits to the equivalent terms set glossaries however, such as they only support CSV files, so exporting or transferring files from another translation service might be a more complicated process than using unidirectional glossaries. But there are also advantages such as compacting many separate glossaries into one single glossary. A CSV file for an equivalent terms set glossary looks very similar to a file for a unidirectional glossary, except that it can contain as many entries/columns as the desired number of locales in the glossary, and the first row of the file is a headers row that specifies the the locales of the phrases in the columns below them with their corresponding ISO-639-1 or BCP-47 language code.
Automatically update glossaries with Translation Memory
When using multiple products within the Localyzer family together, a Translation Memory feature emerges. It allows for the changes that are made to a translation in LocalyzerQA to be automatically added to the most relevant glossary. That way not only the specific translation(s) targeted by the post edit will be changed, but also all future occurrences of the phrase(s) as well. This is accomplished by automatically adding the phrases and corrections from LocalyzerQA to the first glossary in the list that has the proper source and target locales.
Enabling Translation Memory
Turning on Translation Memory can be done from either Jenkins or from Localyzer Express, depending on which products from the Localyzer family you are using. From Jenkins, this is done in the Localyzer L10n Vendor Setup `Jenkins -> Manage Jenkins -> Configure System`. On Localyzer Express, this can be done from the custom machine translator configuration menu.
Select the option “Add QA Changes to Glossaries” and Translation Memory will be enabled on all eligible glossaries.
Dealing with duplicate phrases in Translation Memory
If you have had Translation Memory enabled for a while and have added a lot of phrases to it, you might start to come across emails with a message that reads something like this:
com.lingoport.translationmemory.google.pipeline.stage.UpdateGoogleTranslationMemoryStage: The file `some-glossary-name-sources.tmx` already contains translation memory for the source phrase(s) `[Some phrase in the source locale.]`. These phrases were not updated in the Translation Memory and instead were left the same. All other phrases were added to Translation Memory. To update the Translation Memory for a phrase that has already been added to this vendors Translation Memory, the original phrase must be manually removed from the Translation Memory. Please see https://wiki.lingoport.com/Google_Translate#Dealing_with_duplicate_phrases_in_Translation_Memory for more details.
This message is nothing to worry about at all, it is simply just letting you know that the phrase already exists in the glossary which Translation Memory is trying to update. To avoid duplicating phrases in the glossary, Localyzer chose not to add the new source and target phrase pair, and instead leave the old pair intact. If the previous source and target phrases are desired to be kept, then nothing needs to be done, as Localyzer already took appropriate action. However, if you desire to remove the previous source and target phrases so that they can be replaced with new corrections, then this must be done manually.
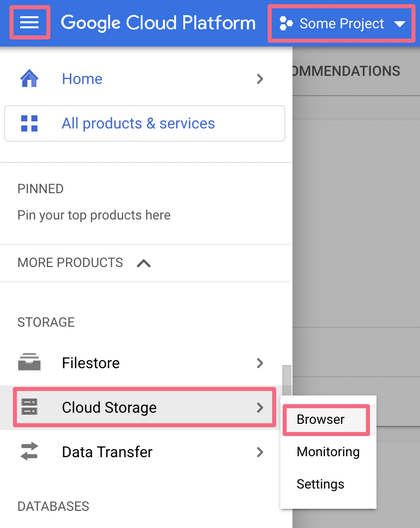
- Log in to the Google Cloud Console, and make sure the desired project is selected (top left of the screen).
- Click on the navigation hamburger menu in the top left corner of the page, and then select Storage (you might scroll the menu), and then select Browser.
- Select the bucket named “{project id}-glossaries”.
- Find the appropriate TSV, CSV, or TMX file associated with the glossary, and click on the download icon on the right side of the table. If you created the glossary by contacting Lingoport support, or by otherwise using Lingoport utilities, then the correct file will be named “{glossary name}-sources.{extension}”. If you created the glossary with your own methods, then the file will be named whatever you named it at the time.
- Open the file and edit it in your favorite text editor. It is up to you if you want to delete the entry altogether, or simply manually modify the contents of the entry.
- Repeat whatever process you originally went through to create the glossary in the first place, using the new file this time.
[[File::GoogleCloudStorageDownload.png|800px]]
Train an AutoML model for fully customized machine translation
Creating and managing AutoML models can be done by the department responsible for setting up the Google Translate service with ease thanks to the AutoML Web Interface that Google provides. This section will give a brief overview of how to add and manage AutoML models, though it should be noted that Google has a much more in depth documentation on the subject if further inquiry is desired.
Preparing training data
AutoML models can use Translation Memory eXchange (TMX) formatted data for training purposes, which is a universal format that most translation management systems should be able to export in. At least 1000 sentence pairs are required for training an AutoML model, though at least 5000 is recommended, and 15 million sentence pairs is the maximum. Google recommends keeping sentences to less than 200 words each for the best results.
Creating a dataset
To create a dataset from the training data that you have prepared:
- Visit the AutoML Web Interface, and select the project to train the model for.
- Under the Datasets page, click the Create Dataset button.
- In the Create Dataset dialog, enter a name for the dataset and select the source and target locales for the dataset.
- Clicking Create will bring you to the Import dialog, where you can upload the training data that you prepared in the previous section, and finish creating the dataset.
Training a model
To train a model from the dataset that you have uploaded to Google Cloud:
- Visit the AutoML Web Interface, and select the project to train the model for.
- Under the Datasets page, click on the dataset to use in the model’s training process.
- Use the Sentences tab at the top to review the dataset if desired, and the Train tab to start training the model.
- Click Start Training and enter a name for the model to start the training process.
- Under the Models page, you will find a list of model names and IDs (to be entered in the Jenkins configuration section), as well as their status.

