Configure the Collaboration Environment
Lingobot supports several collaboration environments; Slack, Flowdock and Cisco Spark.
Contents
LingoBot Slack Setup
This portion of the installation guide only applies if the collaboration environment you will be using is Slack.
1. Go to https://api.slack.com/apps
2. Click Create App
3. Choose "From an app manifest" and choose a workspace
4. Choose "YAML" Enter App Manifest using contents of manifest.yaml
#manifest.yaml
display_information:
 name: Lingobot App
features:
 app_home:
   home_tab_enabled: false
   messages_tab_enabled: true
   messages_tab_read_only_enabled: false
 bot_user:
   display_name: lingobot
   always_online: true
oauth_config:
 scopes:
   bot:
     - channels:history
     - channels:join
     - commands
     - chat:write
     - im:history
settings:
 event_subscriptions:
   bot_events:
     - message.channels
     - message.im
 interactivity:
   is_enabled: true
 org_deploy_enabled: false
 socket_mode_enabled: true
 is_hosted: false
 token_rotation_enabled: false
5. Click Create
6. Once the app is created click Install to Workspace
7. Then scroll down in Basic Info and click "Generate Token and Scopes", and click "Add Scope" to add all scopes
8. Click "Generate" to get an APP_TOKEN, copy and paste it to install.conf
Example:
APP_TOKEN=xapp-**********
9. At "OAuth & Permissions" page, copy and paste the "Bot User OAuth Token" to install.conf
Example:
BOT_TOKEN=xoxb-**********
Once this is complete, the bot is now configured and ready to be installed! Follow the instructions below on running the installation script to finish the installation process.
Skip to the next step: Running The Installation Script
LingoBot CA Flowdock Setup
This portion of the installation guide only applies if the collaboration environment you will be using is CA Flowdock. If you will be using either Slack or Cisco Spark, please follow the corresponding setup instructions.
Setting up LingoBot to run on CA Flowdock is as simple as creating a new user account through which LingoBot will communicate. If you would rather not deal with the hassle of creating a new Flowdock user account, feel free to ask us to make one for your LingoBot instance. We will send you the API token needed for LingoBot's configuration file and you can simply invite the account to join your Flow once it is ready.
If you don't mind creating the account yourself, then simply follow these instructions to do so.
- First, you will need an email account with which you can create a Flowdock account. You can make one for free on Gmail if need be.
- Once this is completed, navigate to the Flowdock Sign Up page and click "Sign Up Using Google"
- When prompted, sign in using the Google account you created for LingoBot (alternatively, you can sign up using a non-google account by filling out the details manually).
- Once the account has been created, navigate to the Profile Editing Page and set the following information:
- Name: Lingoport Chatbot
- Display Name: By default, we recommend simply calling it "lingobot", however you're welcome to name it whatever you would like.
- If you do choose to call it something other than "lingobot", make sure that you set the LINGOBOT_NAME variable in the configuration file to whatever name you chose.
- Example:
export LINGOBOT_NAME=lingobot-123
- Avatar: You can download the following icon
 and upload it, upload your own custom icon, or simply leave it blank.
- Once this is done, scroll down and click "Update Profile"
- The final step is to navigate to the API Tokens page. Here you will find an API token labeled "Personal Api Token".
- Copy the API token and paste it into the LingoBot configuration file next to the HUBOT_FLOWDOCK_API_TOKEN variable declaration.
Example:
export HUBOT_FLOWDOCK_API_TOKEN=0a1b2c3d4e5f6g7a8b9c0d
Furthermore, make sure the LINGOBOT_ADAPTER variable is set to "flowdock".
Example:
export LINGOBOT_ADAPTER=flowdock
Once this is complete, the bot is now configured and ready to be installed! Follow the instructions below on running the installation script to finish the installation process.
Skip to the next step: Running The Installation Script
LingoBot Cisco Spark Setup
This portion of the installation guide only applies if the collaboration environment you will be using is Cisco Spark. If you will be using either Slack or CA Flowdock, please follow the corresponding setup instructions.
Configuring LingoBot to communicate via Cisco Spark is a fairly straight forward process. All that is required is access to an account that has access to your organization's Cisco Spark.
Creating a Custom Bot
- The first step is to sign in to your Cisco Spark account on the Developer Portal.
- Once signed in, navigate to the Custom Bot Creation page.
- On the bot creation page, fill in the form with the following information:
- Display Name: By default, we recommend simply calling it "lingobot", however you're welcome to name it whatever you would like.
- If you do choose to call it something other than "lingobot", make sure that you set the LINGOBOT_NAME variable in the configuration file to whatever name you chose.
- Example:
export LINGOBOT_NAME=lingobot-123
- Bot Name: Ideally this should be the same as the display name, however due to the necessity that it be unique this can be just about anything. This will only be used to invite the bot to a chat room.
- Icon: Paste the following URL into the Icon field: http://i.imgur.com/3bzw0zp.jpg
- Display Name: By default, we recommend simply calling it "lingobot", however you're welcome to name it whatever you would like.
- Once this is done, click "Add Bot". On the following page, you will find an API token. Click the "Copy" button next to it (or select and copy the token itself) then paste it into the LingoBot configuration file next to the CISCOSPARK_ACCESS_TOKEN variable declaration.
Example:
export CISCOSPARK_ACCESS_TOKEN=LDA5YjBiOTItMTAwOS00ODMxLTk4ZjEtYTQ4OGI4N2FjN2Y2MjVlM2QyNTUtYmM2
Creating a Webhook for LingoBot
- The final step is to create a webhook that LingoBot can receive message event notifications through. To do this, navigate to the Spark Webhook Creation Page.
- Make sure that the "Test Mode" switch is turned ON. This will allow you to generate webhooks directly into your organization's account.
- Under the "Request Headers" section, fill in the following information:
- Authorization: "Bearer [YOUR BOT'S API TOKEN HERE]"
- In the "Request Parameters" section, fill in the the following information under the "Your values" column:
- name: This can be anything. i.e. "lingobot".
- targetURL: "[YOUR JENKINS INSTANCE URL HERE]:5001/hubot/ciscospark/incoming"
- resource: "all"
- event: "all"
- secret: This can be just about anything, but ideally it is a random string of letters and numbers that it at least 32 characters long.
- Whatever you chose for this must also be copied to the LingoBot configuration file, next to the CISCOSPARK_SECRET variable declaration.
Example:
export CISCOSPARK_SECRET=a1b2c3d4e5f6g7h8i9j0k1l2m3n4o5p6
- Once all of these values have been entered, click the "Run" button. You should see a response containing the webhook's information on the right.
Finally, make sure the LINGOBOT_ADAPTER variable is set to "sparkwebhook".
Example:
export LINGOBOT_ADAPTER=sparkwebhook
Once this is complete, the bot is now configured and ready to be installed! Follow the instructions below on running the installation script to finish the installation process.
LingoBot MS Teams Setup
This portion of the installation guide only applies if the collaboration environment you will be using is MS Teams. If you will be using either Flowdock or Cisco Spark or Slack, please skip to the corresponding setup instructions.
Setup ngrok
- Navigate to the ngrok page and sign up a free account or login to an existing account. Click Auth from the left list, and copy your Tunnel Authtoken.
- Copy the Tunnel Authtoken and paste it into the LingoBot configuration file
(/var/lib/jenkins/lingoport/lingobot-<x.y>/config/config.yml) next to the authtoken variable declaration.
Example:
authtoken: 2nde8yqeH8wLiBkv848BW_2Mm39SdudjQJmJ7xxxxxx
tunnels:
   default:
       proto: http
       addr: 5001
- As a root user (not jenkins), run the following commands to start the ngrok service
 sudo systemctl enable ngrok.service
 sudo systemctl start ngrok.service
 sudo systemctl status ngrok.service
If the status does not show active (running), then there is a problem.
- Return to the ngrok page and click Status from the left list. If the page does not show any tunnels online, refresh the page. Store the HTTPS URL for later use.
Microsoft Bot Registration
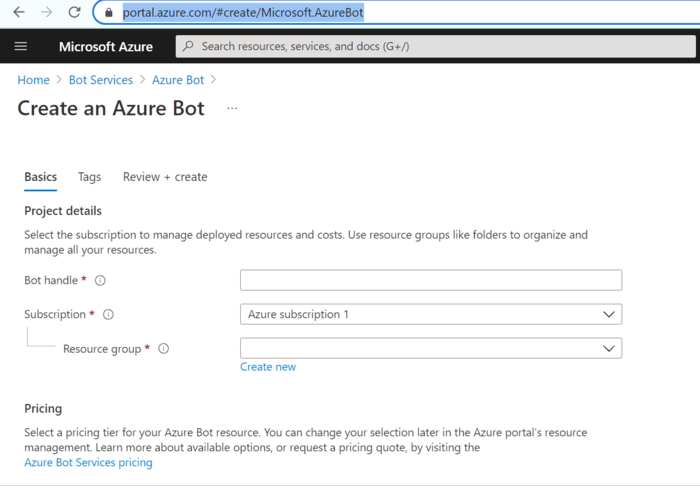
- Navigate to the AzureBot Registration Page page. Create a Botframework Registration by completing the Bot Registration Page. Or login to an existing account.
- On this page, you can set a custom icon for the bot under the "Upload custom icon" section. You can download the following icon
 and upload it, upload your own custom icon, or simply leave it blank.
- In the Display name field, enter the name that you would like LingoBot to respond to.
- By default, we recommend simply calling it "lingobot", however you're welcome to name it whatever you would like.
- If you do choose to call it something other than "lingobot", make sure that you set the LINGOBOT_NAME variable in the configuration file to whatever name you chose.
- Example:
export LINGOBOT_NAME=lingobot-123
- Example:
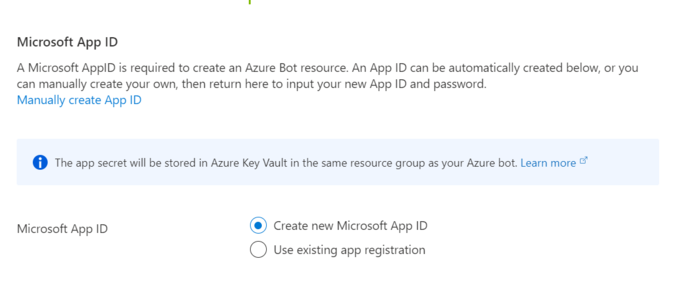
- Click Create Microsoft App ID and password. You may be prompted to login into your MS Teams account first. Store the created app id and app password for use later. See this page how to create a new app and generate password
- Copy the created app id and paste it into the LingoBot configuration file
(/var/lib/jenkins/lingoport/lingobot-<x.y>/config/lingobot_config.sh) next to the BOTBUILDER_APP_ID variable declaration.
Example:
export BOTBUILDER_APP_ID=e8911192-eca4-4f37-8284-616f3339f0e6
Furthermore, make sure the LINGOBOT_ADAPTER variable is set to botframework.
Example:
export LINGOBOT_ADAPTER=botframework
- Copy the created app password and past it into the LingoBot configuration file
(/var/lib/jenkins/lingoport/lingobot-<x.y>/config/lingobot_config.sh) next to the BOTBUILDER_APP_PASSWORD variable declaration.
Example:
export BOTBUILDER_APP_PASSWORD='wdS50{cphgeDCTKZO073{]#'
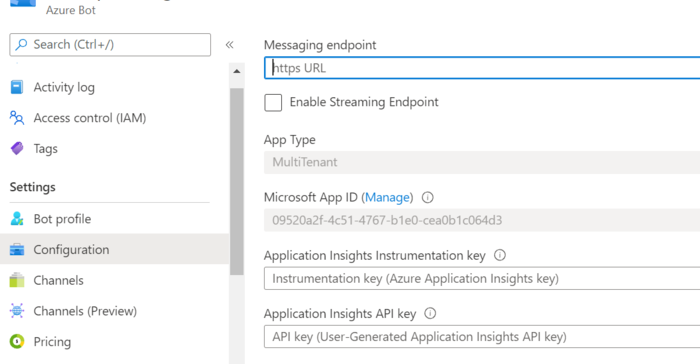
- Copy and paste the URL generated by ngrok to Messaging endpoint field on the Botframework Registration page, and add /api/messages to the end.
Example:
https://87406e76.ngrok.io/api/messages
- Fill in the Paste your app ID below to continue field using the App ID.
- Once this is done, scroll down to the bottom of the page, agree to the terms of service, and click "Register" to complete.
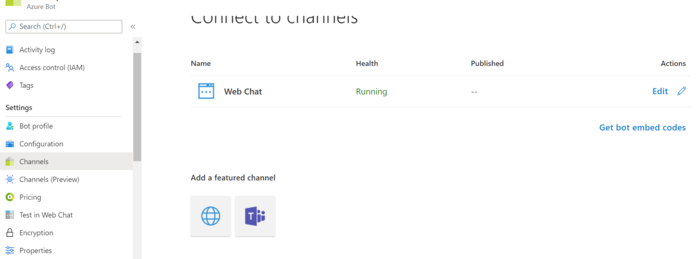
- On the new opened My bots page, you will find your just created bot, under Connect to channels field, the Web Chat has been added as default. Click MS Teams icon under "Add a featured channel" to add MS Teams channel. And Save your changes.
Create a Microsoft Teams app package
- Installing App Studio for Microsoft Teams follow steps on this page.
- Once you are in App Studio, click on the Chat tab, App Studio and the Manifest editor tab. Click Create a new app.
- Complete the App details section. This includes things such as the app’s name, description, and visual branding. You can automatically generate a GUID for your app and provide URLs for your privacy statement and terms of use.
- Click Bots section, Set up a bot then click Existing bot tab, type in your bot name and Select from one of your existing bots, then choose the bot you just created above. Save.
- Copy and paste the URL to Messaging endpoints and make sure it matches the value you just set at bot Register page.
Example:
https://87406e76.ngrok.io/api/messages
- Click "Add" button under Commands section to add new commands
Example:
 Command text: list projects
 Help text: Displays list of active projects
 Scope: Team
- Create a Microsoft Teams app package (.zip) to upload in Teams. Click Test and distribute under the Finish section, and click Download button to download the package file.
- Click the Store button (left down at the Teams), click Upload a custom app (at bottom left). And upload the package file just created above.
Once this is complete, the bot is now configured and ready to be installed! Follow the instructions below on running the installation script to finish the installation process.
Next Step: Install and Start the Lingobot Service


