Pull Requests
The Lingoport Suite offers two options for Pull Requests from your repository. The Pull Request can be done on your Lingoport Server or there is a distributed option that uses the Master/Agent capability of Jenkins to distribute the work among several nodes.
To use the Distributed Pull Request option, please install the Node Installer optional software.
Contents
GitHub and Git Pull Requests
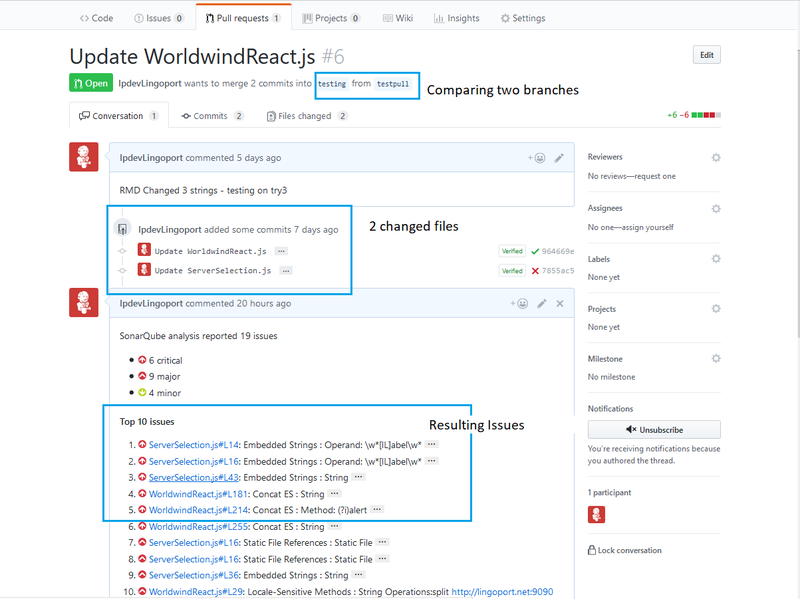
GitHub is a Web-based Git repository hosting service. It offers all of the distributed revision control and source code management (SCM) functionality of Git as well as adding its own features.
Files can be committed in a Git branch or directly in the Master branch. When committing files in a branch, pull requests let you know what changes you've made to a repository before they are committed to the repository's master branch. Once a pull request is sent, interested parties can review the set of changes, discuss potential modifications, and even push follow-up commits if necessary.
Configuring Pull Requests
Verify the Lingoport Dashboard Plugin
The Pull Requests rely on the Dashboard GitHub plugin. If your system was installed using the Stack Installer, this plugin should have been included. Verify that it is installed.
- Go to the Lingoport Dashboard and log in as Administrator.
- Select the Administration tab at the top of the window.
- Select the System pulldown and Update Center
- With Installed selected, search for GitHub. You should find a plugin with the description: "Provide some integration between GitHub and SonarQube"
If you do not find the plugin installed, select Available, search for 'GitHub' again and Install it.
Set up Nodes on Jenkins
If you are using the Distributed Pull Requests option, the first thing that needs to be done is to set up nodes in Jenkins. If you installed the Node Installer and followed its setup instructions, there should be a master system (where Jenkins and Lingoport Dashboard are hosted) and at least one agent or node system. The master system should be able to ssh into the agents' centos user and the jenkins user. If this is not completed, make sure that is done before proceeding further.
If you are not using nodes and agents, skip to the next section.
Create Nodes in Jenkins
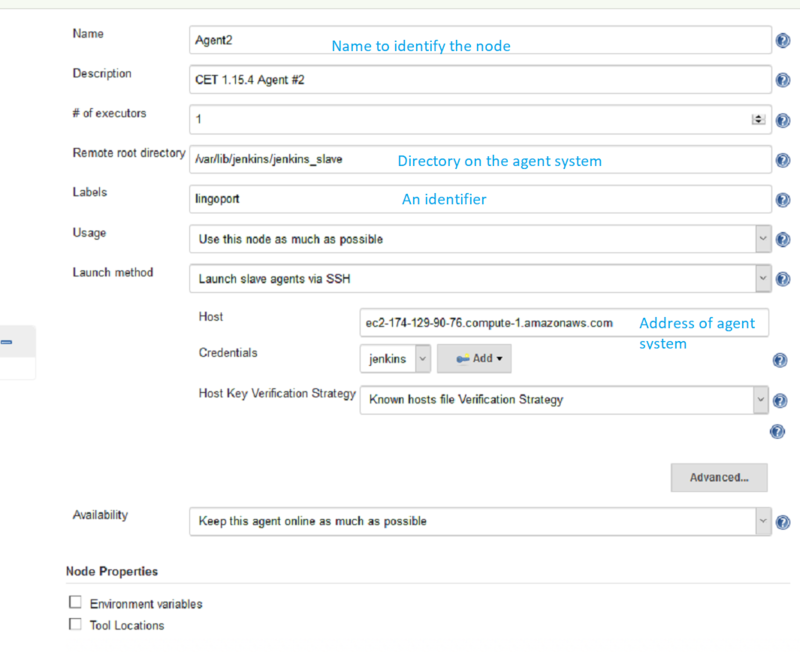
On the Master system, in Jenkins, select Manage Jenkins → Manage Nodes → New Node
Set up each agent node using this example:
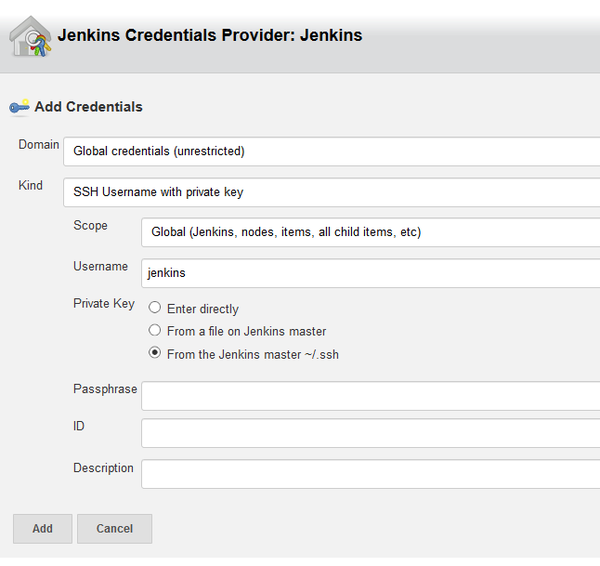
Select Add to create the jenkins ssh credentials
Nothing needs to be done with the master node. Online the new nodes and the console output should look like:
[01/26/18 16:26:19] [SSH] Opening SSH connection to ec2-54-227-210-213.compute-1.amazonaws.com:22.
[01/26/18 16:26:19] [SSH] SSH host key matches key in Known Hosts file. Connection will be allowed.
[01/26/18 16:26:19] [SSH] Authentication successful.
[01/26/18 16:26:19] [SSH] The remote user's environment is:
BASH=/usr/bin/bash
BASHOPTS=cmdhist:extquote:force_fignore:hostcomplete:interactive_comments:progcomp:promptvars:sourcepath
....
Verify the Agent setup in Jenkins
To verify that the Agent setup is correct, use the Jenkins 'Debug' job.
Under General check Restrict where this project can be run and set it to lingoport.
In the Execute Shell leave only:
whoami
pwd
sleep 5
Run the job. The console output should show:
Started by user anonymous
Building remotely on Agent1 (lingoport) in workspace /var/lib/jenkins/jenkins_slave/workspace/Debug
[Debug] $ /bin/sh -xe /tmp/jenkins7953464360000549139.sh
+ whoami
jenkins
+ pwd
/var/lib/jenkins/jenkins_slave/workspace/Debug
+ sleep 5
Note that it shows that it ran on the Agent using the lingoport label.
Jenkins PullRequest and DistributedPullRequest jobs
There are two Jenkins job templates for Distributed Pull Requests.
- Lingoport.SampleLite-PullRequest
- Lingoport.SampleLite-DistributedPullRequest
The Distributed Pull Request makes use of the Jenkins master/agent system.
Create a new Jenkins job using the Lingoport.SampleLite-PullRequest or Lingoport.SampleLite-DistributedPullRequest template. This should be modeled on an existing Jenkins project.
For example, if you have a Jenkins project called Acme.BigProject and you want to use PullRequests with this project and repository, name the new project Acme.BigProject-PullRequest.
Configuring the PullRequest Jenkins job
Once you have created the new PullRequest project, some configurations need to be modified.
- Make sure the name is <Group>.<Project>-PullRequest. The <Group>.<Project> Jenkins job should already exist and have been executed. Anything other than <Group>.<Project>-PullRequest may cause problems.
- Leave the payload parameter alone. Do not modify it.
- If nodes have been set up for other projects, select Restrict where this project can be run and set it to master. If nodes have NOT been set up, nothing needs to be done with this option.
- Under Build Triggers, select Trigger builds remotely (e.g., from scripts) and set the value to HOOK.
- Under Build, and Execute Shell, set the Project Definition File for <Group>.<Project>
LITE_PROJECT_DEFINITION=/var/lib/jenkins/jobs/<Group>.<Project>/workspace/lingoport/LiteProjectDefinition.xml
- Save the configuration and Enable the project.
From the command line console, in /var/lib/jenkins/Lingoport_Data/Dashboard/Projects/GROUPNAME.PROJECTNAME-PullRequest/ (this may need to be created), make a sonar-project-pr.properties file that looks like:
# Make sure a Dashboard user is set up with the credential below
# otherwise the dashboard will not accept the pushed data
#
sonar.login=admin
sonar.password=<admin password>
#
# Do not change the properties below
# the capital letter tokens will be replaced by
# build scripts
#
sonar.projectKey=PullRequest:scan
sonar.projectName=PullRequest
sonar.projectVersion=PR

sonar.language=lport
sonar.encoding=UTF-8

#
# For the GitHub SonarQube Plugin to push the results to GitHub PR
#
sonar.analysis.mode=preview
sonar.github.endpoint=https://api.github.com
sonar.github.login=myGitLogin
sonar.github.oauth=<created token>
sonar.github.disableInlineComments=true
sonar.github.pullRequest=6
sonar.sources=/var/lib/jenkins/jobs/<Group>.<Project>-PullRequest/workspace
sonar.lingoport.project.root=/var/lib/jenkins/Lingoport_Data/Dashboard/Projects/<Group>.<Project>-PullRequest
sonar.github.repository=<Repo> #for example: NASA/nasa-latex-blocks
Configuring the DistributedPullRequest Jenkins job
Once you have created the new DistributedPullRequest project, some configurations need to be modified. The DistributedPullRequest should be based on a <Group>.<Project> Jenkins job that has been executed.
- Leave the payload parameter alone
- Set the GIT_REPO parameter. This should be set to the form Company/Project as seen on GitHub. For example, in GitHub, NASA has many projects so the GIT_REPO would be set to NASA/nasa-latex-blocks
- Set the LITE_PROJECT_DEFINITION parameter to the value on the Agent.
$JENKINS_HOME/jenkins_slave/workspace/<Group>.<Project>-DistributedPullRequest/lingoport/LiteProjectDefinition.xml - Select Restrict where this project can be run and set it to lingoport.
- Under Build Triggers, select Trigger builds remotely (e.g., from scripts) and set the value to HOOK.
- Save the configuration and Enable the project.
Configuring GitHub for PullRequests
Some configuration needs to be done on GitHub for the PullRequests to occur.
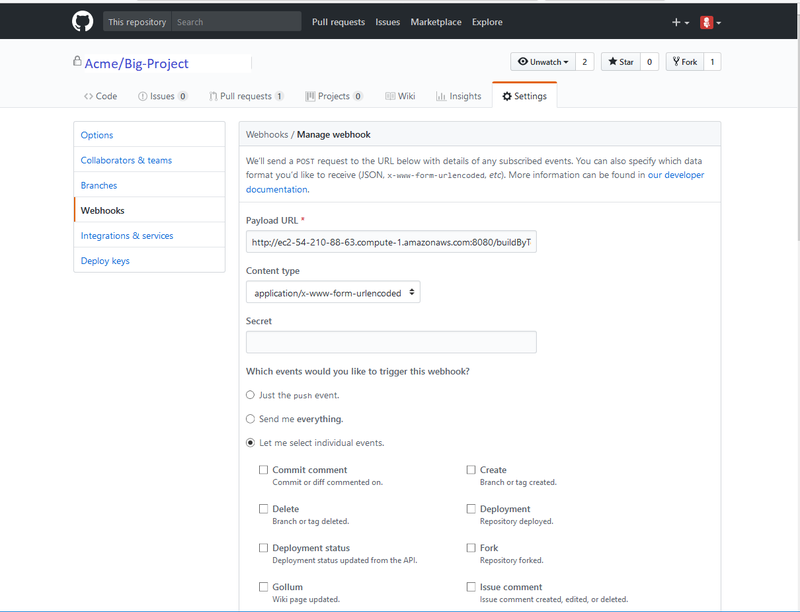
In the GitHub page for your Project:
- Select Settings at the top of the window.
- Select the Webhooks tab in the left menu.
- Select the Add webhook button.
- Set the Payload URL to
http://<Jenkins IP>:8080/buildByToken/buildWithParameters?job=<Group>.<Project>-PullRequest&token=HOOK
for PullRequest jobs or
http://<Jenkins IP>:8080/buildByToken/buildWithParameters?job=<Group>.<Project>-DistributedPullRequest&token=HOOK
for DistributedPullRequest jobs.
- Make sure the Content Type is
application/x-www-form-urlencoded - Leave Secret blank
- Which events would you like to trigger this webhook? Select: Let me select individual events and check the Pull Request item.
- Update or Add Webhook


