Prep Kits
Contents
What is a Prep Kit?
A Prep Kit is what we call the set of resource files that are gathered by LRM, sent out for translation, and then integrated back into the source code tree once translated. LRM sets and tracks versions of a Kit so that, as your developers add strings to the base resource files, you can prepare and send out the Kit multiple times. There are a variety of checks that LRM makes on the base resource files to ensure that they are correct, as well as tracking the progress and correctness of the translated resource files.
Note: If your project contains translated files, then when prepping your first kit, LRM will not be able to detect if a text change has occurred within a resource string. It will, however, be able to detect added keys or missed translations.
How do I prep a kit and receive it back from translation?
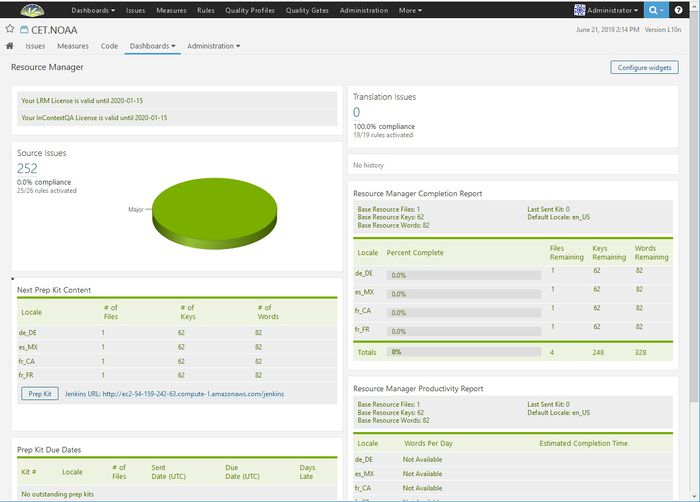
There is a Jenkins job on-boarded. The Lingoport Dashboard is populated and the L10n Vendor has been configured. A Prep Kit can be sent. At this point, the Lingoport Dashboard for the project looks something like:
- Last Sent Kit is 0 since no prep kits have been sent yet.
- All the Locales are at 0 Percent Complete since we only have a base resource file.
- Under Next Prep Kit Content, it shows that we are sending 1 file that has 62 keys and 82 words.
- Since we have not sent anything yet, there is nothing in Prep Kit Due Dates
To send a prep kit, either select the Prep Kit button on the Dashboard (this runs the DashboardPrepKit job in Jenkins) or run the PrepKit job in Jenkins called <group>.<project>-PrepKit.
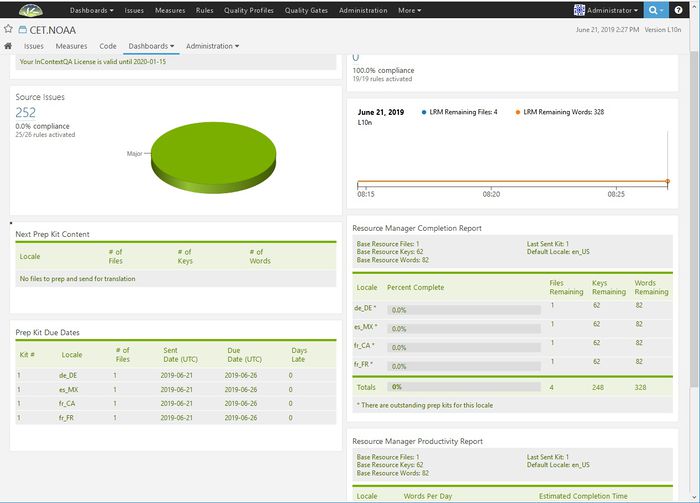
When everything is successful, the Dashboard should look like:
- Last Sent Kit is 1 since we sent Prep Kit #1 to be translated.
- All the Locales are at still at 0 Percent Complete since we have not gotten the translations back, but there is a note: There are outstanding prep kits for this locale
- Under Next Prep Kit Content, there is nothing because everything at this point has been sent.
- Prep Kit Due Dates shows 1 file for each locale was sent and when it is due back.
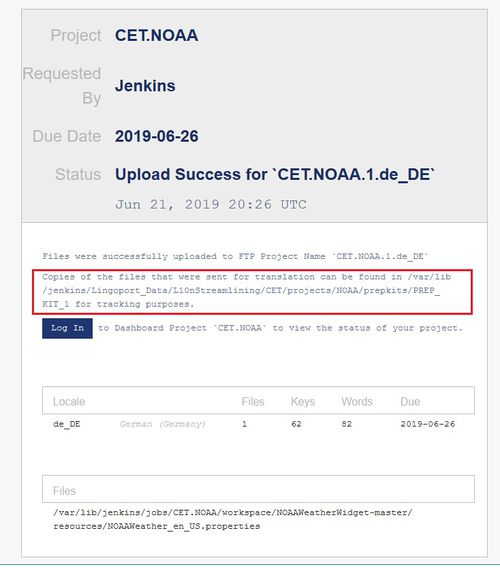
For the persons that were designated in the Jenkins job to get notifications of prep kits, an email will be sent. When the prep kit is successfully sent out, the email will be an Upload Success. There will be one email for each locale.
This shows just the German (de_DE) locale.
- Note that it shows CET.NOAA.1.de_DE that is <group-name>.<project-name>.<prep kit number>.<locale>
- It shows where to find the files on the local machine that were sent to translation.
- It lists the files sent to be translated to German. In this example, there is only 1 file.
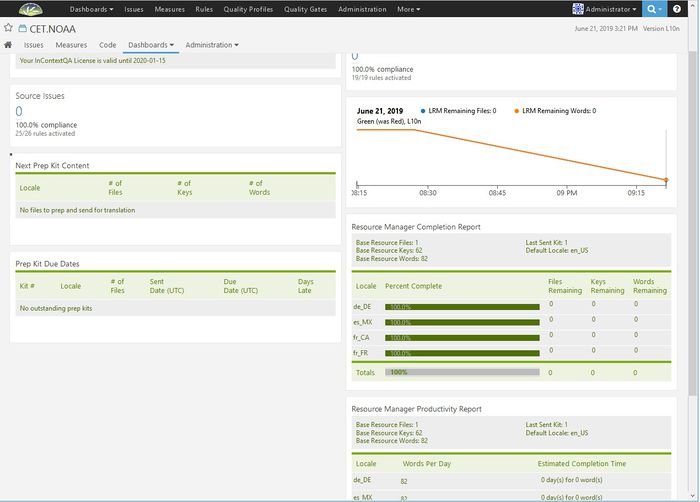
When the files have been translated, they are put in a special directory and Jenkins routinely checks for files to be downloaded. The files are downloaded and and then the translated files are pushed to the repository. To do this manually, invoke the FTPDownload Jenkins job if using FTP. Once the files have been downloaded, the Dashboard will update to reflect the changes.
- Next Prep Kit Content and Prep Kit Due Dates are empty. All files have been translated.
- Each Locale shows 100% Complete with 0 Files, Keys or Words Remaining.
The code repository will have the translated files.
What is done when a prep kit is generated?
After a LRM project is created and correctly identifies the base and target resource files, the project needs to be baselined. When the project is baselined, the base resource files are in the system. If any changes happen to them afterward, this will be picked up in the prep kit. This is done in the Jenkins Nightly job or it can be done on the command line.
> java -jar /var/lib/jenkins/lingoport/lrm-server-<version>/lrm-cli.jar --create-baseline --project-name <project-name> -- group-name <group-name>
LRM is able to detect modified text as well as missing keys and missing files.
For example let's say you have a project with:
- 3 locales: en_US (base locale), fr_FR and de_DE.
- 2 base files
- file1_en_US.properties (100 keys)
- file2_en_US.properties
- 1 fr_FR file with a missing key
- file1_fr_FR.properties (99 keys)
- 1 de_DE with 2 missing keys
- file1_de_DE.properties (98 keys)
Create a prep kit for the new LRM project by selecting the Prep Kit button on the Lingoport Dashboard or by running the Jenkins <project-name>-PrepKit job.
> java -jar lrm-cli.jar -pk -pn ProjectName -gn GroupName
The following reports were generated:
/var/lib/jenkins/Lingoport_Data/LRM/GroupName/prep_kit/ProjectName/PREP_KIT_1/BaseFileSearch_de_de.xml
/var/lib/jenkins/Lingoport_Data/LRM/GroupName/prep_kit/ProjectName/PREP_KIT_1/BaseFileSearch_fr_fr.xml
/var/lib/jenkins/Lingoport_Data/LRM/GroupName/prep_kit/ProjectName/PREP_KIT_1/FilesToPrep.xml
/var/lib/jenkins/Lingoport_Data/LRM/GroupName/prep_kit/ProjectName/PREP_KIT_1/ProjectName_1_de_de.xml
/var/lib/jenkins/Lingoport_Data/LRM/GroupName/prep_kit/ProjectName/PREP_KIT_1/ProjectName_1_fr_fr.xml
Process completed successfully.
The base locale resource files are extracted and place in the appropriate localized prep kit folders. See the de_de and fr_fr folders.
> ls /var/lib/jenkins/Lingoport_Data/LRM/GroupName/prep_kit/ProjectName/PREP_KIT_1/
BaseFileSearch_de_de.xml  FilesToPrep.xml      ProjectName_1_fr_fr.xml
BaseFileSearch_fr_fr.xml  fr_fr/
de_de/                     ProjectName_1_de_de.xml
In the fr_fr folder, are all the files to be translated:
> ls /var/lib/jenkins/Lingoport_Data/LRM/GroupName/prep_kit/ProjectName/PREP_KIT_1/fr_fr/
file1_en_US.properties
file2_en_US.properties
For missing files, the entire file will be sent. For missing keys (or modified text) only the changed keys will be sent.
How can I prevent a file or folder from being included in the prep kit?
You will need to alter your project definition file and exclude the file/folder from the project.
In Jenkins, select the project you are working on and select Configure from the menu.
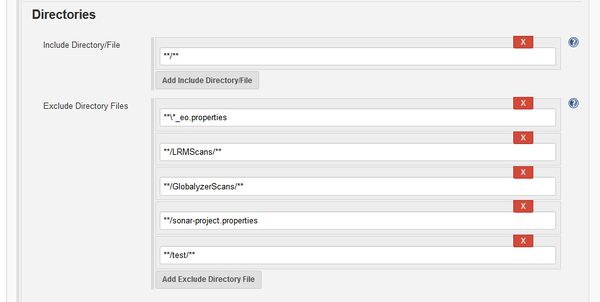
Scroll down to the Directories section and select the Add Exclude Directory File button which will create a new entry. Add the directory or file you want to exclude. Save your project.
When the project is run, the Jenkins output shows:
Creating Project Definition File: /var/lib/jenkins/Lingoport_Data/LRM/<group-name>/reports/<project-name>/ProjectDefinition.xml
If you open the Project Definition File, you should see your new addition to the excludes:
<excludes>
     <exclude-dir-file>**\*_eo.properties</exclude-dir-file>
     <exclude-dir-file>**/LRMScans/**</exclude-dir-file>
     <exclude-dir-file>**/GlobalyzerScans/**</exclude-dir-file>
     <exclude-dir-file>**/sonar-project.properties</exclude-dir-file>
     <exclude-dir-file>**/test/**</exclude-dir-file>
 </excludes>
