Difference between revisions of "Pull Requests"
(→Video Introduction to GitHub, GitLab, and Bitbucket) |
(→File System Configuration) |
||
| Line 55: | Line 55: | ||
<code> |
<code> |
||
mkdir ~/docker/jenkins/lingoport/bin |
mkdir ~/docker/jenkins/lingoport/bin |
||
| − | + | cp ~/PRC-Docker/Globalyzer.license ~/docker/jenkins/lingoport/ |
|
cp ~/PRC-Docker/globalyzer-lite-VERSION.zip ~/docker/jenkins/lingoport/ |
cp ~/PRC-Docker/globalyzer-lite-VERSION.zip ~/docker/jenkins/lingoport/ |
||
cp -p ~/PRC-Docker/jq ~/docker/jenkins/lingoport/bin/ |
cp -p ~/PRC-Docker/jq ~/docker/jenkins/lingoport/bin/ |
||
Revision as of 17:18, 31 May 2023
Pull Requests, Merge Requests code changes can be analyzed using the Globalyzer Scanner.
Contents
- 1 Video Introduction to GitHub, GitLab, and Bitbucket
- 2 Pull Requests via Jenkins Running on Docker
- 3 Historical Version of the Pull Request/Commit Globalyzer Scanning
Video Introduction to GitHub, GitLab, and Bitbucket
Below are short introductions of the functionality around Globalyzer scanning for Git repository:
- GitHub https://vimeo.com/817611647
- GitLab https://vimeo.com/817610534
- Bitbucket https://vimeo.com/826230267
Pull Requests via Jenkins Running on Docker
THIS SECTION IS CURRENTLY A WORK IN PROGRESS AN NOT YET COMPLETE
Prerequisites
- VM running Linux and Docker
- JQ JSON Parser - Statically compiled binary version
- GitHub PAT credentials to connect to GitHub
- The user for these PAT credentials has read access to the repository
- A copy of your Globalyzer.license from globalyzer.com or your local globalyzer server instance.
- Globalyzer.com credentials for logging in to globalyzer.com
- username
- password
- server
- Optional:
- Apache or nginx could be installed and running on the VM itself
- Used as a reverse proxy to front the Jenkins instance
File System Configuration
If Apache is installed as per normal for many Lingoport systems, the following is required to configure Apache to permit proper connection to the Jenkins Docker container
- Copy the tar file to the home directory of the user that will be running docker and unzip
- Identify the port that will be used to connect to the Jenkins instance in the container. It could be something like 8085 for example. That is what will be used in this instruction set.
- Obtain the UID/GID for the user that will be running docker. Note this user must have sudo privileges.
- Create the directory structure for the volume storage used by jenkins. Be sure there is sufficient space. Base install will consume 650MB of space for the volume itself.
- Place files as noted below before installing
- Be sure that the jq binary is executable once copied
- Create the .globalyzerrc file and populate it with the credentials for logging into globalyzer.com or the globalyzer server that will be connected to.
Here are the steps from the terminal.
   mkdir ~/docker/jenkins/lingoport/bin
   cp ~/PRC-Docker/Globalyzer.license ~/docker/jenkins/lingoport/
   cp ~/PRC-Docker/globalyzer-lite-VERSION.zip ~/docker/jenkins/lingoport/
   cp -p  ~/PRC-Docker/jq ~/docker/jenkins/lingoport/bin/
   cd ~/docker/jenkins/lingoport
   unzip globalyzer-lite-VERSION.zip
   rm /globalyzer-lite-VERSION.zip
   cd globalyzer-lite/GitHub_PRC
   cp -p job_lite_pr.sh job_lite_pr.sh_orig
   cp ~/PRC-Docker/job_lite_pr.sh.tar .
   tar -xf job_lite_pr.sh.tar
   rm job_lite_pr.sh.tar
   cd ~/docker/jenkins
   vi .globalyzerrc
Launching the Jenkins Docker Container
Given the file system has been created and UID/GID are known as well as the port that will be used for connecting to the Jenkins instance. Start the docker instance for Jenkins.
- The -d detaches the command being run from the terminal. Normally this is something that will only be used once everything is in place and confirmed to be working. For initial startup, its use can be ignored.
- The -u is for setting the uid/gid of the user that owns the volume storage identified earlier. This user should also be the user that is starting the docker instance.
- The -p 8085:8080 is the port external to internal mapping identified earlier. The 8080 would never change, only the external port is modifiable
- The -p 50000:50000 is for mapping between Jenkins instances only. Not required for standalone systems.
- The JENKINS_OPTS sets the baseurl for the application
- The -v mounts the prior locally created file system to the running docker instance as a volume and mas it.
- The jenkins/jenkins:lts-jdk11 is the long term support image for Jenkins. Currently, it is Jenkins 2.387.3
The below command string will create a new container instance that will restart the container unless specifically stopped. It will reuse the existing container on a restart of the OS. If the container is stopped before the reboot is performed, it will need to be started using sudo docker start "CONTAINER ID"
sudo docker run -d -u 1000:1000 -p 8085:8080 -p 50000:50000 --env JENKINS_OPTS="--prefix=/jenkins" --restart=unless-stopped -v /USER_HOME_DIR/docker/jenkins:/var/jenkins_home jenkins/jenkins:lts-jdk11
This will download the required images and start the container. There will be a message about initial password, make note of it as it will be used to log into Jenkins
   *************************************************************
   *************************************************************
   *************************************************************
   Jenkins initial setup is required. An admin user has been created and a password generated.
   Please use the following password to proceed to installation:

   xxxxxxxxxxxxxxxxxxxxxxxxxxxxxx

   This may also be found at: /var/jenkins_home/secrets/initialAdminPassword

   *************************************************************
   *************************************************************
   *************************************************************
Browser Connected Configuration
Go to application using the browser and use the above password to log in initially

At this screen select Install Suggested Plugins

The plugins will begin to install, this will only be a few minutes.

Create the Admin account. This will be a new account outside of what was used to connect initially. It will be the administrator account.

This sets up the URL with a path to the instance. It will include /jenkins so it should be something like “http(s)://<YOUR FQDN/jenkins/

The base Jenkins system install is complete at this point.

Click Start using Jenkins and the Dashboard appears

The alert is caused by this running locally and not using nodes. Click on it and select “Dismiss”

If once this is cleared, this message appears. It is due to a reverse proxy being used that needs to have some additional configuration.
![]()
When using Apache as a reverse proxy, adding these two entries to the virtual host SSL configuration should correct the error.
RequestHeader set X-Forwarded-Proto "https"
RequestHeader set X-Forwarded-Port "443"
Add Configuration Items for Pull Requests and Commits
Install and additional plugin called “Discard Old Builds” by going to Manage Jenkins → Manage Plugins → Available Plugins and search for “Discard old builds”

Install an additional plugin called “Throttle Concurrent Builds” by going to Manage Jenkins → Manage Plugins → Available Plugins and search for “Throttle Concurrent Builds”
![]()
Once plugin is installed to go Manage Jenkins → Configure System → Throttle Concurrent Builds and select Add Category:
Create Category Name PRC_THROTTLE and set Maximum Total Concurrent Builds = 1 and Maximum Concurrent Builds Per Node = 1.
Select “Apply” to save
Set up the environment variables in Jenkins:
- Select the Environment Variables checkbox
- Select Add and add the following
- For a GitHub Installation
- GITHUB_PRC_FILES = $JENKINS_HOME/lingoport/<globalyzer-lite-dir>/GitHub_PRC
- PATH = $PATH:$JENKINS_HOME/lingoport/bin
- If https is to be used for connecting to the git repos set to true. If ssh is to be used to connect to git repos set to false.
- useHTTPS = true or false
- For a GitHub Installation


Click Apply and Save
Add new API token to be used by GitHub Webhook
In Jenkins create a new API token for the user that will be running the build. This will be required to be added to the webhook to permit connection back to the Jenkins instance
The credentials used for GitHub will require read access to the git repository.
- Select Dashboard → Manage Jenkins → Manage Users → Select the gear icon on the right side of the Admin user (Admin user created earlier)
- In the API Token section, select Add new Token
- Set the name of the new token to GitHub-PRC-TOKEN or something that is memorable and can identify with the PRC action.
- Be sure to copy the token value as it will never be displayed beyond this time.

Leave the GUI and go back to the file system
- Edit the github.properties file:
- /HOME_DIR/docker/jenkins/lingoport/globalyzer-lite-VERSION/GitHub_PRC/github.properties.
- Update the github.login and github.oauth with the appropriate PAT values that were created ahead of time.
- When using https there will need to be a .netrc file placed in the jenkins_home directory inside of the container. This can be placed in the volume directory at /HOME_DIR/docker/jenkins/.netrc
- login <GitHub login ID> (Not email)
- password PAT
- When using ssh there will need to be the ssh public and private keys stored in the /HOME_DIR/docker/jenkins/.ssh directory. Also with ssh be sure to manually connect to the git repo prior to using the PRC scripts. The known_hosts file needs to be updated and that is a manual process that requires manually accepting the key. This should only be needed to be performed once.
- Run the installer for Globalyzer-Lite. This must be done inside of the contains so everything is properly set up in that environment
- Obtain the container id
-
sudo docker container ps
-
-
sudo docker exec -it CONTAINER ID /bin/bash -
cd ~/lingoport/globalyzer-lite-VERSION -
./install-lite.sh(Should return Globalyzer Lite installation completed successfully)
- Obtain the container id
Create Jenkins Build for Pull Requests and Commits via GitHub
- Log into Jenkins and go to the Dashboard
- Select New Item
- Create an item name for the PRC build.
- Use an item name that is memorable, something like GitHub-PRC is fine.
- Select Freestyle Project
- Select OK
- Add a description (optional)
- Select “This project is parameterized”
- Add two string parameters
- payload = NOT_SET
- LITE_PROJECT_DEFINITION = DEFAULT
- DEFAULT looks for the project definition to exist in the lingoport directory of the working branch as such: lingoport/LiteProjectDefinition.xml
- Select “Throttle Concurrent Builds”
- Set Maximum Total Concurrent Builds to 1
- Set Maximum Concurrent Builds Per Node to 1
- In Build Triggers Section
- Select Trigger builds remotely (e.g., from scripts)
- In the Authentication Token place a token you wish to use. Something like HOOK for example.
- In Build Steps Section
- Select Execute Shell
- Place the following shell code
-
set +x -
$GITHUB_PRC_FILES/job_lite_pr.sh $GITHUB_PRC_FILES/pr_message.html
-
- In the Post-build Actions
- Select Discard Old Builds
- Set Days to keep builds to 14
- Save the configuration
GitHub Configuration
Webhooks are calls made from the GitHub side down to the Jenkins instance. They provide information required by the Jenkins build to properly scan the files that were either committed or had a pull request performed on them. This is discussed in detail in the Videos found in earlier sections of this page.
Below is a summary of the steps.
- Log into GitHub
- Navigate to the repository that will have pull requests and commits applied to it
- Click on Settings → Webhooks→ Add webhook
- Enter the following:
- Payload URL
- URL found in Build Triggers Section of the Jenkins Build
- It will likely require the API Token generated prior along with the username that the build in Jenkins was created
- https://USER:TOKEN@JENKINS_URL/jenkins/job/BUILD_NAME/buildWithParameters?token=BUILD_TOKEN
- Content Type application/x-www-form-urlencoded
- Radio button: Let me select individual events
- Pushes
- Pull Requests
- Pushes, Pull Requests
- Payload URL
- Using the Recent Deliveries tab it's possible to check the status of a web hook call to confirm that it worked correctly.
- There should be a build triggered for each webhook called submitted
- If there are issues use the Redeliver button to resend
Install Validation
This completes the basic installation. To confirm that everything is working correctly.
- Log into GitHub and navigate to a repository
- Make a change directly to a file in the GitHub repository and “Commit” the change (assuming Commits are enabled).
- Switch to Jenkins and confirm that the build was triggered and successfully completed
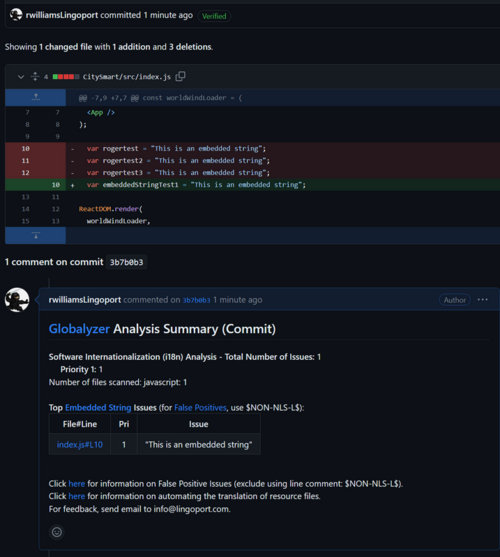
- Switch back to GitHub and click on the commit id for the modification in and confirm that there is an associated summary.
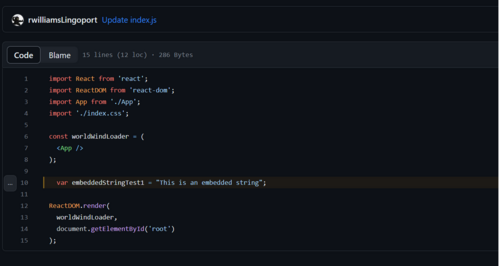
- Clicking on the File/Line link in the summary should show the code line and modification made.
This is an image of the Analysis Summary in GitHub for a commit
This image shows the line of code that is presented when clicking on the link in the Analysis Summary
Historical Version of the Pull Request/Commit Globalyzer Scanning

