AWS S3 Data Source Credential
Git to AWS S3 buckets
AWS S3 may be used when the actual repository (Git, etc.) may not be reachable by Command Center directly. In that case, AWS S3 may be used as a bridge between the repository and Command Center. For more information on how to set up the process between a Git repository and AWS S3, see:
In order to use this system from Command Center, a project needs to be created with an AWS S3 Data Source Credential.
Creating an AWS S3 Data Source Credential
[Administrator]
The Administrator can create the data source credentials by selecting the ![]() (Create new credential) button on the Manage Data Source Credentials page.
(Create new credential) button on the Manage Data Source Credentials page.
Select the AWS S3 card
This will start the configuration process
- Enter a Region, an Access Key, and a Secret Key
These elements should be provided by an AWS administrator who has configured the AWS S3 bucket.
- Next
Give the new credential a name
- Assign it to applicable managers
- Create
The system should return to the Manage Data Source Credentials page with "Credential created" note and the new credential should be listed.
Creating a project using the AWS S3 credential
Select the ![]() to get to the Projects page and select the
to get to the Projects page and select the ![]() to Create new project. The first step in the process will come up.
to Create new project. The first step in the process will come up.
Before creating the project, the AWS S3 bucket must be configured correctly. The bucket might contain to_localyzer and from_localyzer folders that contain resource files to be translated. These are the default names and can be anything as long as they are indicated in the project configuration.
Step 1: Select the AWS S3 data source credential
Next
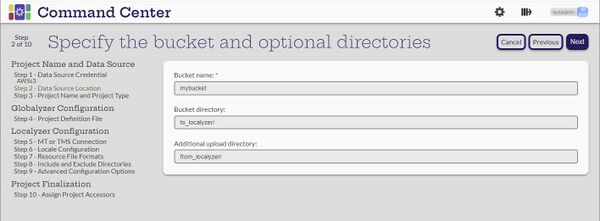
Step 2: Specify the bucket and the optional directories
- Bucket name: This is the name of the bucket as shown in AWS S3
- Bucket directory and Additional upload directory: These are optional. But if there are values in the fields, they must exist as folders in the AWS S3 bucket.
Next
Now continue with the Step-by-step instructions.


