Figma Plugin and Localyzer Project
Introduction
Show translations within Figma with the Lingoport Localyzer Figma plugin.
To get the Figma plugin, log on to your Figma account and follow this link:
The video below explains how to configure and use the Figma plugin:
The image will be used below to show the Figma side of the configuration:
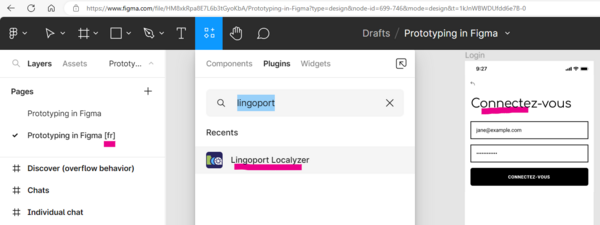 Lingoport Localyzer Figma plugin: the page was translated into French.

Set up overview
To set up the Figma Plugin with Command Center, the following elements need to be configured:
- An API User: the link between the Figma plugin and the Command Center Localyzer project
- A repository / branch with
figma/locales/en/translation.json - A Command Center Figma project configured on the repository
- Provide access to the Command Center Localyzer project to the API User
- The Figma plugin in Figma
Overall interaction
From Figma to Command Center Localyzer
From the Figma plugin, strings are sent to an existing Command Center Localyzer project's repository. Those strings are stashes in a repository under a top level directory called locales, a sub-directory called en (if English is the source locale), and in a file called translation.json: so
figma/locales/en/translation.json
The Command Center Localyzer project leverages the overall functionality for any other Command Center Localyzer projects, such as access, email notification, TMS, analysis, translation, etc.
From Command Center Localyzer to Translation
As a Localyzer project, the translation.json file can be sent for translation, like any other projects. Best is to keep two letters locales, such as ja for Japanese/Japan or fr for French/France.
The translated files will be stashed in the repository under their respective locale directory, for example
figma/locales/fr/translation.jsonfigma/locales/ja/translation.json
From Command Center back to Figma
For those strings which were passed from Figma to Localyzer and were translated, the Figma plugin will retrieve those translations and display the page in that locale. Those strings which were not translated will show in the source locale.
Create API user
API Users are used to authenticate and authorize API actions on Command Center. The Figma plugin needs an API user and token in order to communicate with a Command Center Localyzer project with that API User configured.
To set up an API user, please see:
And choose the role API user. The API user name and token will be used to configure the Figma plugin.
Create a Command Center Figma Project
Set up the Lingoport Localyzer Figma plugin
To get the Figma plugin, log on to your Figma account and follow this link:
or navigate to the plugin search box and type Lingoport as shown in the introduction image above
Enter the following configuration elements for the Lingoport Localyzer Figma plugin:
- The URL to your Command Center
- The API user name configured above
- The API token

At that point, the drop down below will show those projects accessible to the API User. Select he project configured above.
Context
Optionally, click the Enable Context Screenshots checkbox: This option associates the design element as the context for the strings sent to Command Center for translation. This works with projects whose TMS or LLM has an InContext server.
Modes and Variable Tables
Optionally, click the Enable Variable Table Translation. This option leverages the Figma Modes Variable Tables. See:
If your organization does not use Modes, do not click this option.
If it does, this option allows for a faster and more elegant solution. It also allows to see the variable tables with each column showing one of the 'modes', here one of the locales. Switch locales on the <page>[var tables] to see the design in a different locale, including the keys used later on by developers with 'Figma 2 Dev'.

- '1': Once translation is returned, if the Variable Table option is enabled, a new page with 'Var Table' shows.
- '2': Select the locale, or 'mode' in this Figma framework, in which to view the application
- '3': To open the table with the variables, click on 'Variable Table'
- '4': Each column is a 'mode', here a locale. This table provides one view with the source strings, the keys, the translated strings.
Note: Keys are created in the Lingoport Figma Plugin, based on the Figma project hierarchy. Keys can be modified in the Variable Table and sent to the Localyzer projects, to be used in the Figma2Dev development resource file generation.
Verification of the setup, actions
- With the plugin active, in the source English page, select a few items to be sent to Command Center Localyzer using the selection cursor.
- The selected strings will appear in the plugin.
- Click on the x to eliminate those strings which do not need to be sent to Localyzer.
- Click Review export.
- Click Export to Command Center.
- In Command Center Localyzer, analyze the project: The number of source words should now have increased.
- Send the file to translation.
- Upon translation, go back to Figma.
In Figma, select one of the locale that was translated: A new page appears, as shown in the introduction above for French, with the locale in square brackets, as with [fr] above.
To verify the context was associated correctly, browse to the associated Localyzer project, navigate to the String Manager and click on the context indicator.
Missing Fonts
Figma design being developed on one system and used on another may have font issues. If so, the translation may not be able to be returned in the Figma design from Localyzer. The font issues first need to be corrected.
When returning a translation from Localyzer, the following modal window will indicate the error:

To correct the missing font issue: