InContext Installation
InContext QA Installation and Verification
This section identifies the tasks to get the InContext QA configured and verified. These are items, most likely, performed by a system administrator or linguistic developer. A linquistic QA, or reviewer, would not need this section for installation and should continue to the next part.
Translate all resource files
First, create a Jenkins automation job for your application and it's resources. Make sure that it displays on the Dashboard correctly.

Make sure the resources are fully translated and in the repository.
Configure the Jenkins job for instrumentation
In Jenkins, select the automation job, scroll down and select Add build step at the bottom of the Build section. Select IQA Instrument.

Run the automation job again. Verify that it Succeeds and there are no ERRORs in the console output. There should be instrumented resource files in the repository. The instumented files can be identified because they are resource files with _LRMLQA in the name.
Deploy the web-based application
At this point, the Lingoport system is configured, resource files have been instrumented and should reside in the repository.
The next step is to deploy the new instrumented resource files in the web-based application. On another server, the Deployment Server, set up the application and use the instrumented _LRMLQA resource files in place of the usual resource files. We assume that the Deployment Server is using Linux.
The deployment server may need the following software packages:
- Tomcat
- Ant
- Java (1.8 or higher)
The Lingoport Server Jenkins user needs to be able to communicate with the deployment server over SSH and SCP. The permissions can be set up using ssh-keygen from the Jenkins user on Lingoport Server:
$ cd /var/lib/jenkins/.ssh
$ ssh-keygen
$ <accept the defaults and don't enter a password>
$ vi id_rsa.pub
<copy contents of file>
On deployment server:
$ cd ~/.ssh
$ vi authorized_keys <if this file does not exist, create it>
<copy the contents of id_rsa.pub on the Lingoport Server into authorized_keys, being careful not to add line breaks>
$ scp <testfile> jenkins@<Lingoport Server>:/var/lib/jenkins
Verify that the <testfile> is transferred from the deployment server to the Lingoport Server.
Test the system
- On the Lingoport Server, as the Jenkins administrator, create a username and a token to be used with the Chrome Extension.
- As a user, install and configure the InContext Chrome Extension and verify that you can select strings and suggest changes.

- Then Send the changes.

- If everything has been configured correctly, the Jenkins IQARetranRequest job should have been triggered.
Installation for Reviewers or Linguistic QA
Pre-Requisites
In order to use Lingoport InContext QA, the user must have access to the Google Chrome browser. Lingoport InContext QA is based off a Chrome extension and other browsers do not have the same capability. Firefox or Internet Explorer can not be used as the browser in this situation.
- Localyzer must be installed and
- the G11n Continuous System's Jenkins server must be accessible from the reviewer's system.
The reviewer needs to have the following information which should be set up by the Jenkins administrator:
- The Jenkins URL
- A Jenkins username and password.
- To get the API token and verify the Jenkins account:
- Log in to Jenkins using the reviewer username and password.
- Select the pull down next to username at the top of the window and select Configure.
- Under API Token, Show API Token.... Copy the token.
In addition, the reviewer will need:
- Their email address
Chrome Extension Installation
From within the Google Chrome Browser:
- Make sure you are signed in to Chrome Web Store with an authorized Google account: https://chrome.google.com/webstore/category/extensions
- Lingoport will give permissions to access the extension, based on the email address given to Lingoport. This is the email address that must be used when signing into the Chrome Web Store.
- Navigate to https://chrome.google.com/webstore/detail/lingoport-incontext-qa/jboelmhkcjgogedegacfnhabhgpamiam
- If this gives an error or a "URL was not found" message:
- In the Chrome Web Store, verify that you are logged in using the correct email address . If this does not work, please contact support@lingoport.com.


- click on Add to Chrome Extension
You should see the Lingoport swirl ![]() at the top of the Chrome browser window.
at the top of the Chrome browser window.
Chrome Extension Configuration
- Before configuring the Chrome InContext extension, a username needs to be created in Jenkins.
- Click on the Lingoport swirl
 for the Chrome Extension (top right corner of your Chrome)
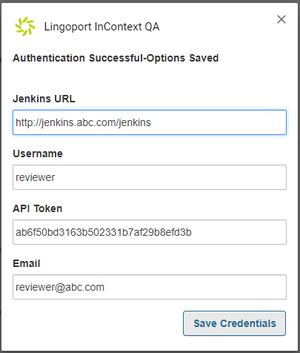
 - Click on the 'Option' icon (☰) of the dialog.
- Fill in the data, using the username and API token and Save Credentials

You should be ready to do InContext reviews.
Loading Local Files in Google Chrome
Due to security reasons Chrome will not load local files by default. You'll need to launch the Google Chrome browser from the command line window with the additional argument –allow-file-access-from-files as well as allowing local files access within the Chrome Extension.
- Determine where chrome.exe is located on your machine by entering chrome://version into your Chrome Browser and search for Executable Path.
- Launch the Google Chrome browser from the command line window with the additional argument –allow-file-access-from-files.
>"path to your chrome installation\chrome.exe" --allow-file-access-from-files
- Within the Chrome Browser right-click on the Lingoport Incontext QA Chrome Extension and choose Manage Extensions

- Move the Allow access to file URLs switch to the right.

Using Multiple Displays with Google Chrome
In order for multiple high resolution displays to work properly with Google Chrome you'll need to launch the Google Chrome browser from the command line with additional arguments. You may want to create/change the Chrome shortcut to include the options rather than opening from a command line each time.
- Determine where chrome.exe is located on your machine by entering chrome://version into your Chrome Browser and search for Executable Path.
- Launch the Google Chrome browser from the command line window with additional scaling directives /high-dpi-support=1 /force-device-scale-factor=1.
>"path to your chrome installation\chrome.exe" /high-dpi-support=1 /force-device-scale-factor=1- Note: arguments are single spaced. If you need to load local files then add –allow-file-access-from-files to the argument list.