Difference between revisions of "InContext Installation"
(→Chrome Extension Installation) |
(→Chrome Extension Installation) |
||
| Line 18: | Line 18: | ||
* Navigate to https://chrome.google.com/webstore/detail/lingoport-incontext-qa/jboelmhkcjgogedegacfnhabhgpamiam |
* Navigate to https://chrome.google.com/webstore/detail/lingoport-incontext-qa/jboelmhkcjgogedegacfnhabhgpamiam |
||
* If this gives an error or a "URL was not found" message: |
* If this gives an error or a "URL was not found" message: |
||
| − | ** Check to make sure you are logged in as the correct Chrome user. Return to google.com and select the upper-right icon. This should match the login given to Lingoport. If it does not, sign out and sign in as the correct user. If this does not work, please contact support@lingoport.com. |
+ | ** Check to make sure you are logged in as the correct Chrome user. Return to www.google.com and select the upper-right icon. This should match the login given to Lingoport. If it does not, sign out and sign in as the correct user. If this does not work, please contact support@lingoport.com. |
[[File:google.png|600px]] |
[[File:google.png|600px]] |
||
| − | * click on 'Add to Chrome Extension |
+ | * click on '''Add to Chrome Extension''' |
| − | You should see |
+ | You should see the lime-green Lingoport swirl at the top of the Chrome browser window. |
| + | * Select the '''three vertical dots''' on the top right side of the Chrome browser window. In the menu, select '''Settings''' |
||
| + | * On the Settings page, select the '''three horizontal lines''' (Main Menu) and select '''Extensions'''. There should be an entry for Lingoport InContext QA. Slide '''Developer Mode''' button to ON. |
||
Note: If you are using multiple screens, you may want to invoke Chrome the following way: |
Note: If you are using multiple screens, you may want to invoke Chrome the following way: |
||
Revision as of 20:00, 24 July 2018
Pre-Requisites
In order to use Lingoport InContext QA, the user must have access to the Google Chrome Browser. Lingoport InContext QA is based off a Chrome extension and other browsers do not have the same capability. Firefox or Internet Explorer can not be used as the browser in this situation.
- LRM must be installed and
- the G11n Continuous System's Jenkins server must be accessible from the reviewer's system.
The reviewer needs to have the following information, usually received in an IT email:
- The Jenkins URL
- Their Jenkins user name
- Their Jenkins API token
In addition, the reviewer will need:
- Their email address
Chrome Extension Installation
From within the Google Chrome Browser:
- Make sure you are signed in to Chrome Web Store with an authorized Google account: https://chrome.google.com/webstore/category/extensions
- Lingoport will give permissions to access the extension, based on the email address given to Lingoport.
- Navigate to https://chrome.google.com/webstore/detail/lingoport-incontext-qa/jboelmhkcjgogedegacfnhabhgpamiam
- If this gives an error or a "URL was not found" message:
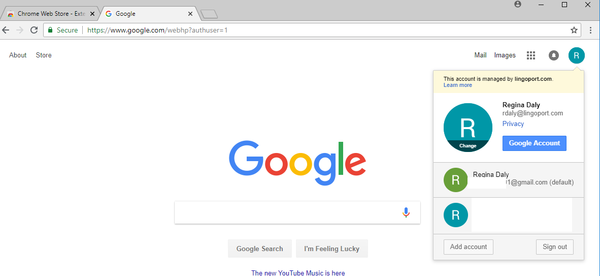
- Check to make sure you are logged in as the correct Chrome user. Return to www.google.com and select the upper-right icon. This should match the login given to Lingoport. If it does not, sign out and sign in as the correct user. If this does not work, please contact support@lingoport.com.
- click on Add to Chrome Extension
You should see the lime-green Lingoport swirl at the top of the Chrome browser window.
- Select the three vertical dots on the top right side of the Chrome browser window. In the menu, select Settings
- On the Settings page, select the three horizontal lines (Main Menu) and select Extensions. There should be an entry for Lingoport InContext QA. Slide Developer Mode button to ON.
Note: If you are using multiple screens, you may want to invoke Chrome the following way:
"C:\Program Files (x86)\Google\Chrome\Application\chrome.exe" /high-dpi-support=1 /force-device-scale-factor=1. --allow-file-access-from-files
Chrome Extension Configuration
- Click on the Lingoport swirl of the Chrome Extension (top right corner of your Chrome)
- Click on the 'Option' icon (☰) of the dialog.
- Fill in the data as per the Pre-Requisites above:
- Jenkins URL
- Jenkins user name
- Jenkins user API Token
- Reviewer's email address
- Click on 'Save Credentials'
