Difference between revisions of "GitHub Pull Requests"
(→Git Pull Requests) |
|||
| Line 1: | Line 1: | ||
| + | = GitLab Pull Requests & Commits Globalyzer Analysis Webhook = |
||
| + | |||
| + | Follow these steps to set up a webhook to automate Globalyzer's analysis on your GitLab repository's merge requests and/or commits. |
||
| + | |||
| + | '''Video Guide:''' https://drive.google.com/file/d/1SQX9VUFfLnHfNn6a1yZ3erFczDKSSJOf/view?usp=sharing |
||
| + | <br> |
||
| + | |||
| + | == Jenkins Set Up == |
||
| + | |||
| + | |||
| + | === Install Globalyzer Lite === |
||
| + | 1. If not done so already, move the root Globalyzer Lite folder to your Jenkins file system. Create a `lingoport` directory at the root of your Jenkins system and place the downloaded globalyzer-lite folder there (e.g., /var/lib/jenkins/lingoport/globalyzer-lite). ***To avoid any errors, please do not modify or move the files in this folder unless specifically directed to do so.*** |
||
| + | 2. Install Globalyzer Lite on your Jenkins system by following the instructions in the `README.txt` file (located in the globalyzer-lite folder). ***Make sure to install Lite as the `jenkins` user!*** |
||
| + | - Note: You should see the success message "Globalyzer Lite installation completed successfully" before proceeding. |
||
| + | 3. You will need to download the Globalyzer.license file from here: https://www.globalyzer.com/gzserver/home/installclient (you may need to log in with your Globalyzer.com credentials). Once downloaded, place the Globalyzer.license file into the `lingoport` directory from step 1. |
||
| + | |||
| + | |||
| + | === Set Up GitLab Credentials === |
||
| + | 4. In this folder, you will find the `gitlab.properties` file. Your GitLab credentials will need to be set in this file before proceeding (failure to set these credentials will result in an error). |
||
| + | - For `gitlab.login`, enter your GitLab username. Note this is not your GitLab login email, it is the username as it appears after you sign in. You can find this by selecting the profile icon on the top right after signing into GitLab. Your username will be located under your full name and start with an @ symbol, please **do not** include the @ symbol when filling out this field in the properties file. |
||
| + | - For `gitlab.oauth`, you will need to enter a Personal Access Token created for your GitLab account. To generate an access token: |
||
| + | - Sign in to GitLab. |
||
| + | - Select your profile icon on the top right and select "Preferences". |
||
| + | - On the left navigation menu, select "Access Tokens". |
||
| + | - Enter the Token name and expiration date as desired. |
||
| + | - Under "Select scopes", select "**api**". The api scope is necessary for the analysis comment to be posted to the merge requests and/or commits. |
||
| + | - Select "Create personal access token". |
||
| + | |||
| + | |||
| + | |||
| + | |||
| + | |||
| + | |||
| + | |||
| + | |||
| + | |||
| + | |||
| + | |||
| + | |||
| + | |||
| + | |||
| + | |||
| + | |||
| + | |||
| + | |||
| + | |||
| + | |||
| + | |||
| + | |||
= GitHub = |
= GitHub = |
||
GitHub is a Web-based Git repository hosting service. It offers all of the distributed revision control and source code management (SCM) functionality of Git as well as adding its own features. |
GitHub is a Web-based Git repository hosting service. It offers all of the distributed revision control and source code management (SCM) functionality of Git as well as adding its own features. |
||
Revision as of 18:45, 17 April 2023
Contents
GitLab Pull Requests & Commits Globalyzer Analysis Webhook
Follow these steps to set up a webhook to automate Globalyzer's analysis on your GitLab repository's merge requests and/or commits.
Video Guide: https://drive.google.com/file/d/1SQX9VUFfLnHfNn6a1yZ3erFczDKSSJOf/view?usp=sharing
Jenkins Set Up
Install Globalyzer Lite
1. If not done so already, move the root Globalyzer Lite folder to your Jenkins file system. Create a `lingoport` directory at the root of your Jenkins system and place the downloaded globalyzer-lite folder there (e.g., /var/lib/jenkins/lingoport/globalyzer-lite). ***To avoid any errors, please do not modify or move the files in this folder unless specifically directed to do so.*** 2. Install Globalyzer Lite on your Jenkins system by following the instructions in the `README.txt` file (located in the globalyzer-lite folder). ***Make sure to install Lite as the `jenkins` user!***
- Note: You should see the success message "Globalyzer Lite installation completed successfully" before proceeding.
3. You will need to download the Globalyzer.license file from here: https://www.globalyzer.com/gzserver/home/installclient (you may need to log in with your Globalyzer.com credentials). Once downloaded, place the Globalyzer.license file into the `lingoport` directory from step 1.
Set Up GitLab Credentials
4. In this folder, you will find the `gitlab.properties` file. Your GitLab credentials will need to be set in this file before proceeding (failure to set these credentials will result in an error).
   - For `gitlab.login`, enter your GitLab username. Note this is not your GitLab login email, it is the username as it appears after you sign in. You can find this by selecting the profile icon on the top right after signing into GitLab. Your username will be located under your full name and start with an @ symbol, please **do not** include the @ symbol when filling out this field in the properties file.
   - For `gitlab.oauth`, you will need to enter a Personal Access Token created for your GitLab account. To generate an access token:
       - Sign in to GitLab.
       - Select your profile icon on the top right and select "Preferences".
       - On the left navigation menu, select "Access Tokens".
       - Enter the Token name and expiration date as desired.
       - Under "Select scopes", select "**api**". The api scope is necessary for the analysis comment to be posted to the merge requests and/or commits.
       - Select "Create personal access token".
GitHub
GitHub is a Web-based Git repository hosting service. It offers all of the distributed revision control and source code management (SCM) functionality of Git as well as adding its own features.
Git Pull Requests
Files can be committed in a Git branch or directly in "main" or "develop". When committing files in a branch, pull requests let you know what changes you've made to a repository before they are committed to the repository's "main" branch. Once a pull request is sent, interested parties can review the set of changes, discuss potential modifications, and even push follow-up commits if necessary.
You can configure Globalyzer to scan the files that changed between the two branches of a pull request, and post a Globalyzer Analysis Summary on the pull request in Github.
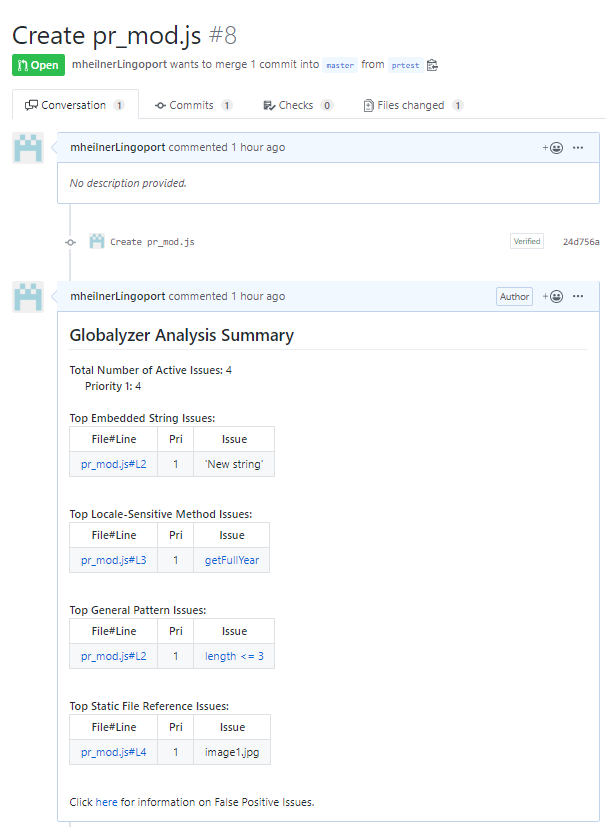
Example of a Pull Request Analyzed with Globalyzer
This is pull request #8. The change to the code in the pull request was to add a file containing one embedded string, one locale-sensitive method, one general pattern, and one static file reference to illustrate the different sections of the analysis summary. At the top of the analysis, are issue totals. Then the issues are displayed by type, with the top (up to) ten issues displayed.
Clicking on the file#line link will send the user to the line of code in that respective file. If an issue has associated help, as in the case for most locale-sensitive methods, the issue will appear as a link and clicking the issue will display the associated help.
Before merging the code back to "main", the developer would typically externalize embedded strings, fix locale-sensitive method issues, general pattern issues, and static file references and re-submit the changed code for further analysis.
Pre-requisites
You will need read access to the github repository. If using ssh to clone, follow github's guide to set up ssh clone access for an account which may be used for the pull request analysis.
To check and see if you have read access to the github repository, try to clone from the command line:
git clone git@github.com:<RepoName>.git
If you see:
fatal: Could not read from remote repository.
Please make sure you have the correct access rights and the repository exists.
follow the github's guide to correct the issue before moving forward.
Github will need to be able to send HTTPS (port 443) requests which reach your system. See github's guide to github IP addresses here, and check with your IT and networking departments to set up access or forwarding of Github's connections.
Once configured, you may verify that the pull request notifications are making it to the target machine via:
sudo tail -f /var/log/httpd/access_log
An example might look like:
140.82.115.102 - - [18/Nov/2021:17:58:40 +0000] "POST /jenkins/buildByToken/buildWithParameters/build?job=CET-WorldWindExplorer-PullRequest&token=HOOK HTTP/1.1" 201 - "-" "GitHub-Hookshot/93dfdaa"
How to Configure Pull Request Analysis
- Configure github.properties
- Create a Pull Request Jenkins Job
- Create a Webhook for your Github Repository
- Navigate to the GitHub repository as an Admin account
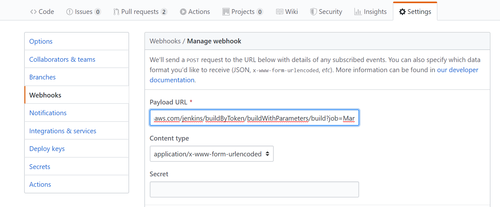
- In Settings tab for the GitHub repository (available if the account has Admin permissions), select Webhooks and the Add webhook button.
- The Webhook should follow this pattern:
- Also, select: Let me select individual events.
- Then: Pull Requests
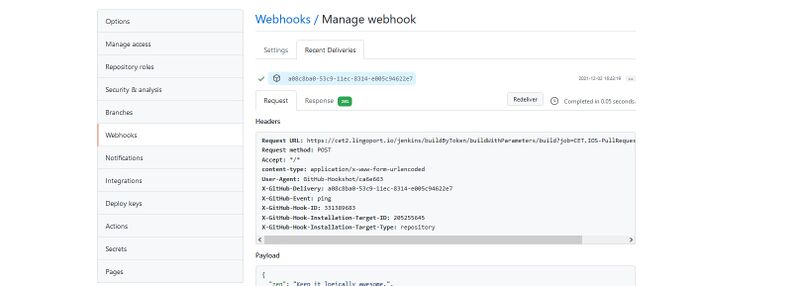
- Test the Webhook and especially check for firewall issues going back to the Jenkins system. After creating the Webhook, it will attempt to send a payload which should trigger the Jenkins job. While still in Webhooks, select the Recent Deliveries tab.
- A response of 201 is successful and this can be verified by checking the Jenkins job. It should have been triggered and have some information in it.
- A response of 404 means that there was a communications issue with Jenkins. Verify that port 443 is open. Once changes have been made, select the Redeliver button to test the payload again.
You must create the file /var/lib/jenkins/Lingoport_Data/Dashboard/github.properties with the following contents:
  github.login=<your github login>
  github.oauth=<your github token>
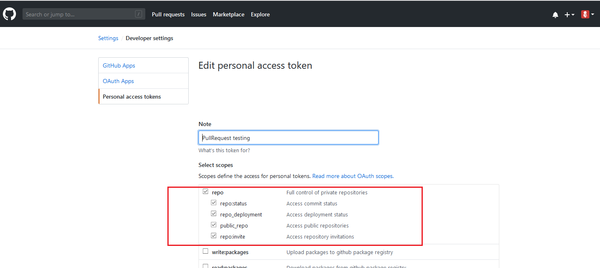
Note: To create a token for yourself on Github, navigate to https://github.com, select Settings from login dropdown, select Developer settings on left, select Personal access tokens, click the Generate new token button. Also note that your access token must have the repo scope selected.
Create a new Jenkins job named <YourOrganization>.<YourRepoName>-PullRequest by copying the template Lingoport.RepoName-PullRequest job.
Look at the configuration for your new job and verify that Trigger builds remotely is checked and then set the authentication token; the default is HOOK. The token is the only item you need to configure for your new job.
Note: Your Jenkins user must have special permissions to configure the PullRequest job. If your job does not have the Trigger builds remotely option, it is likely that your Jenkins user does not have the necessary permissions. Please see here for information on Jenkins Global Security Configuration.
The Pull Request on GitHub needs to trigger a Webhook back to Lingoport's Jenkins instance. To do so:
Payload URL: http(s)://JENKINS_URL/jenkins/buildByToken/buildWithParameters/build?job=Group.RepoName-PullRequest&token=HOOK
Content type: application/x-www-form-urlencoded
Pull Request event selected
Active
For example:


