Difference between revisions of "On Boarding Overview"
(→Jenkins job and Projects) |
(→Jenkins job and Projects) |
||
| Line 86: | Line 86: | ||
== Jenkins job and Projects == |
== Jenkins job and Projects == |
||
| − | When the Stack Installer creates the Jenkins jobs, it orders them into various tabs. |
+ | When the Stack Installer creates the Jenkins jobs, it orders them into various tabs. Here is an example showing the <group>.<project> for Acme.Weather: |
[[File:all_tabs.jpg|700px]] |
[[File:all_tabs.jpg|700px]] |
||
| Line 93: | Line 93: | ||
* The <b>1 - Automation</b> tab contains on-boarded jobs which generate the status of the project and pushes it to the dashboard, and pseudo-localizes resource files if necessary. These jobs tend to run whenever files are pushed to the repository for the project. See <code>''$LRM_HOME/bin/job_automate.sh''</code> |
* The <b>1 - Automation</b> tab contains on-boarded jobs which generate the status of the project and pushes it to the dashboard, and pseudo-localizes resource files if necessary. These jobs tend to run whenever files are pushed to the repository for the project. See <code>''$LRM_HOME/bin/job_automate.sh''</code> |
||
| + | ** Any job that starts with '''Lingoport.''' is a template and can be used to simplify the on-boarding process. |
||
[[File:automation_tab.jpg|700px]] |
[[File:automation_tab.jpg|700px]] |
||
| Line 100: | Line 101: | ||
[[File:nightlies_tab.jpg|700px]] |
[[File:nightlies_tab.jpg|700px]] |
||
| + | |||
* The <b>3- PrepKit</b> tab contains on-boarded jobs which are triggered by a human intervention to send the kits for translation based on the configured translation endpoint. See <code>''$LRM_HOME/bin/job_prepkit.sh''</code> |
* The <b>3- PrepKit</b> tab contains on-boarded jobs which are triggered by a human intervention to send the kits for translation based on the configured translation endpoint. See <code>''$LRM_HOME/bin/job_prepkit.sh''</code> |
||
Revision as of 20:35, 12 April 2017
Introduction
The Lingoport Suite consists of the Globalyzer Products and the LRM Product. The Globalyzer Products analyze code and identify internationalization issues such as embedded strings and locale sensitive methods. LRM uses the resource files and tracks and manages translation. Both Globalyzer and LRM have projects. A Lingoport project consists of the Globalyzer project and an LRM project.
When a Lingoport project is On-boarded, the project is set up to get new code and resource files from the repository. Jenkins jobs analyze the code using Globalyzer and LRM and the results are pushed to the Lingoport Dashboard.
- getting the necessary information about the LRM project, its target locales, etc.
- creating an LRM project using the command line
- creating a Globalyzer Lite project definition file
- setting up the Jenkins jobs
- verifying those jobs
A project can only be on-boarded within a group. That group must have been licensed. The Jenkins user must have read and write access to the code repository.
In Jenkins and on the Dashboard, the Lingoport project will be referred to as <group name>.<project name>. For example given a group called "Acme" and a software project called "Weather", Jenkins and Dashboard will refer to it as Acme.Weather
Groups
A Lingoport Group is associated with a license that defines how many projects can be created in the group. When installing with the Stack Installer, the "Company Name" is the current group.
The Stack Installer creates a Jenkins job which will show information about the Group and when the license expires.
The group is Acme. Select the job (Acme.LicenseExpiration). Select the top blue sphere under Build History. This will bring you to Console Output which looks like:
Building in workspace /var/lib/jenkins/jobs/Acme.LicenseExpiration/workspace
[workspace] $ /bin/sh -xe /tmp/hudson5197610759813816370.sh
+ set +x
-rw-r--r--. 1 jenkins jenkins 425 Apr 10 12:28 /var/lib/jenkins/stack-installer/VERSION
STACK_INSTALLER_VERSION=1.9.17
COMMIT_HASH=84ed4823cb000db415c5025036a965f74c472155
SUITE_JENKINS_COMMIT_HASH=59eaaf6f1bc7d5515ea9e7c3e19ff7a636d8e09f

GLOBALYZER_LITE_VERSION=5.3
GLOBALYZER_WORKBENCH_VERSION=5.3.0
GLOBALYZER_CLI_VERSION=5.3.0

LINGOPORT_RESOURCE_MANAGER_VERSION=3.2

LINGOPORT_DASHBOARD_CLIENT_VERSION=5.6.1
LINGOPORT_DASHBOARD_SERVER_VERSION=5.6.1
SONARQUBE_VERSION=5.6.3

INSTALLATION_FINISHED=2017-04-10
Acme.LicenseExpiration
 =================================================================
 CHECK_LICENSE for GROUP Acme
License line for Acme:  Acme 10 2018-01-01 177
Number of days left on license for Acme:  177 days
Email Renewal Threshold: 30 days

 END CHECK_LICENSE
 ==========================================================
The projects under one group get the group's defaults for the associated translation system. So if a group's configuration is set up for a Lingotek's community for instance, all projects under that group will by default use the same mechanisms (Lingotek) with the same settings.
LRM projects are associated with a group. If LRM is installed without the Stack Installer, the installer requires at least one group and its license. The license for a group is obtained from support@lingoport.com based on the commercial agreement between the client and Lingoport. Each project within a group must have a unique name.
To add new groups after installing the system, use the --create-group command on lrm-cli.jar command line. You need to have requested a license key for the new group from Lingoport before creating the group. For instance:
> java -jar $LRM_HOME/lrm-cli.jar --create-group --group-name group1 --date "2016-06-01" --number-of-licenses 10 --license-key <license-key>
To update the license of an existing group, used the --update-license command on lrm-cli.jar command line. You need to have requested a license key for the new group from Lingoport before updating the group.For instance:
> java -jar $LRM_HOME/lrm-cli.jar --update-license --group-name group1 --date "2016-06-01" -number-of-licenses 10 --license-key <license-key>
Once a group has been created, the database and the file structure are updated. The Jenkins LicenseExpiration job should show the change to the license.
Group Name
A group name must conform to the following specification: A set of alphanumeric characters without the following special characters:
- < (less than)
- > (greater than)
- : (colon)
- " (double quote)
- / (forward slash)
- \ (backslash)
- | (vertical bar or pipe)
- ? (question mark)
- * (asterisk)
- (space)
- % (percentage)
Jenkins job and Projects
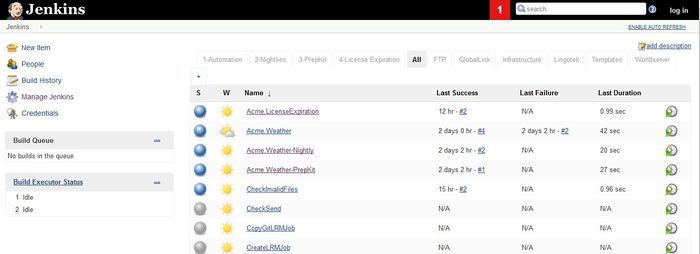
When the Stack Installer creates the Jenkins jobs, it orders them into various tabs. Here is an example showing the <group>.<project> for Acme.Weather:
- The 1 - Automation tab contains on-boarded jobs which generate the status of the project and pushes it to the dashboard, and pseudo-localizes resource files if necessary. These jobs tend to run whenever files are pushed to the repository for the project. See
$LRM_HOME/bin/job_automate.sh- Any job that starts with Lingoport. is a template and can be used to simplify the on-boarding process.
- The 2 - Nightlies tab contains on-boarded jobs which run every day or every night and provide an update to the dashboard and an email to a set of recipients based on the configured frequency. See
$LRM_HOME/bin/job_nightly.sh- It also contains the license check for a group (not a project). The name of the Jenkins job is
<group_name>.License_Expiration.See$LRM_HOME/bin/job_checklicense.sh 30(if 30 days is set as the threshold)
- It also contains the license check for a group (not a project). The name of the Jenkins job is
- The 3- PrepKit tab contains on-boarded jobs which are triggered by a human intervention to send the kits for translation based on the configured translation endpoint. See
$LRM_HOME/bin/job_prepkit.sh
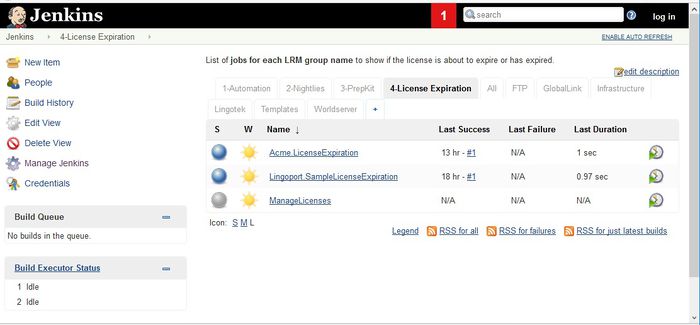
- The 4- License Expiration tab contains on-boarded jobs which are run every night to warn you if your license is about to expire. See
$LRM_HOME/bin/job_checklicense.sh
Each tab has a job setup during configuration via scripts (or manually if you prefer). After the first project has been on-boarded, on-boarding a new job consists in copying an first project's jobs and configuring a set of xml files.


