Difference between revisions of "What are the Localyzer locales"
| Line 9: | Line 9: | ||
[[Resource File(s) Format| Step 7: Resource file formats]] |
[[Resource File(s) Format| Step 7: Resource file formats]] |
||
| + | |||
| + | |||
| + | [[Step by Step Project Creation |Step 1:Data Source Credential for the project]] |
||
| + | |||
| + | [[Choose a Repository|Step 2:Choose a Repository]] |
||
| + | |||
| + | [[Name The Project and Type |Step 3: Name the Project]] |
||
| + | |||
| + | [[Creating a Globalyzer Project |Creating a Globalyzer Project - Step 4: Globayzer Lite Definition File]] |
||
| + | |||
| + | [[Creating a Localyzer Project| Creating a Localyzer Project - Step 5: Which MT or TMS will Localyzer use ]] |
||
| + | |||
| + | [[What are the Localyzer locales| Step 6: What are the locales Localyzer is acting on? ]] |
||
| + | |||
| + | [[Resource File(s) Format| Step 7: Resource file formats]] |
||
| + | |||
| + | [[Include and Exclude Patterns|Step 8: Set up optional include or exclude patterns]] |
||
| + | |||
| + | [[Optional Localyzer Settings|Step 9: Optional Advanced Localyzer Settings]] |
||
| + | |||
| + | [[Grant Users and Teams Access | Step 10: Grant Users and Teams Access]] |
||
Revision as of 20:59, 31 August 2023
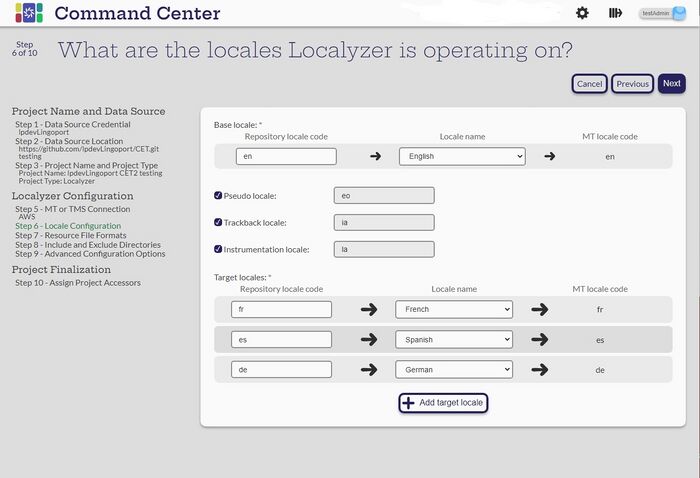
- Select the Base locale that will be used. Generally it is en, but can also be en_US or en-US.
- Select if Pseudo locale, Trackback locale or Instrumentation locale will be done for this project. These have default values that can be changed. If these are selected, another process is added after the job analysis.
- Select the Target locales and match it to the Locale Name. Different Machine Translation and Translation Management systems have different lists of locales.
Select Next
Step 1:Data Source Credential for the project
Creating a Globalyzer Project - Step 4: Globayzer Lite Definition File
Creating a Localyzer Project - Step 5: Which MT or TMS will Localyzer use
Step 6: What are the locales Localyzer is acting on?
Step 8: Set up optional include or exclude patterns
