Difference between revisions of "On Boarding a Localyzer Project"
(→Pseudo-Localize and Trackback) |
|||
| (2 intermediate revisions by the same user not shown) | |||
| Line 1: | Line 1: | ||
| + | = OBSOLETE! = |
||
| + | |||
= Before On Boarding a Localyzer project= |
= Before On Boarding a Localyzer project= |
||
To on-board a project, a number of basic information is needed: |
To on-board a project, a number of basic information is needed: |
||
| Line 121: | Line 123: | ||
==== Pseudo-Localize and/or Trackback ==== |
==== Pseudo-Localize and/or Trackback ==== |
||
Optionally, two build steps can be used to add pseudo-localized files or trackback files: |
Optionally, two build steps can be used to add pseudo-localized files or trackback files: |
||
| − | [[File:Pseudo and Trackback.PNG]] |
+ | [[File:Pseudo and Trackback.PNG|700px]] |
* Pseudo-localize shows what a translated files with more characters and non US-ASCII characters would look like even before any translation takes place. For information on pseudo-localization, see: https://lingoport.com/what-is-pseudo-localization/ |
* Pseudo-localize shows what a translated files with more characters and non US-ASCII characters would look like even before any translation takes place. For information on pseudo-localization, see: https://lingoport.com/what-is-pseudo-localization/ |
||
| − | * Trackback-localize is used in conjunction with LocalyzerQA. This steps is required for LocalyzerQA. It creates mapping files between a running application and the resources found in the repository. |
+ | * Trackback-localize is used in conjunction with LocalyzerQA. '''This steps is required for LocalyzerQA'''. It creates mapping files between a running application and the resources found in the repository. |
==== Post Build Actions ==== |
==== Post Build Actions ==== |
||
Latest revision as of 17:23, 20 March 2024
Contents
OBSOLETE!
Before On Boarding a Localyzer project
To on-board a project, a number of basic information is needed:
Code Repository Location
- The code repository location and branch for the project.
- Git locations could look like: https://github.com/group/project ; In addition, the branch for the Git project is needed
- SVN locations could look like: https://svn.group.com/project/trunk
- Read and Write Access granted to repository
Users
- The list of translation requesters. Those members to add to Jenkins so they have permission to trigger the Prep Kit job:
username1@company.org, username2@companyname.com - The list of emails to be notified of the Localyzer actions:
username1@company.org, username2@companyname.com, username3@companyname.comNote: All emails will also be used as Dashboard user identifiers.
Locales
- The locale of the files created by developers and to be translated
- The list of target translation locales
- The pseudo-locale
Resource File types
- Files types (for instance .properties, .resx, etc.). For more information on Resource file types and what is supported, please see Resource Files
- Naming convention for the base file: for instance <filename>_en.properties or <filename>.properties
- The directory structure for the resource files.
- Translated file naming convention: for instance <filename>_fr_FR.properties
- The files or directories which follow the above convention but should NOT be translated. For instance **/config*.properties
Localization Vendor
- Who is the translation management system and how are the resource files going to be transferred to them?
- Lingoport supports multiple vendors including Local vendors, FTP and SFTP, WorldServer, Lingotek, Systran and AWS Amazon Translate.
For more information about selecting a L10n Vendor for the project see Creating L10n Vendors
On Boarding the Localyzer Automation Job
Jenkins
Create the Jenkins job
To begin the on-boarding process, go to Jenkins, and select the 1-Automation Tab, and New Item
- Make a copy of
Lingoport.SampleLRM - Set the name of the new job to <groupname>.<projectname>
- Make sure Add to current view is checked and select OK
Configure the Jenkins job
General
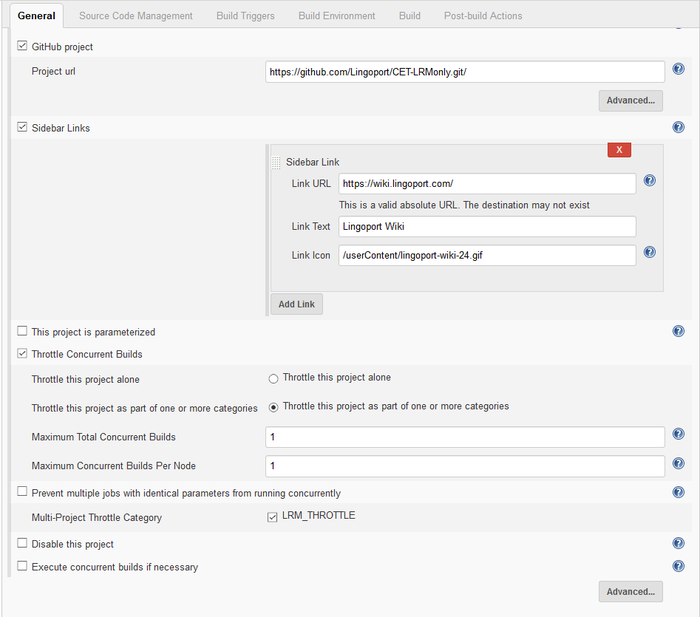
- General section: Select the GitHub project and fill in the Project url
- Throttle Current Builds should be checked.
- LRM Throttle should be checked.
Source Code Management
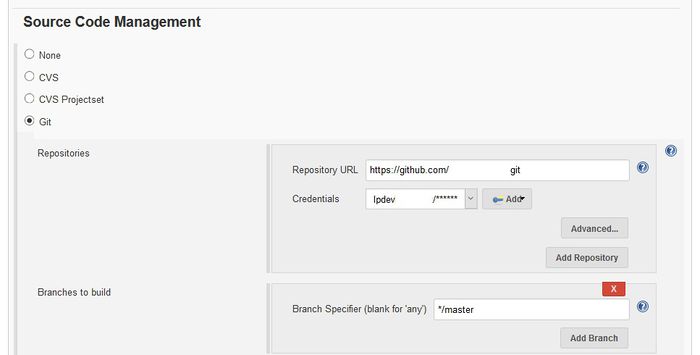
Source Code Management section: Set up the Repository, Credentials, and Branch. For example if the Git repository is Acme/myproject and the code to work with is in the 'development' branch, then set the Repository URL to https://github.com/Acme/myproject.git. It is often easy to copy this from GitHub. For the branch, make sure to define it as */development. If the '*/' is left off, there will be problems.
Build Triggers
These are left unchecked by default, but the Build Periodically can be set to build on a repeating basis.
Build Environment
Leave these unchecked.
Build - Run LRM
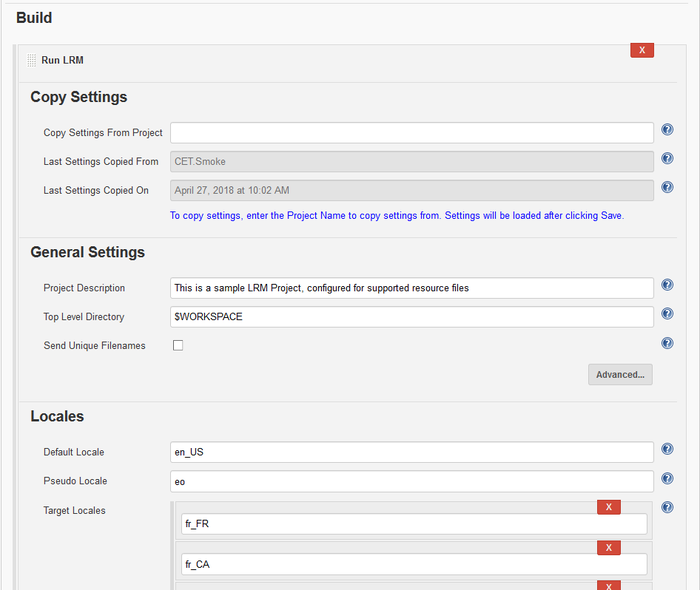
- The Top Level Directory is defaulted to look at the whole repository. If the resource files are located under a resources directory, this can be changed to
$WORKSPACE/resources. - Locales are defaulted to common values. Remove and add locales to get the appropriate translation languages. In addition, two special locales can be used later on in the on-boarding:
- Pseudo locale defaults to 'eo' (Esperanto_.
- Trackback locale defaults to 'ia' / (Interlingua).
- Copy Settings: Use this if you have a project already set up with a similar configuration. This can save configuration time. If there is no other project, just leave it unfilled.
- Check the Send Unique File Names if you want the prep kit files to have unique file names. The default is not to send unique file names. If you have multiple file names that have the same name you may want to check the box. For more information see LRM Unique File Names.
- Advanced: Detect Errors: It is unlikely you need to change the default settings.
- Missed Translation Error: (Default: Unchecked) If you check this box, when a string is returned back from translation with the same text as the original one, an error will be raised. Be cautious with this check: Population for instance is the same word in English and in French.
- Parameter Mismatch Error: (Default: Checked) Keep this check if you'd like to make sure that when a parameter(s) is (are) sent in a text, say "Hello {userName}", the same parameter(s) is (are) sent back untranslated. If the French translation is "Bonjour {nom d'utilisateur}", the 'userName' variable cannot be replaced at run time in the application.
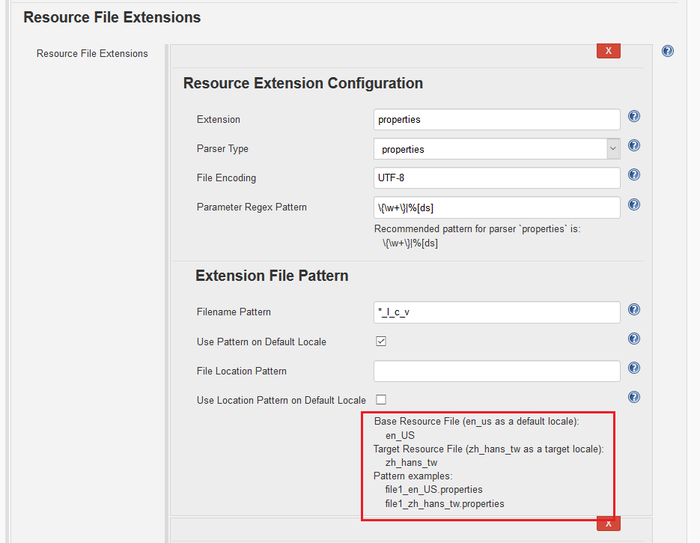
- You can have more than one file extension. For example, you may have .json file and .properties files in the same repository. For each file extension, fill in or modify the following fields:
- Extension: the resource file extension, for instance properties (without the '.'), json, resx, etc.
- Filename Pattern:
- The
*(star) character represents the filename without the extension or the locales; lrepresents the locale's language, for instance 'fr' for Frenchcrepresents the locale's country, for instance 'FR' for Francevrepresents the locale's variant. That's less frequent.
- The
- Use Pattern on Default Locale checkbox: Is the default locale named with its locale?
- Check this box if the default file is message_en_US.properties and the target locale will be messages_fr_FR.properties.
- Leave this box unchecked if the default locale file does not use the locale. If the default file is messages.properties and the target locale is to be messages_fr_FR.properties.
- A few examples may help:
*_l_c_v: If a target locale is fr_FR and messages_en.properties needs to be translated, the French file will be message_fr_FR.properties*.l-c-v: If a target locale is fr_FR and messages.resx needs to be translated, the French file will be messages.fr-FR.resx*-l-c-v: If a target locale is fr_FR and messages-en.json needs to be translated, the French file will be messages-fr-FR.json
- File Location Pattern: Use this if the locales are in different directories. For example, the default locales could be in en/translation.json and the translated file in fr/translation.json. This pattern is the same as the Filename Pattern.
- Use Location Pattern on Default Locale: Is the default locale in a folder with its locale?
- Check this box if the default location is locales_en/translation.json and the target locale is locales_fr/translation.json.
- Leave this box unchecked if the default location is locales/ and the target locale is locales_fr/.
- The samples at the bottom of the Resource File Extensions box shows how the system is going to look for resource files. Verify that the resource files look like the example, otherwise errors could occur.
- For the other entries, leave them defaulted unless told to change them.
- If the resource files use the same names under different directories, for example, file1_en/translation.json and file2_en/translation.json, make sure to check Send Unique Filenames under General Settings. Otherwise more than one translation kit will be sent out.
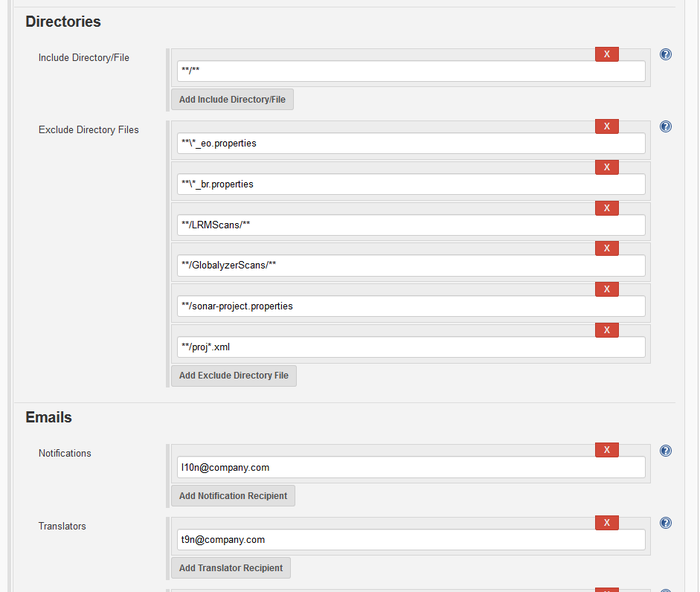
- Directories: Which directories and files to include and which ones to exclude as resource files.
- Emails: Who will be receiving emails for which notification
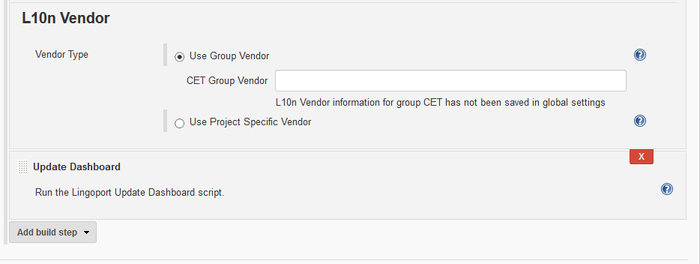
- The L10n Vendor can be configured in Jenkins, Manage Jenkins or in the project. Also a project can have a different value than other projects in the same group.
Pseudo-Localize and/or Trackback
Optionally, two build steps can be used to add pseudo-localized files or trackback files:

- Pseudo-localize shows what a translated files with more characters and non US-ASCII characters would look like even before any translation takes place. For information on pseudo-localization, see: https://lingoport.com/what-is-pseudo-localization/
- Trackback-localize is used in conjunction with LocalyzerQA. This steps is required for LocalyzerQA. It creates mapping files between a running application and the resources found in the repository.
Post Build Actions
- Nothing needs to be modified in this section
Select the Save button. Enable the project and Build Now. The Jenkins project should run and push the results to the Lingoport Dashboard.
For more information, see Project Configuration Files
Verifying the Automation Job
The Jenkins job should complete successfully and populate the Lingoport Dashboard.
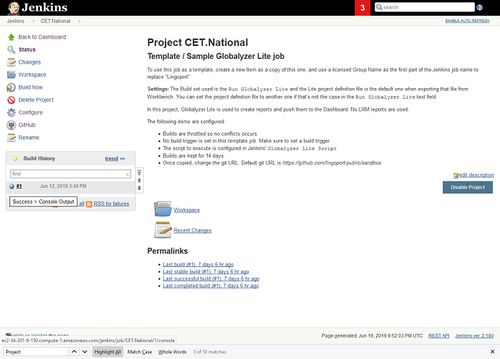
To check if it completed successfully, select the project and look at the Build History
The indicator should look like a blue ball.
If it is a red ball, select it to go to Console Output and look for errors.
If it is a blue ball, select it and look for the output following "List of Target Files". It will look like the following:
   resources/messages_de_DE.properties
   resources/messages_fr_FR.properties
   resources/messages_ja_JP.properties
   resources/messages_zh_CN.properties
Make sure the target files are correct. If not, you may want to change some of the on-boarding parameters, for instance the exclude directories if the list of target files includes test files or application configuration which should not be translated.
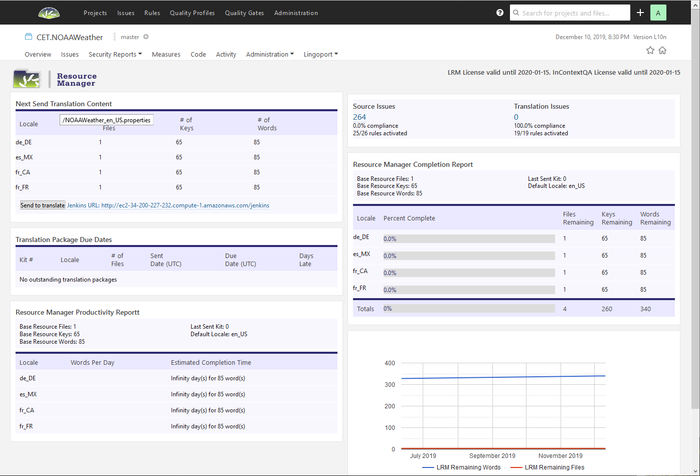
If the indicator is blue, then login to the Lingoport Dashboard and verify that the project is on the Dashboard. When you hover over the Next Send Translation Content, a list of files to be translated will come up. Verify that they are the correct files to be translated.
If there are problems at this point, please contact support@lingoport.com for assistance.
Set up the "send to translate" URL on the Dashboard
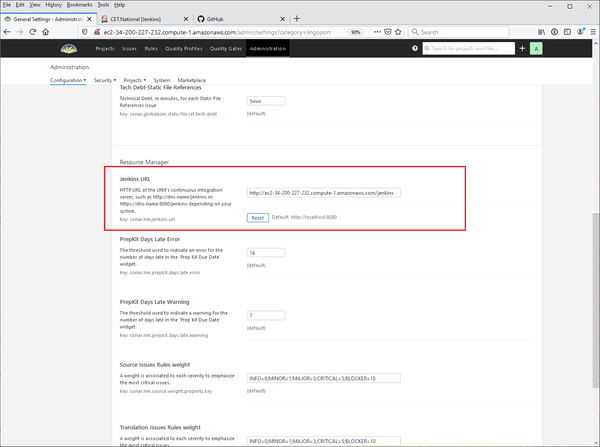
Finally, if this is the first project on the Dashboard, the URL for Jenkins needs to be configured.
- Select Administration on the top of the Dashboard.
- Select Lingoport in the left side menu
- Scroll down to Resource Manager and Jenkins URL
- Enter the URL for Jenkins and Save.
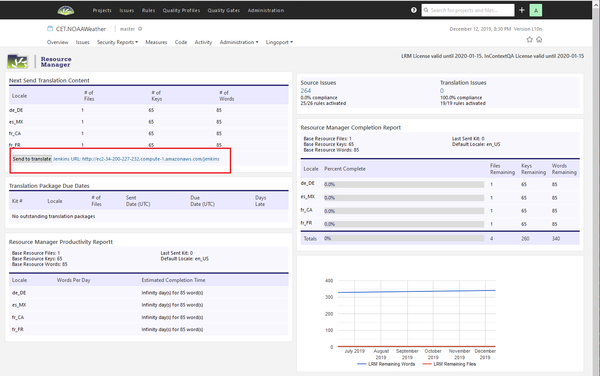
Returning to the Resource Manager page, the Send to translate button should be populated in the Next Send Translation Content area. If there are "no files to prep and send for translation", the button will not appear. When this button is pressed, the Jenkins DashboardPrepKit job should be triggered and run. If that does not happen, contact support@lingoport.net.
Next Steps
The following are optional helper jobs for Localyzer projects.
The Nightly job, checks the status of projects on a nightly basis and sends out notifications.
The PrepKit job will send the projects files to be translated. This can also be done from the Dashboard.
Note: For more information about selecting a L10n Vendor for the project see Creating L10n Vendors

